In Mechanical Finishing, All That Glistens Is … Or Is It?
Surface finish types for commercially supplied stainless steel sheet are detailed in various standards. ASTM A480-12 and EN10088-2 are two; BS 1449-2 (1983) is still available, although no longer active. These standards are very similar in that they define eight grades of surface finish for stainless steel. Grade 7 is “buff polished,” while the highest polish—the so-called mirror polish—is designated Grade 8
Introduction: Polished stainless steels
Ever since the discovery in 1912, of the family of alloys collectively known as stainless steels, many of their applications have required that they be provided with a polished finish. Cutlery, domestic appliances and tableware are but a few such applications. For some architectural applications, such as handrails, a relatively low degree of polish is required. Where aesthetics come into play, a higher degree of polished finish is required, as with tableware. Such finishes are usually created using electropolishing. However the ultimate polished finish on stainless steel is the so-called mirror-finish achieved using mechanical polishing. The types of surface finish on commercially supplied stainless steel sheet are laid down in various Standards. ASTM A480-12, EN10088-2 are two such standards. BS 1449-2 (1983) is still available, though no longer active. These standards are very similar in that they define eight grades of surface finish for stainless steel. Grade #7 is “buff polished” while the highest polish, so-called Mirror Finish with which we are concerned here, is designated #8 (in the case of EN10088-2, it is designated 2P). These standards describe, in qualitative terms, how such a mirror finish is obtained, by mechanical polishing using progressively finer grades of abrasive and finally, a polishing compound. However these standards do not define the optical quality of surface finish in any quantitative way other than specifying “ a non-directional finish which is reflective and has good image clarity. The surface will be essentially free from grit lines due to the initial grinding stages”. We show here that, while such Standards are undoubtedly valuable, they can conceal considerable differences in nominally identical products from different suppliers.
Mirror-finish stainless steels
As mirror-finish stainless steels became commercially available, they were eagerly seized upon, initially by interior designers, for example in retail stores or hospitality venues, then by architects who welcomed their durability in external as well as internal settings. Last but not least, modern sculptors began to embody mirror-finish stainless in their structures or indeed to create an entire work of art using the material. Perhaps the most striking example is the “Cloud Gate” sculpture in Chicago as shown in Figure 1. Created by sculptor Amish Kapoor in 2004-2006, this massive piece dominates the AT & T Plaza and is “functional” in that - as a convex mirror – it reveals a view of the city and the lake shore. It measures 10 x 20 x 13 m and weighs around 100 tonnes. A lengthy Wikipedia entry provides some details of its polishing and maintenance (1)
Production of Mirror-Finish Stainless Steel & Standards
Mirror-finish stainless is produced by mechanical polishing. Details will not be described here, but a succinct description is given by Lehnen (2) who notes that a final grit size of 430-400 should be used before polishing.
All that glistens ...
The work described here was triggered when the author, comparing several samples of #8 mirror-finish from different manufacturers, immediately recognised that, in optical terms, they were anything but identical. Even with only the naked eye, it was evident that – as mirrors – some were better than others. It was therefore decided to make a more rigorous comparison, using various instrumental techniques. Samples from three manufacturers formed the basis of the exercise, and these will here be designated as R, O and A.
Characterisation of Surfaces
Today, the characterisation of a surface in terms of its topography and optical properties, is a branch of science in itself. The term surface roughness now embodies a family of sub-definitions, Rx where different definitions represent peak-to-trough, root mean square or other definitions (3). Other, more mathematical concepts for surface characterisation are texture and curvature (4), the latter, somewhat misleadingly, is used to characterise a broadly planar surface in terms of the amplitude and spacing (frequency) of surface undulations.
Optical properties have long been characterised in terms of specular reflectance, also known as gloss. More recently, parameters such as DoI (Distinctness of Image) have been introduced. (5)
Instrumental Techniques for Surface Characterisation
Profilometry, in which a micron-sized stylus records surface topography as an electrical signal (which can then be processed) is one of the oldest methods for surface roughness measurement and still very widely used today. In the last decade or more, a range of optical, non-contact methods have been developed, the oldest being interferometry, More recently, a technique known as Phase Stepped Deflectometry has been developed in France, offering many advantages over older optical and other techniques. (for a fuller description see. 6)
Experimental Results
Some general comments should be noted. A highly reflective surface may have random defects, such as scratches or pits. These can be too small to be observed with the naked eye. More important, however, is the question of isotropy (or anisotropy). As a result of mechanics of the polishing process, there are often systematic variations of property along the X- and Y-axes, and some such effects are revealed in the data reported below.
Surface Roughness
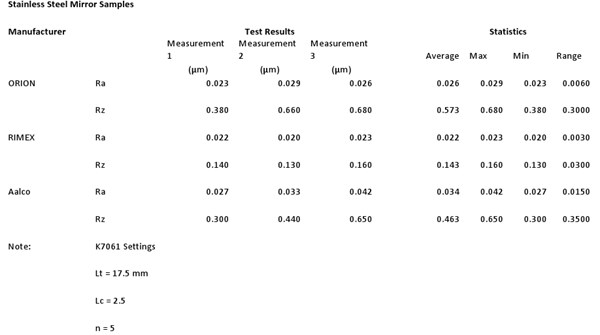
Using an Elcometer 7061 MarSurf PS1 profilometer, roughness data was obtained as shown in Table 1.

These measurements already reveal significant differences between the products of the three manufacturers, with Manufacturer R scoring best.
Optical Measurements
Relationship between Surface Roughness and Optical Properties
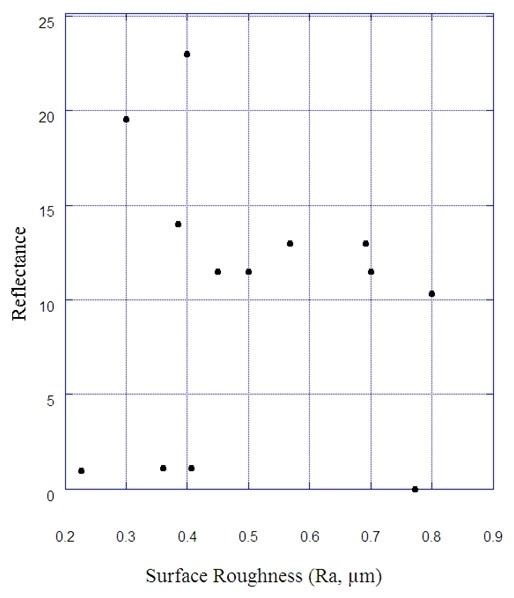
A number of previous authors have studied the relationship between surface roughness and reflectance or gloss. Several such studies can be found in (7) while a study by Bikulcius (8) cites work as far back as 1850. Bikulcius who studied several metal surfaces including chromium, reports that he does indeed find a relationship between the two parameters, but it is not clear from his work on what basis he reached this conclusion. In many cases, there is simply no such relationship and this is well demonstrated by results from a recent publication (9). Figure 3 plots reflectance vs. surface roughness for electrodeposited chromium. (reflectance expressed in arbitrary units as photocurrent values from the glossmeter detector output) from Ref. 9. As seen, there is no discernible trend. Electrodeposited chromium, on which an air-formed oxide film exists, is chemically very similar to stainless steel. A number of previous studies have reported the optical properties of stainless steel mirrors, reminding us of the role of the optical properties of the air-formed surface metal oxides and also noting that abrasive particles may be embedded in the surface thus also affecting the optical properties. . A key variable absent in many studies, is the angle of incidence (usually the same as the angle of reflection) used to measure gloss. The importance of this parameter is evident in data published by Koch and Schlump (10) shown in Table 2.
Table 2. Reflectance as function of Angle of Incidence (from ref. 10)
|
Angle of Incidence (Degrees) |
Reflectance (%) |
|
85 |
82 |
|
60 |
62 |
|
20 |
60 |
The authors describe the sample as “mirror polished stainless steel” and indicate that the roughness, RZ was less than 1μm, probably less than 0.5μm. Table 3 shows data for the three samples compared here, obtained using an Elcometer 6015 Goniophotometer. From left to right are listed Gloss Units (GU), R(spec) specular reflectance, DoI (Distinctness of Image) and Haze/
Table 3. Optical values for mirror-finish samples
|
Sample |
|
Gloss(GU) |
R(spec) |
|
DoI |
Haze |
|
R |
|
77 |
76 |
|
96.6 |
0 |
|
0 |
|
79 |
82 |
|
95.6 |
1.6 |
|
A |
|
89 |
97 |
|
96.5 |
0.7 |
Note the Gloss measurement is taken at a 20° angle with the unit calibrated using a mirror tile.
The parameters in Table 3 will not be discussed here in detail, all are referenced to Standards. Broadly speaking, DoI is a characteristic of the surface at the 0.1mm wavelength, Haze at 0.01mm and Gloss at 0.001mm wavelengths. Gloss is defined in ISO 2813/ASTM D523, measured at 20⁰ and 60⁰.R(Spec) is a measurement of peak reflectance defined in ASTM D430, Haze is specified in ASTM D430 and DoI (Distinctness of image) is defined in ASTM D430/D5767

Figure 2. Reflectance (arbitrary units) vs. surface roughness for electrodeposited chromium (data from ref. 9)
Beyond Mechanical Polishing ?
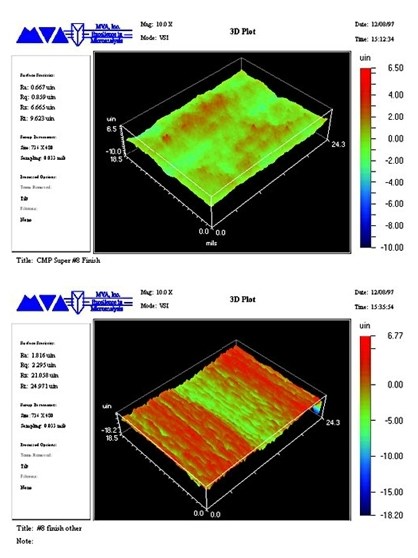
At least one manufacturer offers mirror-finish stainless steel claimed by them to be superior even to the so-called #8 grades such as those described above. Pacific Plus Specialties, based in Dallas, Texas (www.pacificplus.com ) offer #8 (so-called True #8) and, superior to that, CMP Super#8, produced , as the designation indicates, by Chemical Mechanical Polishing. This is a technique almost universally used in polishing of semiconductor silicon wafers and associated copper surfaces in electronics, but its use for larger surfaces (nominal 1200 x 2400mm) is very rarely found. Figure 4 shows AFM images of the CMP #8 Mirror Finish from this source and that of #8 from an unnamed competitor.

Figure 3. AFM Images of mirror-finish stainless steel. Top: Messrs Pacific Plus. Below:
#8 from unnamed competitor. (with kind permission of Pacific Plus (11)).
Figure 4 shows micrographs of the surfaces of the same specimens.

Figure 5. Micrographs of CMP Super#8 (top) and unnamed competitor (below). X500
(Courtesy Pacific Plus Corp)
These images clearly demonstrate that significant differences in surface finish of nominally identical mirror-finish stainless can occur. However discussions (11) have left some uncertainty as to the finishing process used to produce CMP Super#8. The product is manufactured in the Far East, said to be finished using wet alumina slurry which would not generally be held to be a CMP process.
The Importance of Surface Finish
The highest possible degree of surface finish is usually desirable, for two quite distinct reasons. On the short timescale, the highest possible finish is desired both for aesthetic and functional points of view. The former speaks for itself, while where the stainless steel is actually used as a mirror, whether in an instrument or on a larger scale, image quality, both in terms of DoI and absence of larger scale distortions, is vital. On the longer timescale – months and years, there is abundant evidence (e.g 10, 12) that the smoother the surface, the slower will be processes such as corrosion or tarnishing (both of these being chemical reactions whose rate is related to true, as opposed to superficial, surface area) and also to accretion of fine airborne particulates, such as soot or dust. As with corrosion and tarnishing, such “soiling” for want of a better term, would be expected to related to true surface area. The smoother the surface, the more difficult it is for such micron or sub-micron sized particles to lodge. This was demonstrated, for example, by Arnold & Bailey (12) who used SEM and AFM to characterise the surface finish of stainless steel samples after polishing, electropolishing etc in relation to bacterial attachment and biofilm formation.
Conclusion
It has been shown that nominally identical grades of mirror-finish stainless steel from different manufacturers differ significantly in their surface finish and optical properties, though all conformed to the relevant Standard. Measurements are shown allowing such differences to be identified and quantitatively characterised and the author suggests that the relevant Standards could usefully be revised to include such measurements. There is not always a simple relationship between surface roughness and optical properties. The author strongly believe that manufacturers of this type of product should provide purchasers with technical information as to the state of surface finish, and not just relying on the ill-defined classification laid down in existing Standards.
Acknowledgements
Thanks are due to Steve Pollard from Elcometer Ltd. who carried out some of the measurements.
References
- . www.wikipedia.com “Cloud Gate”
- Lehnen, K, Grinding & Surface Finishing: April (2012) p. 60
- www.wikipedia.com “Surface Roughness”
- www.wikipedia.com “Surface Finish” and “Curvature”
- www.wikipedia.com “Distinctness of Image”
- Y. Surrel, M. Grédiac, N. Fournier, P.A. Paris
"Phase-stepped deflectometry applied to shape measurement of bent plates, Experimental mechanics" (in) Experimental Mechanics vol 39, N°1, March 1999, - searchable at www.surfacequery.com
- G. Bikulcius Galvanotechnik, 1999 (90) (3) pp. 654-661
9. Mantcheva, R & Mileva, D; Galvanotechnik 103 (2012) 702-709
10. Koch, H: Otto, A: Schlump, W: Stainless Steel and the Challenge of Time.Presentation: Conference “Stainless Steels for Architectural Visions” 15th May 2001, Paris. www.euro-inox.org/pdf/paper/Koch_Otto_EN.pdf
11. Private communication with M L Taylor, Pacific Plus Corporation
12. Arnold, J W; Bailey, G W; Poultry Science (2000) 79: 1839-2845 Supplement 1: Surface finishes on stainless steel reduces bacterial attachment & early biofilm formation:
Related Content
Advantages to Pumped Eductor Agitation
Not all agitation methods are created equally. Pumped agitation with eductor nozzles can improve process tanks and quickly show a reduction in operating costs while keeping staff safe, following environmental legislation and preventing pollution.
Read MoreTrivalent Chrome Overview
As the finishing industry begins to move away from the use of hexavalent chromium to trivalent chromium, what factors should finishers consider as they make new investments? Mark Schario, chief technology officer for Columbia Chemical offers a helpful overview of this complicated topic.
Read MoreAn Overview of Electroless Nickel Plating
By definition, electroless plating is metal deposition by a controlled chemical reaction.
Read MoreProducts Finishing Reveals 2024 Qualifying Top Shops
PF reveals the qualifying shops in its annual Top Shops Benchmarking Survey — a program designed to offer shops insights into their overall performance in the industry.
Read MoreRead Next
Episode 45: An Interview with Chandler Mancuso, MacDermid Envio Solutions
Chandler Mancuso, technical director with MacDermid Envio discusses updating your wastewater treatment system and implementing materials recycling solutions to increase efficiencies, control costs and reduce environmental impact.
Read MoreEducation Bringing Cleaning to Machining
Debuting new speakers and cleaning technology content during this half-day workshop co-located with IMTS 2024.
Read MoreA ‘Clean’ Agenda Offers Unique Presentations in Chicago
The 2024 Parts Cleaning Conference, co-located with the International Manufacturing Technology Show, includes presentations by several speakers who are new to the conference and topics that have not been covered in past editions of this event.
Read More


