Isotropic Mass Finishing for Surface Integrity and Part Performance
Barrel, vibratory, centrifugal and spindle finish can improve part performance and service life.
When presented with edge and surface finishing problems, many manufacturers continue to reach for solutions that rely on out-of-date, time-consuming and labor-intensive methods. It is still not unusual to see precision parts and critical hardware being manually handled, and edge and surface finishing operations being performed with abrasive hand tools or manually controlled power tools that use coated abrasives or abrasive filaments.
This situation often arises from insufficient planning and a lack of understanding of what will be required to render the manufactured part or component acceptable for the end user. At the root of the problem is a manufacturing and design engineering culture that considers its work done when the part comes off the machining center or the fabricating machine. Too often, part edge and surface condition is simply someone else’s problem.
This is a situation that deserves and is getting an increasing amount of scrutiny. It is a subject repeatedly discussed at the “Deburring, Edge-Finish, and Surface Conditioning Technical Group” sponsored by SME Manufacturing’s Machining/Material Removal Technical Community in Dearborn, Michigan.
The costs of neglecting to consider deburring and surface conditioning in production planning and engineering can be substantial. Frequently overlooked, however, are the potentially serious problems that can develop from the ad hoc and interim solutions that are selected to deal with what now has become—in some instances—a manufacturing crisis.
Hidden Costs
The manufacturers who resort to hand or manual finishing do not do so because of its cost on a per piece basis (it is by far the most costly method of handling the problem) but, often, it is the most obvious solution and the easiest and the quickest to implement. The reason this problem persists is that there is an imperfect understanding of the serious hidden cost this manual and uncontrolled approach imposes. This is not to say that some deburring and finishing problems don’t require some manual intervention; some do. In many cases, however, manual methods are selected because they are an easy and quick fix.
The first casualty of this manual approach is the investment the manufacturer has made, often in the millions, for precise and computer controlled manufacturing equipment. The idea behind this investment was to have the ability to produce parts that are uniformly and carefully manufactured to exacting specifications and tolerances. At this point, in too many cases, the parts are then handed off to manual deburring and finishing procedures that will guarantee no two parts will ever be alike.
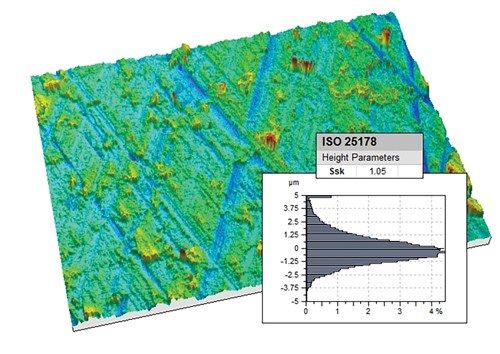
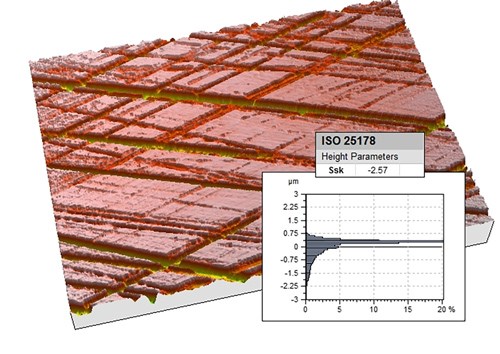
Figure 1 and 2: It is axiomatic that almost all surfaces produced by common machining and fabrication methods are positively skewed. These positively skewed surfaces have an undesirable effect on the bearing load of surfaces, negatively impacting the performance of parts involved in applications where there is substantial surface-to-surface contact. Specialized high energy finishing procedures can truncate these surface profile peaks and achieve negatively skewed surfaces (Fig 2.) that are plateaued, presenting a much higher surface bearing contact area. (Photo Courtesy of Jack Clark, Surface Analytics).
Moreover, the increased complexity and precision requirements of mechanical products have reinforced the need for accurately producing and controlling the edge and surface finish of manufactured parts. Variations in the surface texture can influence a variety of performance characteristics. The surface finish can affect the ability of the part to resist wear and fatigue; to assist or destroy effective lubrication; to increase or decrease friction and/or abrasion with cooperating parts; and to resist corrosion. As these characteristics become critical under certain operating conditions, the surface finish can dictate the performance, integrity and service life of the component.
The role of mass finishing processes (barrel, vibratory and centrifugal finishing) as a method for removal of burrs, developing edge contour and smoothing and polishing parts has been well established and documented for many years. These processes have been used in a wide variety of part applications to promote safer part handling (by attenuation of sharp part edges) improve the fit and function of parts when assembled, and produce smooth, even micro-finished surfaces to meet either functional or aesthetic criteria or specifications. Processes for developing specific edge and/or surface profile conditions on parts in bulk are used in industries as diverse as the jewelry, dental and medical implant industries on up through the automotive and aerospace industries.
Less well known and less clearly understood is the role specialized variants of these types of processes can play in extending the service life and performance of critical support components or tools in demanding manufacturing or operational applications.
Improved Technology
Industry has always been looking to improve surface condition to enhance part performance, and this technology has become much better understood in recent years. Processes are routinely used to improve the life of parts and tools subject to failure from fatigue, and to improve their performance. These improvements are mainly achieved by enhancing part surface texture in a number of different, and sometimes complimentary, ways.
To understand how micro-surface topography improvement can impact part performance, some understanding of how part surfaces developed from common machining, grinding and other methods can negatively influence part function over time. A number of factors are involved:
Positive vs. Negative Surface Skewness. The skew of surface profile symmetry can be an important surface attribute. Surfaces are typically characterized as being either negatively or positively skewed. This surface characteristic is referred to as Rsk (Rsk—skewness—the measure of surface symmetry about the mean line of a profilometer graph). Unfinished parts usually display a heavy concentration of surface peaks above this mean line (a positive skew). It is axiomatic that almost all surfaces produced by common machining and fabrication methods are positively skewed. These positively skewed surfaces have an undesirable effect on the bearing ratio of surfaces, negatively impacting the performance of parts involved in applications where there is substantial surface-to-surface contact. Specialized high energy finishing procedures can truncate these surface profile peaks and achieve negatively skewed surfaces that are plateaued or “planarized,” presenting a much higher surface bearing contact area. Evidence confirms that surface finishing procedures tailored to develop specific surface conditions with this in mind can have a dramatic impact on part life. In one example, the life of tooling used in aluminum can stamping operations was extended 1,000%, or more, by improved surface textures produced by high-energy mechanical surface treatment
Directionalized vs. Random (Isotropic) Surface Texture Patterns. Somewhat related to surface texture skewness is the directional nature of surface textures developed by typical machining and grinding methods. These machined surfaces are characterized by tool marks or grinding patterns that are aligned and directional in nature. It has been established that tool or part life and performance can be substantially enhanced if these types of surface textures can be altered into one that is more random in nature. Post-machining processes that use free or loose abrasive materials in a high energy context can alter the machined surface texture substantially, not only reducing surface peaks, but generating a surface in which the positioning (or lay) of the peaks and valleys has been altered appreciably. These “isotropic” surface effects have been demonstrated to improve part wear and fracture resistance, bearing ratio and improve fatigue resistance. These performance related effects are even more pronounced with high energy finishing methods such as centrifugal barrel finishing and spindle finishing. See Figures 3 and 4.
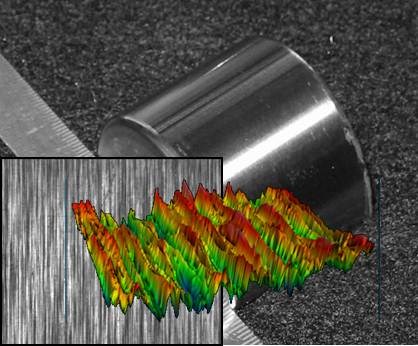
Figure 3: (Photo Courtesy of Jack Clark, Surface Analytics).
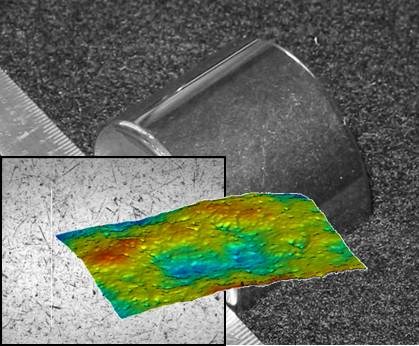
Figure 4: (Photo Courtesy of Jack Clark, Surface Analytics).
Residual Tensile Stress vs. Residual Compressive Stress. Many machining and grinding processes tend to develop residual tensile stresses in the surface area of parts. These residual tensile stresses make parts susceptible to premature fracture and failure when repeatedly stressed. Certain high-energy mass finishing processes can be implemented to modify this surface stress condition, and replace it with uniform residual compressive stresses. Many manufacturers have discovered that as mass finishing processes have been adopted and put into service, the parts involved have developed a working track record with unanticipated developments (their parts are better) and not just in the sense that they no longer have burrs or sharp edges, or that they have smoother surfaces. Depending on the application, they last longer in service, are less prone to metal fatigue failure, exhibit better tribological properties (translation: less friction and better wear resistance) and, from a quality assurance perspective, are much more consistent and uniform.
The question that comes up is why do commonly used mass media finishing techniques produce this effect? There are several reasons. The methods typically are non-selective in nature. Edge and surface features of the part are processed identically and simultaneously. These methods also produce isotropic surfaces with negative or neutral surface profile skews. Additionally, they consistently develop beneficial compressive stress equilibrium. These alterations in surface characteristics often improve part performance, service life and functionality in ways not clearly understood when the processes were adopted. In many applications, the uniformity and equilibrium of the edge and surface effects obtained have produced quality and performance advantages for critical parts that can far outweigh the substantial cost-reduction benefits that were the driving force behind the initial process implementation.
Vibratory Finishing and Burnishing
The assertion above has been affirmed by both practical production experience and validation by experiment in laboratory settings. David Gane and his colleagues at Boeing studied the effects of using a combination of fixtured-part vibratory deburring and vibratory burnishing (referred to by them as Vibro-peening or Vibro-strengthening) processes to produce (1) sophisticated edge and surface finish values and (2) beneficial compressive stress to enhance metal fatigue resistance. In life cycle fatigue testing on titanium test coupons, it was determined that the vibro-deburring/burnishing method produced metal fatigue resistance that was comparable to high intensity peening that measured 17A with Almen strip measurements. The striking difference between the two methods, however, is that the vibratory burnishing method produced the effect while retaining an overall surface roughness average of 1 μm (Ra), while surface finish values on the test coupon that had been processed with the 17A high intensity peening had climbed to values between 5-7 μm (Ra). The conclusion the authors reached was that the practicality and economic feasibility of the vibro-deburring and burnishing method increased with part size and complexity.
Dr. Michael Massarsky of the Turbo-Finish Corp. was able to supply comparative measurements on parts processed by his method for edge and surface finish improvement. Using this spindle oriented deburr and finish method, it is possible to produce compressive stresses in the MPa = 300 - 600 range that formed to a surface layer of metal to a depth of 20 – 40 μm. Spin pit tests on turbine disk components processed with the method showed an improved cycle life of 13090 ± 450 cycles when compared to the test results for conventionally hand deburred disks of 5685 ± 335 cycles, a potential service life increase of 2 - 2.25 times, while reducing the dispersion range of cycles at which actual failure occurred. Vibratory tests on steel test coupons were also performed to determine improvements in metal fatigue resistance. The plate specimens were tested with vibratory amplitude of 0.52 mm, and load stress of 90 MPa. The destruction of specimens that had surface finishes developed by the Turbo-Finish method took place after: (3 - 3.75) × 104 cycles; a significant improvement over tests performed on conventionally ground plates that started to fail after: (1.1 - 1.5) × 104 cycles
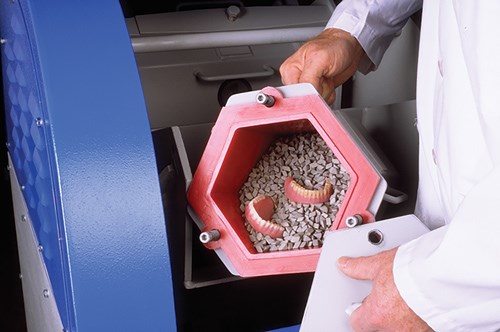
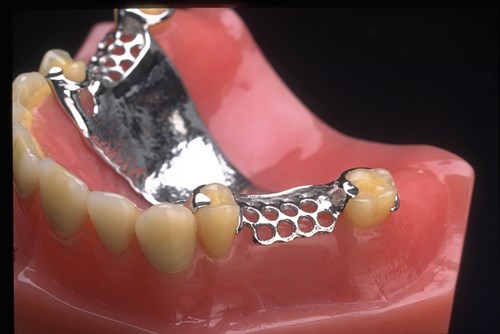
High Energy Centrifugal Finishing is widely used in the manufacture of medical, surgical and dental devices to develop very highly refined surfaces. Shown here is a dental device made up both of acrylic and cast chrome alloy materials that have been machine polished. (Photo courtesy of Mass Finishing Inc.)
Mass media finishing techniques (barrel, vibratory, and especially high energy centrifugal and spindle finish) can be used to improve part performance and service life, and these processes can be tailored or modified to amplify this effect. Although the ability of these processes to drive down deburring and surface finishing costs when compared with manual procedures is well known and documented, their ability to dramatically effect part performance and service life are not. This facet of edge and surface finish processing needs to be better understood and deserves closer study and documentation. Industry and public needs would be well served by a research consortium of partners at the industry, university and governmental agency levels to better understand the role surface textures and stress equilibrium play in enhanced component life and performance.
The authors wish to acknowledge the technical assistance of the following: Dr. Michael Massarsky, Turbo-Finish Corp., Barre, Massachusetts; Thomas Mathisen, Mass Finishing Inc., Howard Lake, Minnesota, and Katie MacKay at MacKay Manufacturing, Spokane, Washington.
Dave Davidson is with SME Manufacturing and an adviser to the Machining/Material Removal Technical Community; he can be reached at dryfinish@gmail.com. Jack Clark, also an SME member, is with the Colorado State University’s Department of Mechanical Engineering and with Surface Analytics, LLC; he can be reached at jclark@surfaceanalytics.com.
Related Content
Hubbard-Hall Technical Team Adds Senior Chemist to Staff
David Keller is joining the Hubbard-Hall technical team as a senior chemist.
Read MoreLapping, Polishing Film Maximizes Strengths, Maintains Flexibility
Dia-Strip and Dia-Sheet film from Titan Tool Supply has a distinct construction that the company says makes it durable while remaining flexible, bendable and formable.
Read MoreBlasting Beads Made of Lead-Free Natron Glass
SwarcoBlast blasting media are made for use in a multitude of surface refinement applications.
Read MoreVulkan Blast Shot Technology
Vulkan Blast Shot Technology is a pioneer in the stainless steel abrasives market.
Read MoreRead Next
Delivering Increased Benefits to Greenhouse Films
Baystar's Borstar technology is helping customers deliver better, more reliable production methods to greenhouse agriculture.
Read MoreEpisode 45: An Interview with Chandler Mancuso, MacDermid Envio Solutions
Chandler Mancuso, technical director with MacDermid Envio discusses updating your wastewater treatment system and implementing materials recycling solutions to increase efficiencies, control costs and reduce environmental impact.
Read MoreA ‘Clean’ Agenda Offers Unique Presentations in Chicago
The 2024 Parts Cleaning Conference, co-located with the International Manufacturing Technology Show, includes presentations by several speakers who are new to the conference and topics that have not been covered in past editions of this event.
Read More


