AES Research Project 3, Adhesion of Electrodeposits, Part 4, Commentary on Measurement
This is Part 4 of a four-part article consisting of the full report of AES Research Project #3, Adhesion of Electrodeposits, done at the University of Michigan in the mid-1940s, following the end of World War II. It contains a commentary by industry people on the published methods for measuring adhesion.
by
Project Director: A.L. Ferguson
Associate: Elmer F. Stephan
Chemistry Department, University of Michigan, Ann Arbor, Michigan
Part 4. Correlated Abstract of Comments on Methods for Measuring the Degree of Adhesion
This is Part 4 of a four-part article consisting of the full report of AES Research Project #3, Adhesion of Electrodeposits, done at the University of Michigan in the mid-1940s, following the end of World War II. It contains a commentary by industry people on the published methods for measuring adhesion. A printable version of this section can be downloaded by clicking HERE.
Introduction
The previous report was a summary and critical analysis of information contained in the literature. The present report is a summary of information contained in communications resulting from a circular letter sent to the total membership of the American Electroplaters' Society, and from many personal letters sent to outstanding men in electroplating and related fields, requesting that they submit their personal experiences in the use of methods for measuring the adhesion of electrodeposits. The information presented in the previous report was organized on the basis of the various methods used. The same plan is followed in this report.
The general tone running through most of the replies was a genuine regret that no satisfactory quantitative method is available for measuring the degree of adhesion. There is a strong feeling that even the fairly quantitative methods for thick deposits are not practical because of the time and care needed in preparation of samples and the nature of the testing equipment required. It is the general belief that the use of present quantitative methods is limited largely to research laboratories. There is a strong desire for a simple, standardized and quick method suitable for regular production.
Much interest is shown in the problem. Some of the typical statements are quoted below. A.W. Hothersall of England has probably done more work on the subject of adhesion than any other person. A letter contains these interesting comments:
"There is much confusion of thought on the subject of adhesion, partly due to failure to define terms properly. It is most important that descriptions of the results of qualitative adhesion tests are intelligible to those not associated with the workers, and also that different people dealing with this question do mean the same thing when they use the same words. For a long time, I have stressed the importance of using defined terms to describe the degree of adhesion found in a qualitative test. I am extremely glad that the AES, which has long been prominent for its work on improvement in the quality of electroplated coatings, is now taking up the study of adhesion. There is much to be done in this direction, particularly in developing methods for assessing the adhesion of relatively thin deposits. I am not aware of any other laboratory in this country or in Europe, where the question of adhesion is being specifically studied. I shall look forward with great interest to the results of your work and if there is any way in which I can be of assistance to your Committee, please do not hesitate to write to me."
M.B. Diggin, Chief Chemist, Hanson-Van Winkle-Munning Company, expresses his feelings as follows:
"I do hope that your Committee makes some progress in developing quantitative methods for determining adhesion and that the methods are simple enough to be applied to formed articles. We wish you success in this undertaking and shall be glad to assist in any way possible."
As stated in the previous report it is the policy of the author to submit the comments and ideas of the various contributors in their own words. In this way, it is hoped to avoid misinterpretations and coloring which might result from personal prejudice. The reader is also freer to form his own opinions.
Bending and twisting tests
Tests of this nature are in more widespread use than any others. In some cases, the manner of application is extremely crude; in others, a distinct effort has been made to carry out the tests so as to permit some degree of standardization and reproducibility.
Judging from the replies received, the Meaker Company ranks very high among those giving consideration to adhesion. E.H. Lyons, Jr., Chief Chemist, furnished considerable detailed information. The following are his statements on the bending and twisting methods used by his company as well as a number of steel companies engaged in electrogalvanizing:
"Our work deals principally with electroplated zinc on steel strip and wire, for which the adhesion requirements are extremely severe. We also test some zinc coatings on fabricated parts and castings, and occasionally cadmium coatings. Because cast and cold-worked zinc or cadmium have much lower tensile strength and hardness than the steel base and, we believe, than the bond between the base metal and the electroplate, the quantitative tests applied to copper and nickel coatings are believed to be inapplicable, and we are not aware of any attempts to apply them. Therefore, as far as we know, no quantitative tests for adhesion have been made on zinc and cadmium plates.
"The qualitative tests can be classed as bend tests and blister tests. The bend tests comprise bending or flexing of the plated steel in such a manner as the nature of the plated object will permit. The bending is usually done by hand and, because no mandrel is employed, the radius of bending is not standardized. It is usually small, however, less than 1/8 in., unless prohibited by the nature of the work. The bending is frequently reversed and repeated until the steel base is fractured. Any sign whatsoever, even microscopic, of peeling, chipping or flaking of the zinc or cadmium plate, is taken as cause for rejection.
"There is a machine put out by Amsler for testing the bending properties of steel strip. A sample of specified size is clamped between a pair of jaws machined to provide mandrels of specified radius. The opposite end of the specimen is seized by a clamp which applies a specific tension. The sample is first bent 90° to one side and straightened, then 90° to the other. This is repeated until the specimen breaks, and the number of bends withstood is recorded. Its chief use, so far as we have observed, is in detecting hydrogen embrittlement of the steel. This machine has been proposed for a standardized bend test, but inasmuch as almost any electroplated zinc or cadmium coating will withstand the test, it has never come into use. Our own laboratory routine for testing adhesion on steel strip includes:
- 90° bend test: Performed by seizing the specimen in a pair of pliers, and bending it as sharply as possible, first to one side and then to the other, until the steel breaks.
- Crimp test: The steel is bent 180° back on itself and the bend is flattened by pliers or in a vise. On opening, the steel usually breaks before the bend has been straightened, the fracture having been initiated during the flattening.
- Twist or rocking test: Outlined in Trans. Electrochem. Soc., 84, 288 (1943).
"The last test is the most severe because specimens which withstand the first two may fail in the last. Attempts to apply the Erichsen cup test to electrogalvanized strip steel as a test for adhesion have been discouraging, doubtlessly because the zinc is ductile enough to flow in this test.
"The requirements on strip steel are unusually severe because the material is frequently severely formed, bent, twisted, folded, stamped or drawn after plating. The same is even more true of steel wire.
"The standard test for adhesion on steel wire consists in wrapping the wire around a mandrel having the same diameter as the wire. It is important to twist the wire around its own axis as well while making this wrap, so that all elements of the surface will be subjected both to stretch on the outside and to compression on the inside. The resultant product is a coil of wire having twenty or thirty turns around the circumference of a straight portion of the wire. Close straight turns must be made to provide the greatest stringency of test. A crude lathe is often helpful.
"Although it is very difficult for most hot galvanized wire to meet this test without flaking of the coating, it is passed so readily by electrogalvanized coatings as to be meaningless for all intents and purposes. Nevertheless, it is commonly carried over from hot dip practice.
"Failures are sometimes noted on wrap testing hard steel wire and copper wire, but on stripping the electrogalvanized coating it will be found that the base metal itself has cracked. This is not regarded as the fault of the coating or its adhesion.
"Sometimes failures are noted on the inner smaller part of the wrap where the coating is under compression, although the stretched portion is perfectly adherent.
"Our laboratory routine for testing adhesion on round wire is as follows:
- Wrap or 'button' test: Includes the steps described above: (a) wrap, (b) unwrap, (c) reverse wrap and (d) unwrap. In (c) the identical wire specimen which has been unwrapped from the coil formed in (a), is rewrapped in the opposite direction to form a second coil, inside-out with respect to the first coil. Some steels will break in (b), (c) or (d).
- Crimp test: The wire is bent 180° sharply back on itself, and squeezed as far as possible in pliers or vise. The highly stretched outer bend is examined.
- Hinge test: The crimp formed in (2) is opened out carefully. The steel which has started to fracture in forming the crimp now parts along the fracture line. While the break is being observed with a low power magnifying glass, the fracture is opened until the steel has entirely parted and a portion of the zinc coating remains intact (though stretched) as a hinge joining the two pieces of steel. The adhesion of the hinge, and of the broken coating around the remainder of the circumference, is examined under the glass.
"As previously stated, the slightest sign of detachment of the zinc coating from the steel is cause for rejection, in any of the above tests."
The twist or rocking test referred to was briefly described by Lyons during the discussion of his paper on "Electrogalvanizing of Strip Steel". In answer to the question by C.G. Fink, "Do you not make any ductility tests?" Lyons replied:
"Yes, they are usually bend tests. We have recently been introduced to a test which is more severe. The strip is bent into a V-shape with handles [Fig. 1] and then it is given repeated bending in a direction perpendicular to the plane of the V, which results in a rolling twist at the point. A satisfactory electrogalvanized coating will stand such twists until the steel breaks, which in some instances may be after sixty or eighty twists."
It may be of interest to mention that the war pennies were blanked out of zinc-plated sheet steel, tested in this manner.
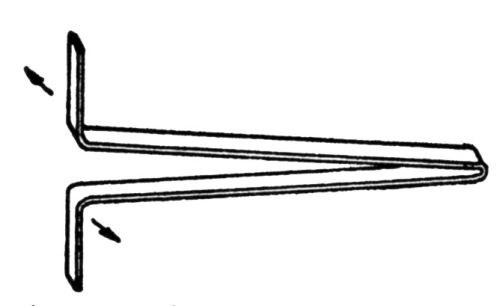
Figure 1 - Rocking or twist test specimen, bent into V shape, is twisted as shown by arrows, then in reverse direction; twisting is repeated until failure occurs.
W.E. Moline of the National Cash Register Co. wrote as follows:
"Several tests for adhesion of electrodeposits have been used in our laboratories. All tests used have been of a series-comparative type, i.e., the tests were used to compare the adhesion on a series of identical test panels subjected to different treatments, etc. The first test is a bend test over a conical mandrel made by the Henry Zuhr Co. The apparatus consists of the cone, a clamp which holds the test panel tangent to the cone, and a lever and roller by which the panel is bent around the cone. This gives a bend of varying radius, and comparison is made between the maximum radii for cracking or flaking. Brittleness is an important factor in this test, so that comparisons of adhesion of different plates cannot be made."
The conical mandrel referred to is described in detail by H.G. Arlt of the Bell Telephone Laboratories, Inc., in an article entitled "Study of Conical Mandrel Test for Attached Lacquer Films", published in the ASTM Bulletin for December, 1937. The apparatus consists essentially of a cone 8 in. in length having a diameter of 1½ in. at the base and 1/8 in. at the smaller end. A bending mechanism is provided to wrap a finished panel closely around the mandrel. This device permits the elongation of coatings of from 2.2 to 28% when applied to 1/32-in. thick panels of brass or steel. Fig. 2 shows a picture of this apparatus.
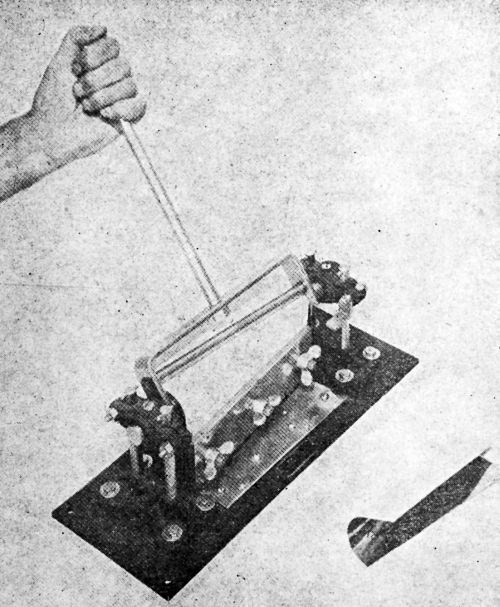
Figure 2 - Conical mandrel device whereby a single panel may be subjected to different degrees of bending in one operation.
According to C.F. Nixon, Process Engineer, Ternstedt Mfg. Division of General Motors Corporation, his company makes use of practically every qualitative test described in the literature. He considers none of the methods wholly satisfactory, although each is considered to serve its purpose in indicating whether the process is operating properly. Concerning the bend test, he states:
"Deformation is necessarily destructive and is usually practiced on parts that are processed in large quantities. The 180° bend test in government specifications is well known and need only be mentioned. Our C.V. glass channel is tested in a deformation test which consists of twisting it through 720° in 180° stages. Observations at each stage gives an indication not only of the degree of adhesion but also of the ductility of the plated coating. Absence of separation of the coating from the base at 720° constitutes satisfactory adhesion.
"A variant of the deformation test, usually performed on small parts, consists of clamping one end of the part in a vise, driving through a 45° angle with a hammer and examining the point of greatest bend. The effect of the hammer impacts is to put the metal to metal bond under high stress which causes separation if the adhesion is poor."
An especially severe bend test is known as the "Handkerchief Test" because of its similarity to the folding of a handkerchief. Concerning this test, Leonard E. Weeg, C.G. Conn, Ltd. has the following to say:
"I used this test during my ten years' association with the American Nickeloid Co., producers of pre-finished metals, and feel that it is completely reliable. Its use is limited to sheet steel products and it is destructive. However, it shows conclusively whether or not adhesion is good."
E. Sohn, American Radiator & Standard Sanitary Corp., tells of a drastic test which includes hammering as well as bending.
"We have for years been making an empirical test. We simply take a faucet body and by means of a hammer and a vise bend the spout end and the flange (if flanged) in a prescribed manner and examine with a magnifier and also note if any flakes of the coating can be rubbed off the bent areas. Such an improvised test is, of course, not subject to any mathematical interpretation. It also gives some idea of the ductility of the coating which is also a matter of importance. Most of the methods thus far developed which permit mathematical calculation of the adhesion are painstaking. Generally, the specimen must be specially prepared. Each test is almost a research project in itself, rather than a quick, simple and practical procedure, which is the preferred objective."
K.G. Soderberg of Graham, Crowley & Associates, Jenkintown, Pa., introduces two ideas, also mentioned by several others:
"Bending the plated part repeatedly until it breaks is also useful. Examination of the fracture under considerable magnification may show voids between the base metal and the coating which indicate poor adhesion. It is worthwhile to insert a knife edge in the void to judge the ease with which the coating can be peeled."
Many other informants included some form of bending or twisting but gave no additional information.
The burnishing test
This test was one of the first to be used and has always been considered of value especially for certain types of deposits. In the silver and gold plating industries it is one of the regular production operations, and in general these industries have considered additional tests to be unnecessary. The test is limited, of course, to very thin deposits.
The best detailed description of a modern application is by Vincent Mattacotti of C.G. Conn, Ltd.:
"The method is particularly applicable to testing the adhesion of thin deposits with special reference to silver and gold plate. It makes use of a burnishing tool, generally of steel, as follows:
"The tool which is continually moistened with soap suds is held near its end, and considerable pressure is applied by the operator while he causes it to glide back and forth without removing it from the surface of the part being burnished.
"The tool must be free from surface defects and kept highly polished. Considerable pressure is exerted locally and causes any areas of plate which are weakly adherent because of poor preparation of the base metal or faulty technique in electroplating, to lift in the form of blisters. This method is not used as an inspection method, but is part of the production operations on band instruments and as such tends to catch defective plating mainly of the poor adhesion type."
C.F. Nixon reports that he used the method extensively for thin deposits of nickel and chromium because of its speed and non-destructive nature.
"Burnishing is a non-destructive test when applied to nickel plated parts. It is performed by moving a cylindrical smooth bar rapidly back and forth over the area being tested. If the plate rises, the adhesion is declared unsatisfactory. The test was applied to nickel and chromium plated brass parts on areas which experience had taught were most susceptible to poor adhesion. Since lack of adhesion in this case resulted from stray currents, occasional poor adhesion could be detected without damage to the balance of the parts."
It has been suggested that the method might even be made at least semi-quantitative by burnishing with a machine in which the pressure, rate of movement, surface area of burnishing tool, area of surface burnished, etc. could be standardized.
Ball burnishing barrels are in rather common use in regular production. At the same time, their use serves as an adhesion test. K.G. Soderberg suggests the possibility of developing a semi-quantitative test using a ball burnishing barrel:
"I have used burnishing tests to develop blisters but never under very controlled conditions. It may be possible to produce controlled conditions by means of a ball burnishing barrel using a given weight of balls and possibly relating the weight to the surface area of the parts being tested."
Impact tests
There are various tests in use today that depend upon impact. Some use a very crude system of striking the object with a hammer of definite weight, some with a direct sharp blow and others with a glancing blow. The feeling is expressed that valuable information may be obtained by a given individual. Others slowly press a ball or plunger against a plated object resting on a ring-shaped anvil. In a third commonly used variant, a known weight is allowed to drop through a known distance and hit the plated object which is supported over a ring-shaped anvil. The last device is the only one considered here.
A rather standard type is known as the Parlin-du Pont Impact Tester. W.E. Moline of the National Cash Register Co. reports that a variant of this tester is in general use by his company. He states:
"A modification of the Parlin-du Pont Impact Tester is used, in which a definite weight falls a definite distance before striking a steel ball of given diameter resting on the panel under test. No set standards have been established for the test, as it is used as a means of comparing a series of electrodeposits of equal thickness while holding the other test conditions constant."
Concerning the availability of this tester, R.O. Isele, E.I. du Pont-de Nemours & Co., Parlin Laboratory, states:
"As regards availability of this equipment we wish to advise that we do not manufacture the apparatus other than for our own needs. However, we are attaching hereto for your inspection and use a photostatic copy of a blueprint for the construction of this equipment."
The Parlin-du Pont Tester and a variant thereof pictured in "Physical and Chemical Examination of Paints, Varnishes, Lacquers and Colors" by Henry A. Gardner (Institute of Paint and Varnish Research, Washington, D. C), are shown in Figs. 3, 4 and 5.
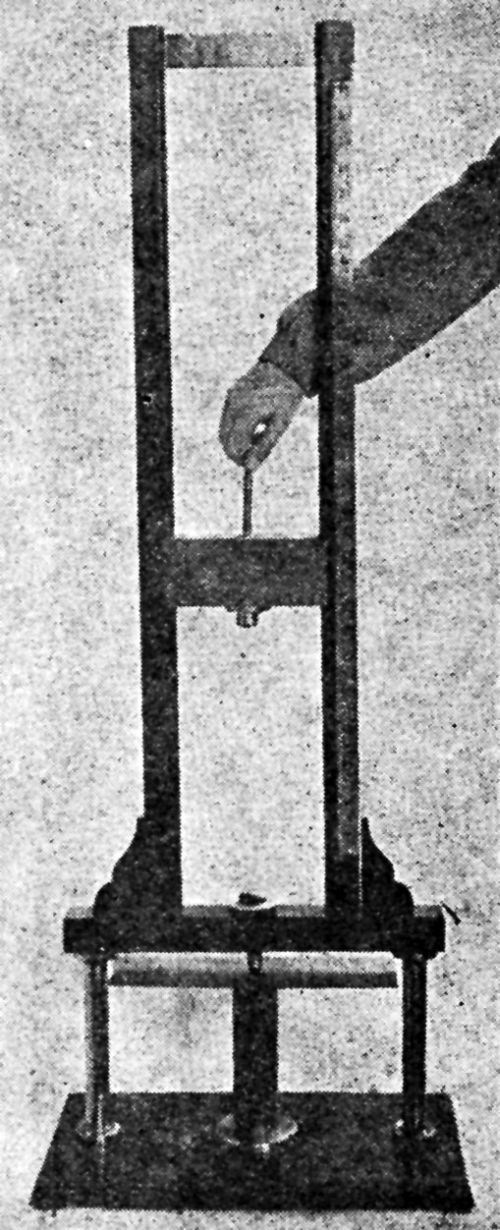
Figure 3 - Parlin-duPont impact tester.
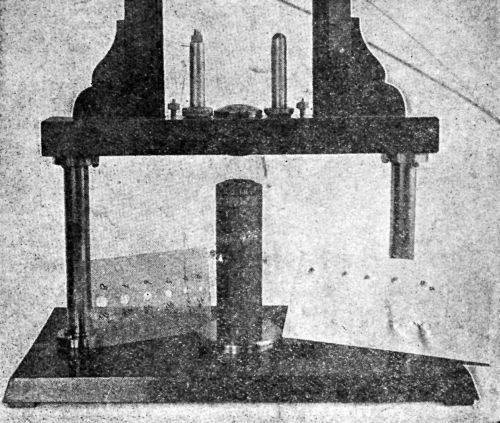
Figure 4 - Lower portion of Parlin-duPont impact tester.
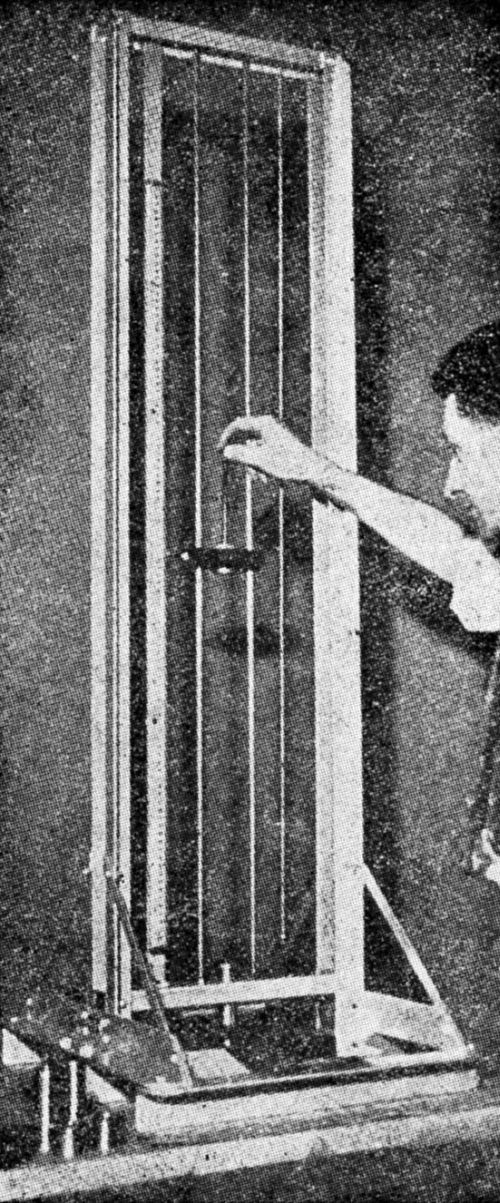
Figure 5 - Pratt & Lambert variant of a Parlin-duPont impact tester.
Another modification, shown in Fig. 6, is reproduced from a picture furnished by M.B. Diggin, Chief Chemist of Hanson-Van Winkle-Munning Co. Concerning the use of this device, Diggin has the following to say:
"The modified cup testing apparatus was made in our own shop and has been very valuable to us in studying the ductility and adhesion of electrodeposits. The plated sample is placed on the lower jaw and a hollow, threaded cylinder is screwed down on the panel so that it is held firmly in position. The hardened steel plunger is inserted in the hole and allowed to rest on the panel. The weighted block which is free to slide up and down the guiding column is fitted with roller bearings to decrease friction. The weight is brought to a height which depends upon the gauge and temper of the stock being tested. When released, it descends and strikes the plunger which draws the cup in the panel.
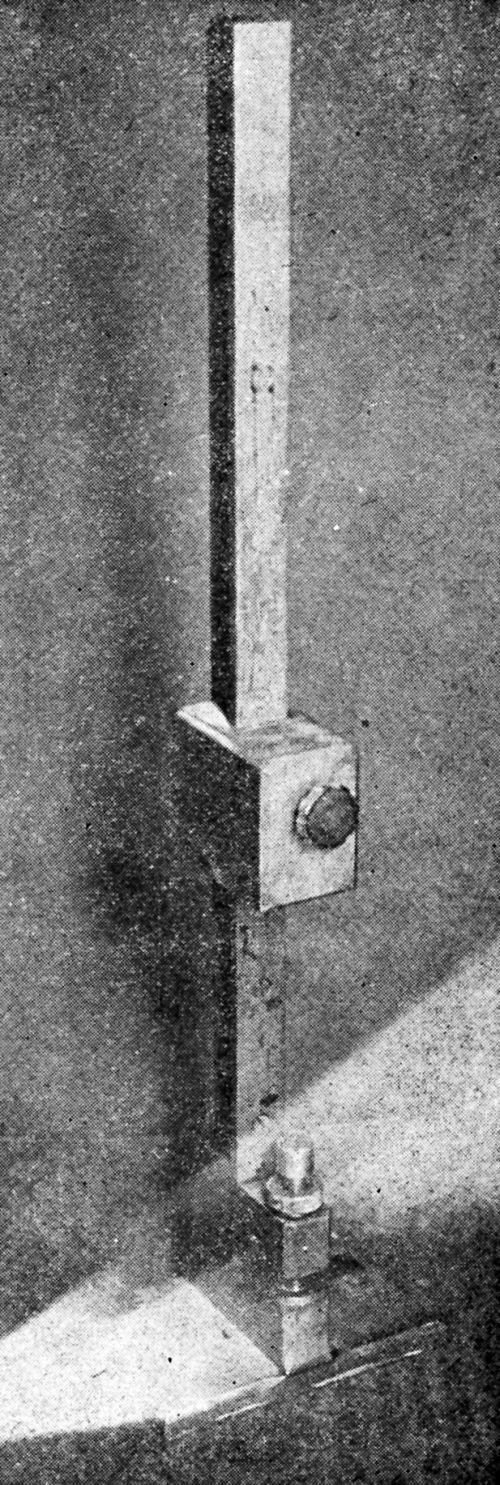
Figure 6 – Hanson-Van Winkle-Munning variant of a Parlin-duPont impact tester.
"We usually draw a cup just short of the breaking point of the metal. This point can be determined by making several trials. The panel is then inspected for evidences of cracking or lifting of the deposit.
"We realize that this is not a quantitative test, but nevertheless through experience we have been able to relate the results of this test with surface requirements."
Heating tests
Many heating tests have been used. There are two main variants, each based on a different principle. In one, the heating causes liberation of gas which has been absorbed by the base metal, or it causes evaporation of liquid absorbed at the interface or held in pockets in the base metal. The pressure of the gases results in the formation of blisters. In the other, the plated object is raised to some high temperature, then suddenly cooled. The difference in the coefficients of expansion of the electrodeposit and base metal results in severe strain at the interface which produces cracks, blisters or peeling. For several years there have been strong differences of opinion as to the influence of heating on the adhesion of an electrodeposit. It appears now that both sides are right. The result depends largely upon the material of the plate and the base.
F.C. Mesle, Superintendent of the Bearing Plating Division, Oneida, Ltd., has been one of the most active investigators of this problem. He has this to say:
"It was my intention to prepare a group of specimens with different degrees of bond strength to be used as an exhibit, but some difficulties were encountered which made my plan impractical.
"I had some plated specimens that had an 'as plated' bond strength of about 1000 psi. This would be considered poor bond. On heating these pieces to from 500 to 950°F for 30 minutes (less time may have accomplished the same results) the bond strength was improved to better than 35,000 psi; at this pull the deposited metal broke but did not lift from the base. It is reasonable to call this bond perfect.
"A longer time at room temperature seems to accomplish much the same result as heating. The specimens that could be lifted with 1000 psi pull shortly after plating, could not be lifted with 35,000 psi six months later. Tests made at intervals during the six months' period showed improvement in bond strength with time, but the exact time required to change from poor to perfect bond was not determined. The above illustrates how difficult it is to prepare an exhibit that could be used by others to check on results or test methods.
"I will send you specimens that illustrate the points mentioned above. Those marked 1 to 4 are sections cut from the same bearing. Therefore, it is reasonable to assume that plating conditions were the same on all four pieces. The plating was done so that the deposit could be lifted from one end to give a handle for the adhesion test. These specimens [photographs not made available in the report – Ed.] were plated in October 1944.
"No. 1 shows how poor the bond was 'as plated'; about 1000-psi pull was required to separate the deposit from the base.
"No. 2 was heated to 900°F for 20 minutes. The deposit was peeled back about 1½ in. before heating to establish that the bond strength was same as in No. 1. After heating, the bond strength was greater than the tensile strength of the deposit.
"No. 3 is the same as No. 1 except that the bond test was made in May 1945. In this case, time (around six months) and room temperature have improved the bond strength so that it is again greater than the tensile strength of the deposit.
"No. 4 is sent to permit you to make the bond test on a tensile machine. I am confident the deposit will break rather than separate from the base. What happens to the first ¼ in. should be ignored.
"The fact that heating generally improves the bond strength of electrodeposits indicates that any test method which requires heating of the test piece, such as soldering lugs to the plated surface, and then applying pull to separate the deposit from the base, does not give a correct indication of the bond strength 'as plated'. If the solder test is used, the production lot should be heated to same temperature.
"I stated above that heating generally improves poor bond. Sometimes the reverse seems to be true. Specimen Nos. 5 and 6 illustrate this.
"No. 5 shows good bond 'as plated'.
"No 6 has been heated to 900°F but the bond strength is definitely poorer than before heating. Nine months' time and room temperature have not produced the same effects as the heating. Why? I would like to know the answer."
George B. Hogaboom, Sr., Consultant on Electrodeposition and Finishing of Metals, writes on the question of heating:
"It is believed that the Mesle method of heating the specimen does not give correct results. It appears that Mesle overlooked the fact that upon heating silver-plated nickel-silver, diffusion of the silver coating into the base metal occurs at certain temperatures. When diffusion occurs, then the bond between the base metal and the coating is improved in many cases. If, however, the diffusion layer is brittle, the peeling of the coating is caused by fracture rather than non-adhesion. Some metals do not diffuse into each other, e.g., silver and steel. If copper is used as an undercoat it may diffuse into both the steel and the silver. It appears to me that the good adhesion obtained on silver-plated aircraft bearings is due to the diffusion of the nickel undercoat into the steel and the silver. The extent of diffusion is also of importance."
Hogaboom continues in another letter:
"If flat, smooth surfaces of cadmium and copper are held tightly together, within a month the cadmium will have lost weight and the copper gained in weight.
"If a sheet of polished brass is cadmium plated and the cadmium removed within a few hours by immersion in a solution of ammonium nitrate, the luster of the brass is hardly affected. If, however, the plated piece is permitted to stand 48 hours before immersion in the ammonium nitrate solution, a loose, black film will be found on the brass and the luster of the brass is destroyed.
"When cadmium plated brass was heated to about 350°F, the deposit blistered. It is my opinion that diffusion had occurred, that a brittle layer of cadmium-copper-zinc was developed by the heating and that it was the cause of the blistering.
"In his book Cadmium - Its Metallurgical Properties and Uses, N.E. Budgen on pp. 140-142 states that while small amounts of cadmium harden copper, 6% of cadmium in the copper makes ‘it break up into short pieces and fall away.' And 'Further increase of cadmium (above 1%) does not harden the alloy as would be expected from the increased proportion of the hard, brittle constituent Cu,Cd, which is formed. ... '
"In his study of the electroplating of zinc die castings (Trans. Electrochem. Soc., 66, 427 [1934]), Castell found that a brittle diffusion layer was formed between the copper plate and the base metal."
K.G. Soderberg comments on Hogaboom's last-quoted communication:
"I can confirm the rapid diffusion which takes place in cadmium plated brass at room temperature. From studies of electrical contact resistance between cadmium plated copper surfaces, I concluded that the rate of diffusion between cadmium and copper is exceedingly slow at room temperature but rather rapid at temperatures as low as 210°F. Blistering is not a normal phenomenon on cadmium plated brass or copper which have been kept at ordinary temperatures."
A.E. Foche, Diamond Chain & Mfg. Co., states:
"After plating, the test pieces are tempered at 375°F for 3 hr to remove hydrogen. We have found that this step is important. In some cases, pieces which have not been tempered have shown poorer adhesion than those which have."
An approach to a semi-quantitative heating test is suggested by E.M. Hayden of The Stanley Chemical Co.:
"The higher the temperature or the more heat applied, the higher will be the degree of blistering or peeling of an electrodeposit having poor adhesion; and the poorer the adhesion, the worse the blistering. The resistance to blistering upon the application of heat is then an indication of the degree of adhesion. We use 350°F for copper-nickel-chromium deposits on die castings, red heat for nickel directly on steel. These tests are practical for proving a cleaning cycle prior to plating. It is interesting to note that if satisfactory adhesion is present to begin with, the application of heat will further enhance the adhesion. Induction heating has been proposed as a means of increasing adhesion by effecting an actual alloying of the base metal and the electrodeposit. We do not consider the two methods described above as being novel, but they are a practical means of determining satisfactory adhesion. Obviously, the bend test results in a damaged article. The heating test has the advantage of not damaging the test piece, yielding an acceptable product if the adhesion is satisfactory, and may be used for items for which the bend test is not applicable. Perhaps with the advances being made in induction heating, a simple practical method, closely measuring the degree of adhesion, can be worked out."
An experience which has been mentioned several times, especially by those who plate on aluminum, is well described in the communication from E.H. Lyons, Jr. While he speaks of days before blisters develop, others have spoken of weeks:
"Blisters sometimes develop in zinc and cadmium coatings on storage at room temperature. Sometimes 5 or 6 days are required for the blisters to develop. They are believed to be inflated by the small amount of hydrogen absorbed during plating, but will not show up unless the adhesive bond is unsatisfactory. Excessive hydrogen absorption sometimes produces blisters in the steel surface, but iron may then be seen or detected on the detached portion of the zinc coating. Separation between the electrodeposit and steel base are indications of poor adhesion.
"Instead of waiting a week for blisters to develop, the specimen may be heated for an hour at 300-400°F, or for a shorter time at 500°F.
"For steel strip and wire and certain other plated parts, the blister test is applied by holding the specimens above a Bunsen flame until the zinc softens and 'fuses', which can readily be seen with the naked eye. Often a certain amount of wrinkling of the surface and sometimes a distinct yellowing accompanies the 'fusion.' The temperature at which zinc softens and becomes plastic but does not actually melt is believed to be about 600°F.
"Any blisters which develop during heating indicate faulty adhesion. There is a tendency to regard the estimated temperature at which the blisters appear, and their size and number, as a semi-quantitative measure of adhesion, but we do not believe this is correct; they probably measure only the rate and amount of evolution of hydrogen from the steel.
"Following the blister test, it is wise to apply a bend test to the 'fused' area and its immediate neighborhood. The most critical portion appears to lie ¼ to 3/8 in. outside the 'fusion' zone. Failure here is not regarded as cause for rejection, but it indicates fault in the cleaning process which, if not corrected, will ultimately lead to failure in one of the other tests."
A suggestion for a test of comparative adhesion for one series of panels is given by W.E. Moline:
"Poor adhesion is measured comparatively by heating a series of panels in a constant temperature oven at 350°F for one hour. The number of blisters appearing per unit area is taken as the basis of evaluation of any one series."
The heating test which depends upon the difference in coefficient of expansion of deposit and base metal has been mentioned frequently. One such test is well described by C.H. Greenall, Lt. Col., Ordnance Dept., Frankford Arsenal:
"It has been found in a limited number of experiments at this Arsenal that cyclic exposure of coated specimens to subzero temperatures followed by room temperature is a sensitive method of detecting poor adhesion of nickel and chromium coatings. Thus far only -40° and -70°F have been tried. It is felt that a temperature as low as that of liquid air may be useful in separating electrodeposits from base metals having different temperature coefficients of expansion."
The "black light" or "fluorescent" test
This is one of the newer tests which nevertheless has been mentioned in several reports. From these, and from conversations, it is evident that the method is applicable only in special cases, and even then, its value is questionable. It depends upon the penetration of oil between the coating and base metal. Some have used the method in connection with the heating test to detect whether loosening has taken place or not. It does indicate complete lack of bond at edges, but does not show a loose deposit even where a blister exists unless there is a break in the deposit. It is more a test for porosity than for adhesion, in fact, it shows only a complete lack of adhesion.
The Erichsen cup test and variants
Extrusion tests have appeared under various names in the literature. The ones most commonly used are the Erichsen cup test or simply the cup test, the Olsen ductility test and the Romanoff flanged cap test. Several have used the regular Brinell machine to force a ball into the sample. From the extent that these tests are reported in the literature, one would gain the impression that extrusion tests are in general use in industry, but in all the correspondence received such tests have been mentioned in only a few instances and then without details or critical comments. A possible explanation is that most of the published literature comes from research laboratories where the necessary equipment is available, while a large part of the correspondence came from production operators and managers.
It might be well to state here that one gets the impression from the literature that the value of the various extrusion methods is highly questionable. They depend very much upon the nature of both the coating and the base metals. One somewhat favorable report was received from L.R. Westbrook, Research Manager of the Electroplating Division, E.I. du Pont de Nemours & Co. He states:
"Recently we have had occasion to use the standard Olson machine for measuring plate deformability and found that poor adhesion was very readily demonstrated. While I doubt that this technique could be adapted to quantitative measurement of adhesion, something might be worked out in connection with deformation tests."
The scratch or scratch-and-knife test
Here again the published literature, particularly the older literature, gives the impression that tests of this nature were in common use, but the private reports contained only an occasional mention of them. Two explanations are offered. There has been considerable improvement in adhesion during the past few years, and thick deposits are more common. From a conversation with the man in charge of adhesion testing for a large bearing manufacturing company, it appears that a test somewhat similar to the scratch test for thin coatings is being used for the thick linings of bearings. Parallel grooves are machined through the lining to the base metal, the distance between them depending upon the thickness of the lining; then another set is machined at right angles to the first. A blunt chisel is placed against the rectangular sections thus formed and hit a sharp blow with a hammer. This is considered a highly effective test for linings made of relatively hard metal, but has little value for soft metal.
The chisel test
This test has come into fairly general use recently, largely on the thick coatings used on bearings. C.F. Nixon states:
"The chisel test was used on work of such size and shape that the deformation test could not be applied and on plate of considerable thickness. One variation of the test is to place a sharp chisel back of a plate overhang, and give it a sharp hammer blow. If the adhesion is good, the plate will either break away or cut through without affecting the bond between base metal and plate.
"A second chisel test consists of cutting through the plate with a sharp chisel and when the base metal is reached, determining whether the separation is plate from plate or plate from base."
A sharp chisel is used in the above procedure. Vincent Mattacotti describes a procedure in which a blunt chisel is used:
"The chisel method has been used successfully to determine the adhesion of very heavy electrodeposits of silver, .040-.060-in. thick, over steel.
"The chisel shall be 3/8-in. wide and shall be ground with a bevel on one side only, leaving the back flat and straight. The cutting edge shall be a flat surface 1/32 in. in width and 90° to the flat back in order that a pushing action rather than a cutting action be obtained. The chisel shall be maintained in proper condition and re-ground when necessary to maintain the flat back. A 12-oz. ball peen hammer shall be used.
"The procedure to be followed in chiseling a bearing is: The plated bearing shall be hung on a proper fixture with proper stops. The chisel shall be held vertically with the flat side against the flange of the bearing and shall be in such a position that it will pass through a slot provided for this purpose on the fixture. The chisel shall be struck by the hammer until the silver either tears or is cut through. Any silver tear shall be examined for depth by further chiseling if necessary. A tear more than 1/8-in. deep shall be cause for rejection.
"The chiseling shall be performed around the flanges of the bearing in three locations equally spaced."
Various other modifications of the chisel test are in use. One which I have seen used with considerable success consists in taking a strip of any convenient width and sawing nearly through the base metal, then bending it at right angles until the base metal, or base metal and deposit break. If the adhesion is not too good, the deposit will part from the base metal to a greater or lesser degree. Even if there is no visible parting between the deposit and base metal, a thin, sharp chisel hit with a light hammer may still loosen the deposit. If not, the adhesion may be considered perfect. A very good idea of the bond may thus be obtained.
The grinding wheel test
From the private communications, it is evident that this is one of the most commonly used qualitative tests. It is generally considered about the most drastic test in existence and will show lack of satisfactory adhesion when other tests fail. The procedure used by C.F. Nixon is typical: "Use has been made of a grinding wheel test in which a plated part is held against a high speed coarse wheel in such a fashion that the cut is made from an edge and enters at a slight angle. The effect is to give a series of lifting impacts to the plate. If no part of the plate (usually nickel in this case) lifts from the base metal, the adhesion is declared satisfactory.
"A variant of the grinding test was applied when worn parts plated back to dimension were ground to finish size. While the procedure was not applied primarily as an adhesion test, it very definitely indicated that the method of surface preparation was satisfactory. In many cases portions of the plate were entirely ground away without plate separation."
R.B. Saltonstall, Technical Director of The Udylite Corporation, made some interesting comments on the method:
"There is a knack to using this test which makes it difficult to describe. It is acquired only after some experience and the test is far from quantitative. The ductility of the deposit is a rather important factor in evaluating the results. If the deposit is extremely brittle, it will simply break off at the point of contact with the grinding wheel rather than pull away from the base metal."
The cathodic or electrolytic test
Cathodic treatment in which hydrogen is liberated at high current densities was mentioned by a few correspondents. A very thorough investigation of the possibilities of such a method was reported by A.W. Hothersall:
"The possibility of using this method to demonstrate poor adhesion of nickel coatings on other metals has been explored. As a preliminary step, the effect of conditions (composition of solution, current density, temperature and properties of nickel deposit) on the rate of expansion of nickel was examined, since it was uncertain to what extent blistering or peeling was assisted by expansion of the deposit or by pressure of gaseous hydrogen. Considerable differences in the rate of expansion were found with different conditions of cathodic treatment and with different types of nickel deposit, but little difference in the effect of these conditions on the blistering of poorly adherent nickel coatings on brass could be detected.
"In subsequent tests, a solution of sulfuric acid (5 wt%) was used. The efficacy of the test was examined by the use of two sets of nickel plated specimens with strongly and weakly adherent coatings, respectively. No blisters were produced on the strongly adherent coatings even after cathodic treatment in the sulfuric acid solution for several hours. All poorly adherent coatings showed blisters after cathodic treatment in the sulfuric acid bath. The number and size of the blisters increased with the time of treatment. They were found to develop more quickly at high current densities and at a high temperature of the sulfuric acid solution. After some experimenting, it was found that the most suitable conditions for general use were: current density 100 A/ft2, solution temperature 60°C. Weakly adherent nickel or nickel-chromium coatings on brass or steel were found to develop blisters in 5-15 minutes under these conditions. In general, after the electrolysis had been stopped, the specimen would produce a crackling noise for some considerable time, whilst immediately after treatment quantities of gas could be seen spurting from the deposit through the film of liquid on the surface. It appeared probable as a result of these tests that the blistering was chiefly caused by the pressure of gaseous hydrogen which diffused through the nickel coating and accumulated at the site of discontinuities between the coating and the base, forcing the coating away from the base. Examples of the appearance of nickel and nickel-chromium coatings on brass after testing by this method are shown in [Figs. 7 and 8], respectively.
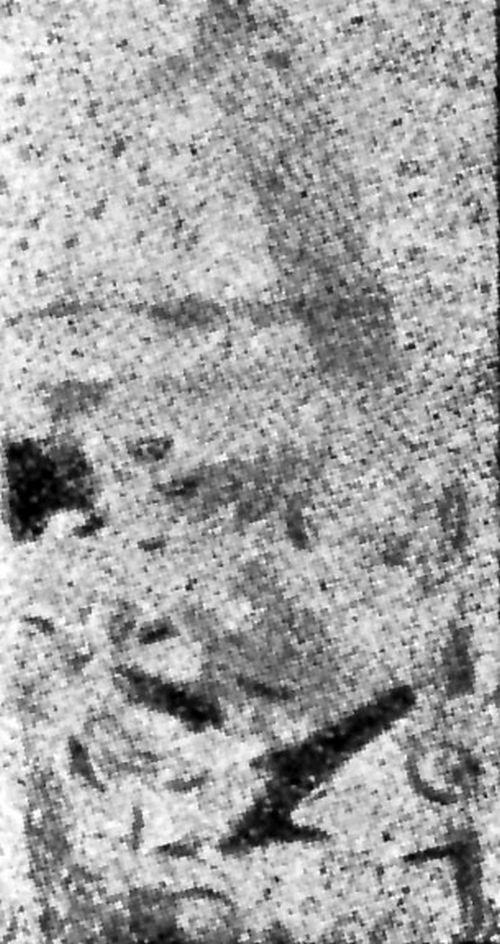
Figure 7 - Nickel plate on brass after cathodic test.
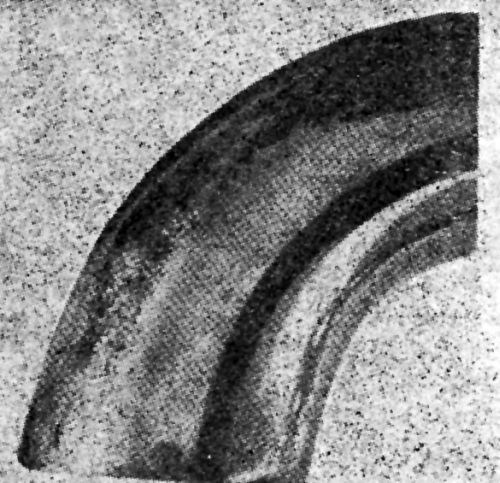
Figure 8 - Nickel-chromium plate on brass faucet outlet end after cathodic test.
"The electrolytic test is limited in application to coatings which are permeable to hydrogen. Nickel or nickel-chromium coatings appeared to react satisfactorily to the test if weakly adherent. This behavior was independent of the conditions of nickel deposition. Coatings of metal such as lead, zinc, tin, copper or cadmium which are not permeable to cathodically discharged hydrogen are not suitable for testing by this method. Similarly, nickel coatings deposited over an undercoating of a metal which is impermeable to hydrogen, for example copper, do not necessarily blister if weakly adherent. The test is thus limited in application and is not suitable for general purposes."
The x-ray test
This test was mentioned in only a few letters. A good brief statement concerning it is made by Vincent Mattacotti:
"X-Ray examination will show voids between the electrodeposits and the base metal. The usual x-ray procedure of taking a picture and then interpreting the developed film is followed. Since many heavy electrodeposits are annealed after electroplating, spots characterized by poor adhesion tend to lift due to the pressure exerted by occluded matter. The blisters thus formed are either visible to the naked eye or can be made visible with x-ray."
L.E. Weeg remarks:
"While I do not believe that the x-ray method is satisfactory for general use, it does have real merit in special applications such as the silver-plated bearing, in which the deposit is thick as compared to the thin deposits used in decorative plating, and for which a destructive test is prohibited. The most serious limitation is the necessity for x-ray equipment which is not found in many laboratories."
The "can opener" test
This is a rather new method and probably first developed by F.C. Mesle. In a recent communication Mesle states concerning this method:
"The 'can opener' with a spring coil is satisfactory for thin deposits, since enough pressure could be applied to lift or break 0.010 in. thickness of silver. For thicker deposits, it was not satisfactory. A 'can opener' device can be used without spring coil and sufficient pressure applied to break almost any thickness of silver to determine if the adhesion is as strong as the tensile strength of the metal. The use of a tensile testing machine appears more satisfactory since it permits the bond strength to be expressed in psi. In bearings, the bond must hold when enough pressure is applied to break the deposited metal. If plating is done for decorative purposes or for protection against corrosion of the base metal, such bond strength is not required but, in my opinion, still desirable."
The Jacquet test
A method similar in some respects to the "can opener" test was developed earlier by P.A. Jacquet. It has not been mentioned except by A. Brenner. Work was carried out at the National Bureau of Standards on this method which was interrupted before completion and has never been published. However, some very interesting information was obtained, and since it has not been available heretofore and will not be published by the Bureau, a considerable portion of the above-mentioned report is quoted here:
"The purpose of the research was to adapt Jacquet's peeling method to the quantitative measurement of the adhesion on specimens already plated, rather than to use it as a laboratory tool for investigating adhesion. We used a 600-lb. Amsler testing machine to measure the force required to peel the coating from the base metal. At the time, we intended to make parallel tests by the Ollard method in order to correlate the force required to peel a coating with the actual tensile strength as measured in the Ollard test, but the research was interrupted. We made a few tests by the Ollard method for demonstration only.
"One of the necessary mechanical requirements of the Jacquet test is that some method be devised to take hold of the coating to initiate the peeling. In a laboratory investigation of adhesion for which special specimens are prepared, a portion of the base metal can be treated to yield a separable deposit. For example, Jacquet dipped one end of the strip to be plated into a colloid solution, whereupon the subsequent copper deposit became non-adherent and permitted the peeling to be initiated. This method is not very satisfactory even for a laboratory investigation, because the colloid on the end might contaminate the rest of the strip on which good adhesion was desired; and, in certain preliminary treatments such as bright dipping, the colloid would be removed from the end of the strip. A more satisfactory method is to plate the end of the steel strip with a weak or poorly adherent layer of gold or silver, which can later be peeled from the base metal along with the subsequent deposit. In some cases, the final coating is not adherent to the gold and may be peeled from it. Another method is to prepare the end of the strip with a coating of nickel or other metal in such a manner as to make it poorly adherent to the base metal, and thus to permit peeling to be initiated after the final plating operation.
"These methods are not useful to initiate peeling on specimens which have already been plated. We have used the following methods for this purpose:
"A piece of spring steel is ground to a sharp edge and bolted to the specimen as shown in the diagram [Fig. 9]. The edge of the steel piece is placed on the coating which is to be tested, and the coating is either removed in the vicinity of the edge or is scratched through. Then a thick layer of nickel 0.03- to 0.05-in. thick is plated over the whole specimen. The nickel coats over the steel attachment which then serves as a handle for starting the peeling of the original coating.

Figure 9 - Device for initiation of peeling on plated specimen for Jacquet test.
"Another method of forming a grip to the original coating is to remove a portion of the original coating by machining or with emery paper. Then the entire specimen is coated with a thick layer of nickel. Since nickel coatings do not adhere very strongly to roughly machined or emeried surfaces, the peeling can be initiated at that point and continued for the purpose of peeling off the remainder of the coating. These methods presuppose that the subsequent nickel coating can be made to adhere strongly to the original coating. In practice, with suitable cleaning procedures, this can be done. However, if the adhesion of the original coating is very strong, then separation may occur between the first and second coating, in which case the measurement of the force required for the peeling would indicate that the adhesion was of a high order. By using these methods of peeling, the adhesion of coatings was measured on some of the panels prepared for one of the early AES programs.
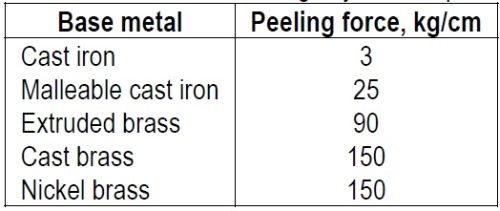
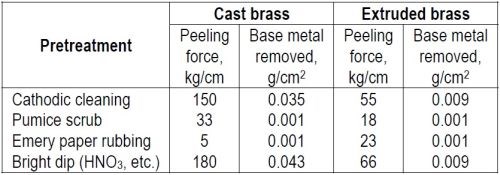
"In the experimental work, nickel coatings deposited from a warm bath were used in thicknesses up to 0.05 in. The forces were measured in terms of kg per cm width, as usually a strip 1 cm wide was peeled. The force required for peeling varied from a few to about 200 kg/cm. Table I gives some representative values for nickel coatings on a few base metals.
Table 1 – Adhesion of nickel coatings by the Jacquet method.
"We have not been able to obtain a theoretical analysis of the forces involved in the peeling method, and hence have carried on the investigation empirically. It was found that both the force required to peel a coating and the amount of base metal removed in the peeling operation, increase with the thickness of the coating. This is true for coatings which have been prepared in the same manner and, therefore, should have the same degree of adhesion. The removal of base metal in this instance is to be distinguished from the variation in the amount of base metal removed from specimens which have unequal degrees of adhesion. In the latter case, the amount of base metal torn out might vary from zero for a low degree of adhesion to a maximum figure.
"Table 2 gives examples of the effect of thickness on the detaching force and the amount of base metal removed.
Table 2 - Effect of nickel coating thickness on peeling force and base metal removed.
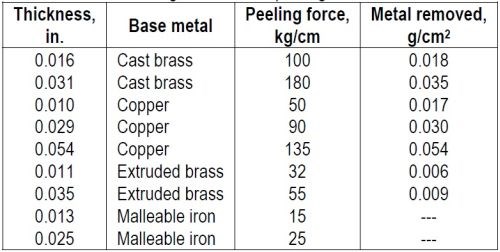
"The greater force required to peel thick coatings does not necessarily prove that the adhesion of the thick coating is greater than that of a thin coating. It is difficult to see how the thickness of a coating would affect its adhesion. The observed effect of thickness may be a result of the larger radius of bending of the coating where it makes contact with the base metal, thus exerting force over a larger area than with the thin coating. The larger amount of base metal removed with the thicker coating may be a result of the stress at the interface being proportionally larger in tensile than in shearing or tearing stress, which latter are more likely to occur when a thin coating is peeled.
"In order to determine definitely whether or not the effect of the thickness of coating was mechanical, or whether it actually represented increased adhesion, an experiment was performed in which two nickel coatings, one 0.03-in. and the other 0.08-in. thick were plated over 0.03-in. thick copper. An attempt to peel the copper from the nickel was not successful as the copper sheet tore.
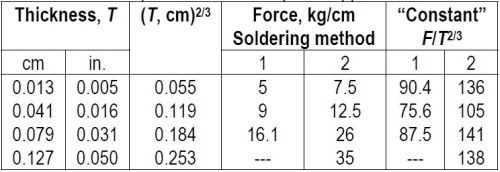
"Since the adhesion between coating and base metal is not highly reproducible, experiments were made to test the effect of the thickness of the coating on the force required for peeling, by soldering copper strips of various thicknesses to a metal base. The adhesion obtained in this manner might be more reproducible than that obtained by plating, and might be independent of the thickness of the upper strip. The data in Table 3 show that an increased force is required to detach thick soldered strips. The detaching force seemed roughly proportional to the square root of the thickness of the strip. However, K.G. Soderberg (unpublished communication) pointed out that a better proportionality was obtained with T2/3 and that an inspection of Table 2 showed the same relation to hold for nickel deposits on cast and extruded brass, copper and malleable iron, for which the constants expressed in metric units are about 910, 540, 310, and 150 respectively. This empirical rule can be used to correct for the varying thickness of coatings used in the peeling tests, or the constant itself can be used as a measure of adhesion, as it is independent of the thickness of the coating.
Table 3 – Force required to detach strips of copper soldered to steel
"The effect of various pretreatments of brass base metals is shown in Table 4.
Table 4 – Adhesion of nickel on brass.
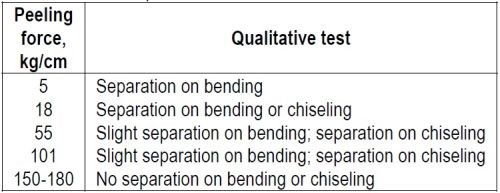
"In Table 5 some correlation is shown between the force required to peel a nickel coating and the results of qualitative adhesion tests which involve (1) bending the specimen back and forth until it breaks, and (2) use of a hammer and sharp chisel to initiate separation. The latter is a more severe test than the former when thick coatings are involved."
Table 5 – Comparison of adhesion tests for nickel on steel.
The explosion test
In the communication from C.H. Greenall, Lt. Col., Ordnance Dept., Frankford Arsenal, mention was made of this recently suggested unique method:
"Recently this Arsenal had the pleasure of assisting Dr. A. Brenner, of the National Bureau of Standards, in a study of a method of measuring adhesion by exploding a primer charge in a groove cut through a nickel deposit. I am sure you will be able to obtain the details of this method upon request to Drs. Brenner or Blum."
The combined report of W. Blum and A. Brenner contained the following remarks on this method:
"Last year some experiments were begun in an attempt to use the force of an explosive, to measure the degree of adhesion of coatings. In work done on the electroplating of gun bores, it was found that unless the adhesion was perfect, the coatings would be detached during firing. It therefore seemed as if a method could be worked out on the basis of this observation. Several preliminary trials were made at Frankford Arsenal, but we have had to postpone further studies until war work becomes less pressing.
"The specimens for the explosive test were prepared so as to have varying degrees of adhesion, particularly relatively low adhesion. These samples were prepared by plating the steel with a flash of nickel; immersing it in a very dilute solution of potassium dichromate, the concentration of which was varied to obtain different degrees of adhesion; rinsing, and returning it to the nickel plating bath. Cross lines penetrating the coating were then put on the specimen and a caliber 50 (0.5 inch) primer was exploded, either in contact with the specimen where the lines crossed, or slightly above the surface of the specimen. The primer was exploded by dropping a weight on it. In several instances, the primer caused the coatings having poor adhesion to peel in the region of the cross lines, but it did not consistently pick out all the specimens having poor adhesion. It is believed that the explosive force of the primer was not sufficient, because, if a 30-caliber primer was used, none of the samples peeled. In further experiments, we plan to use something in the nature of a dynamite cap, which can safely be set off by a battery. It explodes with a detonation, and should give sufficiently local gas pressure to disrupt the coating, while a 50-caliber primer does not produce a true detonation. It is advisable to try the most intense forces at first, and then by increasing the distance between the specimen and the explosive, or by diminishing the charge, to standardize the method. One difficulty is that the surface of the metal may become so blackened that it will be difficult to determine the condition of the coating."
The BNF impact test
Another new method which has aroused considerable interest recently was developed by A.W. Hothersall, in England. A description of the method appeared in the May and June issues of Metal Finishing (see also Monthly Review, 32, 1148 (1945)). Naturally not many comments have been received so far, as few people have had the opportunity to make tests. Those which have been received give the impression that the method is limited in its application to about the same extent as the burnishing method which it might replace. The following is from the combined report of W. Blum and A. Brenner:
"We have tried the vibrating hammer method recently developed by A.W. Hothersall, using both an electromagnetic and a mechanically driven vibrator. We were unable to blister a coating unless the adhesion was so poor that the coating was readily peeled with the fingers. Therefore, the method does not seem suitable for testing commercial products which have any appreciable degree of adhesion. The vibrator did not blister coatings which had failed in service by peeling."
Hothersall refers to this method as the "BNF Adhesion Test." In a recent letter, he has the following to say:
"The work that we have done on this subject, described in J. Electrodepos. Tech. Soc., 19, 49 (1944), resulted in the development of an apparatus which is designed to select non-adherent coatings. The problem becomes complicated as soon as the coating has some adhesion to the base, and we have not succeeded in finding any universal test. Though it is admittedly of limited value, it is likely to fulfil a useful purpose, because we have been able to pick out with this tester quite a few commercially plated articles which appeared satisfactory but whose coatings had no adhesion. The tester probably does no more than a skilled man can do with a burnishing or scraping tool but it has the merit of being a standard apparatus designed to produce the same result when operated by different people. This method has been adopted in the British Standard Specification, 1945, No. 1224, for "Electroplated Coating of Nickel and Chromium."
The illustrations in Figs. 10-12 show blisters produced by the BNF tester.
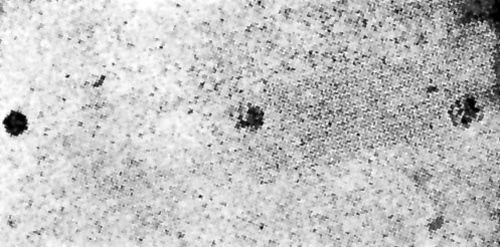
Figure 10 - Blisters produced by B.N.F. test on nickel-plated aluminum.
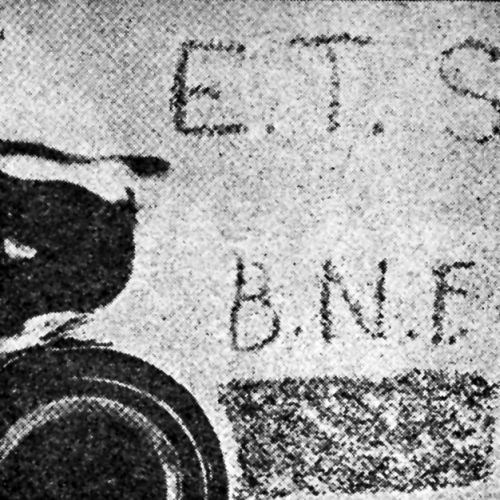
Figure 11 - Blisters produced by B.N.F. test on bright nickel-plated lock frame.
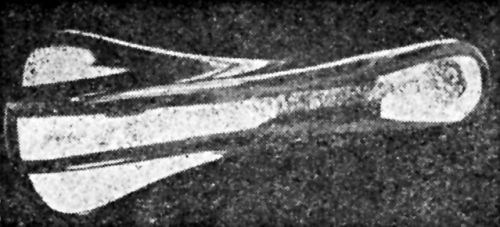
Figure 12 - Blisters produced by BNF test on brass door handle.
The Burgess Battery Company, Handicraft Division, makes a device called the Vibro-Tool. It is the opinion of the representatives of this company that this tool could be used for the test as well as the one made by the W. Canning & Company, Ltd., in England. The Burgess Company has contributed a Vibro-Tool for experimental purposes.
The Ollard test
The only quantitative method, the results of which can be expressed in pounds per square inch, was first described by E.A. Ollard in 1925. Since that time a few changes have been made by others which have materially improved the accuracy, but it is still known as the Ollard method and a variant as the Micro-Ollard method.
The literature survey showed that it is extensively used, but largely for research purposes. It takes too much time, requires too much expert machining and too expensive equipment to become generally used on production parts.
Numerous references have been made to it in the private communications. Some of the comments are given below:
A.H. DuRose (Harshaw Chemical Co.) states: "Methods such as the Ollard test, while giving 'comparable' results, do not tell a plater whether with his particular electrodeposit, base metal and method of cleaning and pickling he is obtaining good or poor adhesion and consequently he must rely on filing, grinding or bending tests."
C.L. Faust (Battelle Memorial Institute) states: "For securing information on the effect of surface treatments and cleaning prior to plating we have used what is essentially the Ollard method."
R.O. Hull, R.O. Hull & Co., has the following comment: "In my opinion the most accurate method available for measuring adhesion is the Ollard test. It is unfortunate that this test has such limited application. For example, I do not believe that it can easily be made adaptable to the soft metals such as cadmium, tin, lead."
The International Nickel Company has probably done as much work as anybody else in this country on the problem of adhesion. W.A. Wesley commented:
"We have done little with qualitative methods because we think their use makes for a waste of time. I am enclosing a copy of Roehl's paper on 'Adhesion of Nickel Deposits' which describes the test we regularly employ. I may also mention that B.B. Knapp has devised a quantitative tensile test for adhesion applicable to coatings on sheet metal. He is now preparing a paper which will disclose the details."
The letter from E.J. Roehl contained the following comments:
"We have further refined Ollard's method and hope to have sufficient data shortly to warrant publication. We are quite satisfied with this test and with a similar test for sheet specimens, so that our work has been confined 'almost entirely to pre-treatment methods for good adhesion."
The micro-adhesion test
One of the largest manufacturers of automobiles has modified the Ollard method into what is known as the micro-adhesion test. A communication contains the following information:
"Up to the present time we have applied the micro-adhesion test to silver and nickel deposits on steel. It appears from our experience that it is necessary to have a plate thickness after machining of at least twice the wall thickness of the test specimens. This wall thickness, as derived from the prints, will be between 0.009 and .0105 in. When lower thicknesses of plate are applied, it is possible, after machining, to plate specimen to the necessary 0.021 in.
"There is no detrimental effect of increasing the thickness of the plate beyond 0.021 in. Below this thickness, if the adhesion is good, the deposit will fail in shear instead of tension. When this occurs, the value obtained is inevitably lower than it would be if the failure were in tension. This test, then, measures the adhesion only when the bond strength is less than the tensile strength of the weaker of the two metals. When it is higher, failure occurs either in the plated metal or the base metal. This test could be applied to any combination of base metal and deposit providing both can be machined. We estimate the accuracy of the method to be ±3.5%. Actual duplicate runs have varied from 0.4% to 4.5% from the mean.
"Heat treatment will have no effect on the accuracy of the result; however, tensile failures of specimens which have been annealed will naturally occur at lower values. Thin underlying layers or 'flash' coats have no effect on the accuracy of the values obtained. The result is simply the tensile strength of the weakest layer or bond in the system."
The solder or adhesive test
A highly desirable quantitative method is one in which there is attached in some manner a handle to the deposit, or possibly two handles, one to the deposit and the other to the base metal. The handle and the base metal or the two handles are held in a tensile machine and the bond strength determined in pounds per square inch. One of the first methods for the determination of adhesion was of this type. It is known as the Burgess method and was proposed by C.F. Burgess in 1905. The method as used by him consisted in soldering, by means of a low-melting solder, a copper lug about ½ in. in diameter to the surface. Special arrangement was used to prevent the solder from flowing on the zinc surface. A spring balance was used to record the pull necessary to separate the plug from the iron base metal. Burgess appreciated the fact that the high temperature required might influence the adhesion. It was his opinion that the heating would decrease the adhesion of an electrodeposited metal. Because of this objection, the method was practically discarded until a few years ago. Recently, after heating had been specified as an adhesion test, in some instances by the Government, the method has been revived and is being fairly extensively used, in some instances as a quantitative method. After the soldering procedure had been discredited, several other devices such as cements and adhesive tapes employing the same basic principle were used and are still being used. Many of the private reports contain remarks concerning such tests.
R.A. Ehrhardt reports as follows on the solder method used by Bell Telephone Laboratories:
"We are not interested in obtaining adhesion much greater than the strength of 50-50 lead-tin solder, and as our plating techniques improved we found that all of our joints were breaking in the solder. Consequently, we have stopped making quantitative tests and test by making soldered joints to the surface of the panel, breaking them and observing whether the failure occurs in the solder or in the aluminum-electrodeposit interface. In doubtful cases, we attempt to resolder since the aluminum surface, if exposed, will not wet with solder. Since we have not made any tensile tests for some time, we do not have any sample joints available.
"Concerning the effect of soldering on the normal adhesion of electrodeposits, we realize that it is subject to criticism. Our chief purpose in plating aluminum was to form soldered joints. We have every reason to believe that with many electrodeposited coatings, heating will lower the adhesion, particularly where the base metal contains absorbed gases which cause blistering. The temperatures required for soft soldering are, however, not very high and probably no higher than those developed in a surface during buffing. Heating to higher temperatures will, of course, cause alloying of the deposit with the base metal in many cases. It is difficult to predict the effect, since in some cases this will improve the adhesion and in others, such as zinc and copper, the alloy layers are brittle and poor adhesion results. Possibly some of the new adhesives will permit bonds to be made at lower temperatures and eliminate the temperature factor."
C.H. Sample, then also with Bell Telephone Laboratories, Inc., furnished additional information on this work:
"In Mr. Ehrhardt's work, we were interested essentially in producing adherent and easily solderable coatings on aluminum surfaces, and he worked out a simple test by means of which one could determine whether or not the aluminum to coating bond was at least as strong as the solder employed. We were primarily interested in soft solders, but I understand that in certain instances in which hard solders were employed as the bonding agent, adhesion values equivalent to the strength of the aluminum base metal were obtained.
"In this method, aluminum test specimens 4×1×1/16 in. were plated with the coating under investigation. The edges on the long sides were milled flat prior to plating. After plating, 1×1/8×1/16-in. pieces were cut from the 4-in. specimen and by means of a suitable jig were soldered to copper strips of the same dimensions, thus providing a tensile test specimen 2 in. in length. Excess solder and coating were removed from the surfaces surrounding the joint, leaving a 1/8×1/16-in. rectangle of soldered coating to be tested. Consistent results were obtainable by this method, although, of course, no adhesion strength data could be had higher than the breaking strength of the solder employed. When the break occurred in the solder, the adhesion of the coating was considered satisfactory."
R.O. Hull makes the following comments:
"Some studies of adhesion was made at du Pont by the application of a strong, low melting point alloy and then determining the relative force required to pull the plated metal from the base metal, with the adherent low melting point alloy as a handle or means for gripping the plated coating. It is quite possible that this method could be standardized to give reproducible values which may be translated into specifications."
Probably the most extensive and precise work of this type done recently, was in the Research Laboratories Division of General Motors Corporation. W.M. Phillips, Head of the Electrochemistry Department, reports as follows:
"The following is an outline of an adhesion test used to determine the bond strength between electrodeposited silver and the base metal. The test was designed chiefly for testing the relative adhesion of 0.010-0.15 in. thick deposits of silver, plated under various conditions. The test does not lend itself readily to testing the adhesion of thin deposits on complex shapes. It is doubtful that it could be applied to anything except the special test pieces used, since a flat surface and an expendable test specimen are required.
"The measurement of the bond strength of the electroplated silver is made as follows: The top surface of the head of a ½-in. hex head bolt is ground and plated with silver to the required thickness. The surface of the silver is then ground, with light cuts to avoid flowing, and is then soldered to another similar surface or to an unplated, ground bolt head. The two bolts are then pulled apart in a standard tensile machine. The ultimate stress required furnishes a measure of the strength of the bond between the silver and the steel base.
"The method as outlined has not been developed to the extent that it can be used to evaluate the strength of strong bonds of electroplated silver to steel. It can be used to show that the bond strength is greater than 22,000 psi and poor adhesion can be evaluated up to 22,000 psi."
A surprising number of the reports indicate a use of the simple qualitative test with an adhesive. The probable reason is the strong desire for a simple, quick and non-destructive test. Several of the more interesting ones are quoted below:
R.V. Miner, Chief of the Crossbar Finishing Department, Hawthorne Works, Western Electric Company, remarks:
"Extremely poor adhesion has been evidenced by raising the deposit with a piece of scotch tape."
H. Morrison, Cycle-Weld Division, Chrysler Corporation, expresses an opinion as follows:
"We have not had very much experience in the use of adhesives for the purpose of determining the adhesion of metallic coatings. We have, in a few instances, been able to pull off cadmium and zinc plates, but are of the opinion that they were not indicative of the best plated coatings. However, it may be possible through an intensive study to employ adhesive joints in such tests."
C.F. Nixon lists the adhesive test among those used by him:
"The adhesive test consists in covering a flat surface with an adhesive tape, allowing it to stand for 24 to 48 hr, and pulling it off. Poor adhesion can be detected by this method. It is our thought that with a bonding material of high strength, actual measurements can be made of bond strength of a plated metal bond."
V.H. Waite, The McGean Chemical Company, offers the following suggestions:
"Recently developed adhesives, which are said to give metal to metal bonds of great strength, might form the basis for a quantitative test which could be applied to simple shapes. After bonding suitable fixtures to the deposit and the base metal, the force required to separate them could be determined in a tensile testing machine.
"Whether the bond provided by the newer adhesives has sufficient strength, remains to be determined."
Suggested experimental work
It will be observed that in some of these reports the opinion is expressed that there is a distinct possibility of developing some method along this line, not only as a qualitative but also as a quantitative test for adhesion. Such a method should be comparatively simple, fairly quick, nondestructive and applicable to both thin and thick deposits. The limitations would be the tensile strength of the adhesive and its adhesion to the metal surfaces under test.
One of the outstanding achievements during the war has been the development of unusual cements and adhesives. Some of the companies engaged in this work were contacted to learn their opinions regarding the application of their cements to the measurement of adhesion of electrodeposits. It appears that none has as yet made such applications, but a keen interest was expressed. An offer of cooperation was extended, and in two instances samples of material with instructions for use were contributed.
[Later acquired information]
One should not overlook the possibility of developing the use of heat or a sudden temperature change under carefully controlled conditions into a valuable qualitative or even a semi-quantitative test of practical value in production. However, work with cements and adhesives is probably most promising. Experiments are now in progress along this line and the results will appear in a later report.
Early in the work on this project, persons were contacted who had made a study of the use of high frequency sound as a means for detecting flaws or voids in metals. It was felt that the method might also be applicable to the detection of degrees of adhesion. The studies in question were made in connection with government research and the information obtained could not be presented at that time. However, the promise was given that as soon as a release could be obtained, the material would be made available as a contribution to this project. The last of this information has now been received and the whole is being submitted herewith together with data on other methods recently made available.
The supersonic test
The pioneer in the field of supersonics is Professor Floyd A. Firestone, recently of the Physics Department of the University of Michigan, now Consulting Physicist located at 3318 Fessenden Street N.W., Washington 8, DC. For general information on supersonics the reader is referred to two publications by Firestone.135,136
Firestone was asked to make comments, based upon the theory involved and his extensive experience in the field, concerning the application of supersonics to the measurement of bond strength of electrodeposits. The following are his statements:
"A sound wave is the propagation of an elastic disturbance. The velocity of propagation of a longitudinal sound wave in metal is of the order of magnitude of 200,000 in/sec. If the frequency of the sound is 5,000,000 cycles/sec, the wave length will be of the order of magnitude of 0.04 in. If a quartz crystal, ½-in. square, is used for radiating the sound, a beam of sound like a search light beam will be formed having a ½-in. square cross-section. If this beam of sound falls upon a plated object at approximately right angle to its surface, then some of the sound will pass through the object and emerge on the other side where it can be picked up by a second quartz crystal used as microphone; but if there is no bond over any portion of this ½-in. square area, then the discontinuity of elasticity will cause the sound to be almost completely reflected and none will be transmitted. The area under test can, in some cases, be narrowed to about one-quarter in. square; a considerable fraction of this area must have no bond in order that a definite indication be obtained by this technique of sending the sound through the piece.
"In applying this technique, it is customary to send the sound beam through a path in water; the metal part to be inspected is then immersed in this path and the absence of bond will be indicated by the complete interruption of the sound beam. With pieces of certain shapes, considerable difficulty may be experienced because of interference between multiple reflections or existence of standing waves. To overcome this difficulty, the beam of waves may be sent for only a few millionths of a second, the wave group then being so short that standing waves are not set up.
"In case still smaller areas are to be examined or if very small flaws or holes are to be found, the same technique of sending out a very short wave group may be employed and reflections from the defective area observed instead of transmission through the area. Under favorable conditions where the plate is fairly thick, a flaw as small as 0.010 in. in diameter can be detected by this technique.
"The supersonic method does not test the strength of a bond except insofar as variations of density, elasticity or continuity may be present which of themselves influence the strength; the supersonic test merely indicates variations in density, elasticity or continuity.
"Equipment for supersonic testing either with continuous waves or with short wave groups is manufactured by Sperry Products Co., Inc.
The Crystal Research Laboratories manufacture ultrasonic equipment and have done considerable research in connection therewith. This company was contacted to learn whether they had attempted to apply the supersonic method to the testing of bond strength. A part of the reply is included below.
"Our experience within this field has been confined to observations made in the course of development of our ultrasonic equipment, and we have never attempted any experiments directly along these lines. We have observed, for example, that the copper or silver electrodes plated on our crystals are sometimes shaken off by the intense agitation at ultrasonic frequencies. The work of Claus137-138 on the preparation of finely divided metallic powders by ultrasonic irradiation of a cathode during electrodeposition, depends essentially on the lowered adhesion of the deposited metal and suggests very strongly the possibility of developing an instrument suitable for measuring adhesion.
"It should not be surprising that an ultrasonic field should tend to detach an adherent coating when the magnitude of the forces acting on a vibrating system at resonance are considered. Bergman139 has given an estimate of the forces that are involved. The magnitude of the acceleration is given by the formula:
amax = 4π2N2A
where amax = acceleration in cm/sec2,
N = frequency in cycles per sec,
A = amplitude in cm
"With N = 500,000 cycles/sec and A = 10-5 cm, the order of magnitude of the displacements encountered in ultrasonic work, amax is about 108 cm/sec2, i.e., about 100,000 times the acceleration by gravity. Forces of such magnitude, properly applied to a metallic coating, should have a strong tendency to tear it loose."
The Brush Development Company is engaged in developmental work involving supersonics as a method for measuring bond strength. A part of its reply is given here.
"At the present time, we are conducting a similar research program using various samples that have been forwarded to us by individual companies. Inasmuch as our results are not as yet conclusive, we do not have any papers or information to be passed on; however, as soon as information is available, we shall be very glad to send you a copy of our reports."
In a research project carried out in the Physics Department of the University of Michigan by Julian R. Frederick, the supersonic method was applied to the determination of bond strength. This work is so pertinent that Frederick was asked to submit a description of the equipment, the methods and the general nature of the results. His report follows:
"Some qualitative experiments with the use of a continuous beam of supersonic waves to test bond have been carried out. From the limited work, it was concluded that the method would readily detect absence of bond, but further investigation would be necessary to determine whether or not the strength of the bond could be measured.
"The method involved sending a continuous beam of supersonic waves into the part and measuring its intensity as it came out on the other side. Lack of bond caused a drop in the intensity of the transmitted beam because the waves were reflected by any sharp discontinuity in the elastic properties of the transmitting medium.
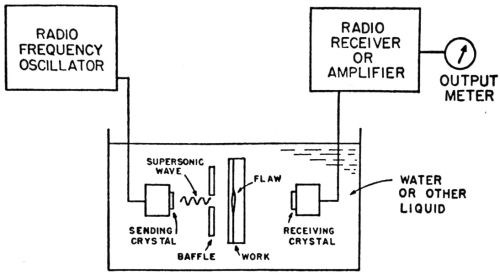
Figure 13 - Arrangement of apparatus to test bond by means of beam of supersonic waves.
"The arrangement of the apparatus is shown in [Fig. 13]. All testing had to be done with the work immersed in a liquid such as water or oil, since air is an extremely poor transmitter of supersonic waves. The source of the waves was a piezoelectric quartz crystal which was electrically driven by a suitable radio frequency oscillator tuned to the natural frequency of the crystal. The receiving crystal was connected to an amplifier which consisted of an ordinary radio receiver with a slightly modified output circuit. The signal from the amplifier was measured on a decibel meter.
"In setting up the equipment, care had to be taken that the sending part of the system was completely shielded electrically from the receiving part, otherwise only part of the signal from the amplifier would have been due to the supersonic energy picked up by the receiving crystal and part a spurious electrical signal.
"Another problem was caused by standing waves that were set up in the acoustical part of the system. Since they can occur most easily between any two parallel surfaces in the path of the beam, it was advantageous to place the surfaces of the part being tested at an angle to the surfaces of the crystals. Another solution to the problem might have been to "warble" the frequency of the supersonic beam, but that would have required a different and more complicated system than the one mentioned above.
"Where it was not convenient to immerse the part completely in a tank of liquid, the beam of supersonic waves was shot down a stream of water which impinged onto the article from a specially designed nozzle. Similarly, the supersonic beam was picked off the other side of the part by another stream of water.
"Tests were made on three different types of articles: 1/32-in.-thick bimetallic sheet of the kind used in thermostatic control elements, aircraft engine bearings of silver electroplated on a steel base about 3¼ in. in diameter, and sintered metal deposits on a steel plate.
"Verification of the results of the supersonic tests in the experiments described below was made as follows: bond between two sheets of metal was assumed to be good if sharp bending of the material did not cause separation; on materials that could not be bent easily, a chisel was used to determine the quality of the bond.
"The bonding in bimetallic sheet was attested successfully at frequencies of 1, 5 and 10 megacycles, both with the tank and with the running water techniques. The actual area inspected at any instant was about 14 in. in diameter and it was necessary for the flaw to cover about one-third of this area before an appreciable drop in the output meter could be observed. Usually, however, the regions of discontinuity covered several square in.es and no transmission of the supersonic waves was observed through them.
"The aircraft bearings were tested by immersing them in oil and sending a beam of supersonic waves from the inside to the outside surface. A baffle plate close to the bearing allowed only a wave beam 14 in. in diameter to reach the receiving crystal, thus permitting detection of defects of about one-third that size. By a suitable jig arrangement, the bond over the whole bearing could be scanned. Only 1 and 5 megacycles were tried, but both frequencies were able to pick out defective areas.
"Only one test was made to determine the bond between a sintered deposit and the base metal. The sintered metal was about 1/16-in. and the steel base plate 1/8 in.-thick. Different regions were deliberately made with poor bond, and these were accurately shown in the test by a decrease in the intensity of the supersonic waves passing through the plate.
"These investigations were carried on as a part of a research project for the Sperry Products Co., Inc., of Hoboken, NJ, which manufactures equipment for supersonic testing."
Probably the most thorough practical investigation of the use of the supersonic method for testing bond strength on a commercial basis was made by Frank D. Hallworth, Engineer, Materials Development Laboratory, Pratt & Whitney Aircraft Division, United Aircraft Corporation. This work was done in connection with the very extensive use of silver plated steel bearings in aircraft engines during the recent war.
The results of the studies of the supersonic and other methods were presented on December 5, 1945, before the Southern New England Section of the Society of Automotive Engineers. A copy of the report140 was recently forwarded to me with the privilege of quoting any desired portions in this paper. Because of the interest shown in the supersonic method and the exceptional nature of the work done by Hallworth on this and other interesting methods, his paper is extensively quoted here:
"For heavy duty applications where high loads, high temperatures and high surface speeds are encountered, the silver-plated steel bearing has established an excellent service record in aircraft engines. Plated with a thin layer of lead and indium to improve its performance, it is used as a bearing for crankshafts, master rods and other highly stressed parts. Because of its excellent anti-galling properties, a thin silver plate is used on articulated rod pins, tappet roller pins and other closely fitted parts. The critical nature of all these parts makes it extremely important that the silver adhere strongly to the steel back. Failure to do so can result in complete breakdown of an engine.
"Even with the most carefully controlled production electroplating processes, poorly bonded silver occasionally occurs. The defective area may be small, or it may extend over the entire plated surface. Such a condition can be caused by improper cleaning or etching prior to plating, failure to connect the current source to the part before immersion in the plating bath, or any of a number of other reasons. Although the percentage of defective parts is normally low, the high standard of quality regularly maintained in aircraft engines requires that non-destructive inspection for bond be performed on every silver-plated part. The methods used must test the entire plated surface, experience having shown that small areas with poor adhesion may occur at random on a part, most of which has good silver adhesion.
"Over a period of four years, a number of inspection methods which vary in effectiveness and adaptability have been developed for testing silver bond. These can be divided into two classes: methods which can be used on a finished part and methods which can be used only on semi-finished parts. In the first group are the supersonic pulse method, the fluorescent penetrant oil method and the whirl test. The second group includes the shear test, the roll-peen test and the shot-peen test.
"The first device used by Pratt & Whitney Aircraft for silver bond inspection was the supersonic reflectoscope [Fig. 14], invented by Dr. F.A. Firestone135,136 of the University of Michigan. This complex electronic unit produces pulses of high frequency current which are applied to the faces of an X-cut quartz crystal. The crystal, ground to fit the curvature of the bearing and separated from it by a thin film of oil, radiates corresponding pulses of supersonic vibrations into the plate. If the plate is in contact with the steel back, the pulse passes from the silver into the steel, thence to the opposite surface, where it is reflected back over the same path to the crystal. If the silver is slightly separated from the steel back, the pulse is either reflected or dispersed at the gap [Fig. 15]. By observing the amplitude and shape of the pattern on the cathode ray tube screen as the crystal is passed over the plated surface, the operator differentiates between areas of good and bad bond [Fig. 16].
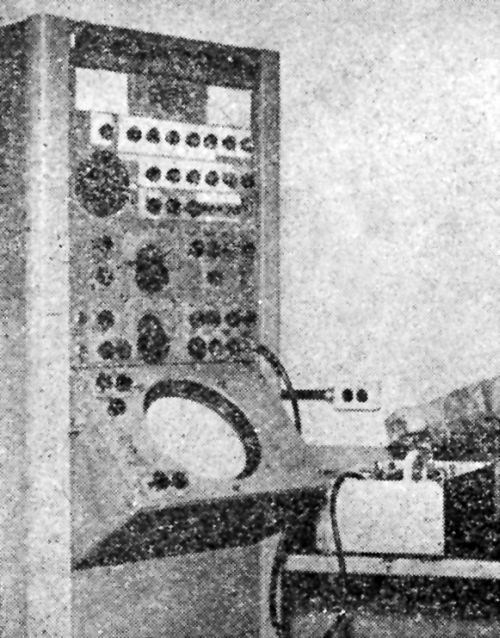
Figure 14 - While rotating bearing mounted in oil-submerged scanning jig, operator observes patterns on supersonic reflectoscope oscillograph.
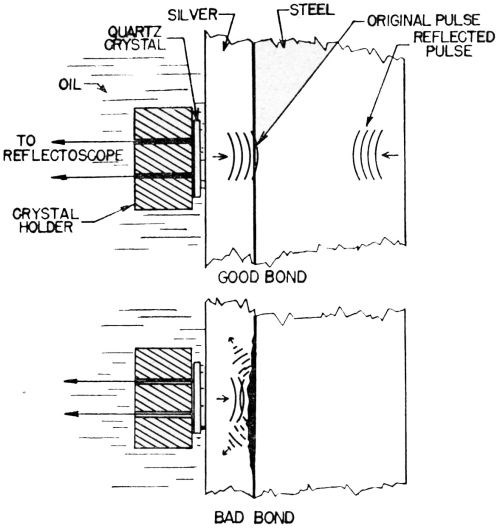
Figure 15 – Supersonic pulses are dispersed by bad bond but pass readily through good bond.
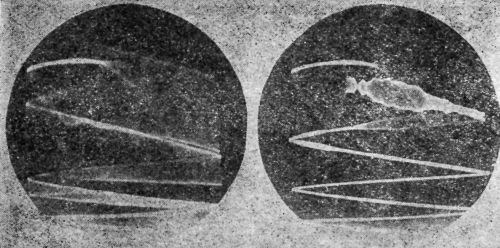
Figure 16 – Reflectoscope oscillography screen patterns: left – good bond; right – bad bond.
During the two years that this method was used for routine inspection by Pratt & Whitney Aircraft, certain limiting features of the reflectoscope became apparent. The device is sensitive to slight depressions and roughness in the plated surface, to micro-porosity in the silver, and to inclusions in the steel back, all of which give screen patterns similar to that produced by bad bond. Most important of all, it detects lack of adhesion only when an actual gap exists between the plate and the steel back, a condition which may not be present even though there is a complete lack of bond. For these reasons, the supersonic reflectoscope did not prove a completely adequate inspection device for silver bond and was superseded by later methods."
In a second private communication,140 additional pertinent information was given and is included below:
"Most of the work done to date has been at a frequency of 5 megacycles/sec using longitudinal waves. It may be that a much higher or lower frequency may be more effective. We know from our experience in supersonically testing large sections of steel for internal flaws, that the sensitivity is a function of the wave length of the supersonic vibrations used. The ratio between the length of the sound wave and the dimensions of the internal flaw must be high if the flaw is to have much effect on the wave train. We have tried frequencies up to 11 megacycles without much success. Further study is necessary before the limitations of supersonic bond testing can be definitely established.
"The reflectoscope is an exceedingly complex device requiring a trained technician to operate it and to interpret its results. A precision jig must be used to hold the part being tested. It is a slow test in that the entire plated surface must be carefully scanned."
The paper by Hallworth also contains reports on studies of other methods. Some of the more pertinent remarks are given below.
The black light test
One of the methods discussed140 is commonly known as the "black Light" or "fluorescent" method; he designated it as the "fluorescent penetrant method." The usual test procedure is followed. The following precaution is suggested:
"Under 'black light', the released oil fluoresces and appears as a sharp, bright line at the edge of the bad bond area [Fig. 17]. Care must be used when this method is applied to bearings which have been machined, since machining has a tendency to smear over the edges of the plate. The oil is thereby prevented from entering the areas of bad bond."
No conclusions are drawn concerning the practicability of the method.
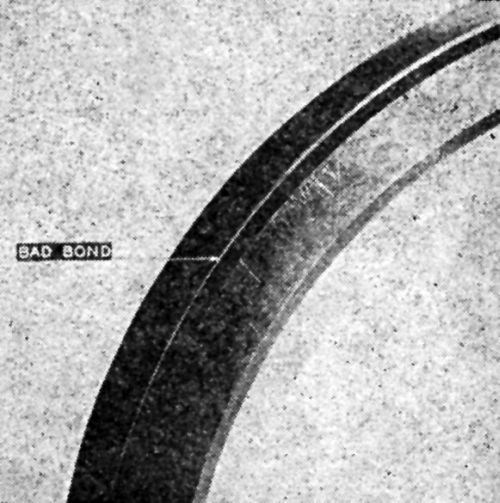
Figure 17 - Fluorescent oil indications of bad bond on crankshaft bearing.

Figure 18 - Defective double wasp front counterbalance bearings after whirl testing at 40,000 rpm.
The whirl test
Hallworth made an extensive study of another and rather unique method which appears to offer possibilities in special cases, at least in research work and even industrially. He calls it the "whirl test." His remarks concerning this test follow:140
"The whirl test consists of spinning an externally plated bearing about its axis at extremely high speeds. Bearings having small areas of defective plating will become blistered during whirl-testing while the silver on larger defective areas will become completely detached [Fig. 18]. The apparatus comprises an armored chamber, a vacuum pump, and an air turbine having a maximum speed of 60,000 rpm. The bearing is mounted on an arbor suspended below the turbine on a thin spindle. Because of the flexibility of the spindle, rotation occurs about the center of mass, thereby making unnecessary precise dynamic balancing of each part prior to whirl-testing. Centrifugal stress developed in the silver causes badly bonded plate to pull away from the steel back. This stress is directly proportional to the thickness of the silver plate, to the diameter of the bearing, and to the square of the angular velocity. The minimum stress considered necessary to test the plating of a part is 600 psi, a figure determined by a series of tests on bearings with known areas of bad bond. The highest speed to which a given type of bearing may be whirled, is fixed by the elastic limit of the steel back. To make the test as severe as possible, parts are whirled at a speed slightly below that which permanently distorts the steel back. The double wasp front counterbalance bearing is whirl-tested at 40,000 rpm. Since the resulting stress is proportional to the silver thickness, bearings should be whirl-tested following the plating operation before any silver is removed by machining. No evidence has been found that good bond is adversely affected by this test, even at speeds which permanently deform the steel back.
"To whirl-test bearings which are plated internally, a turbine arbor was made in which several bearings were mounted at a distance from the center of rotation. The centrifugal force tended to detach the silver from the sides of the bearings nearer the center of rotation. At least two whirl tests were necessary for each group of bearings, the bearings being indexed between runs. Difficulties were encountered in whirling the massive arbor and in protecting the equipment in the event of a bond failure. Because other methods of checking inside plating became available, development of this type of arbor was suspended.
"Although whirling is a practical production test method and has been in use for some time, its production rate is low because of the time required to accelerate to the high test speeds. Also, failure of the silver on a bearing under test at these speeds may result in damage to the turbine or spindle.

Figure 19 - Brittle lacquer coated bearing after 12,000 rpm whirl test. Lacquer has cracked over area of badly bonded silver in center of bearing.
"With a brittle lacquer sprayed on the bearing prior to whirl-testing, it has been found that successful testing can be carried out at lower speeds. When the lacquered bearing is whirled at low speed, the silver on a badly bonded area lifts slightly causing the lacquer to crack [Fig. 19]. Without the lacquer, it is necessary to whirl the same bearing approximately three times faster to produce an actual silver blister. Unfortunately, available brittle lacquers are quite sensitive to oil, fingerprints, and changes in atmospheric humidity, and require a twenty-four-hour drying period. The development of a stable, quick-drying lacquer is necessary before this technique can be used in production whirl-testing."
The chisel test
Hallworth describes an interesting variation of the well-known chisel test which he calls the shear test.140 The picture in [Fig. 20] is very revealing.
"The shear test is a fast, economical method for checking bond of silver at the edge of an as-plated part. The bearing to be tested is held in a jig and a blunt chisel forced against the overhanging edge of the plate.
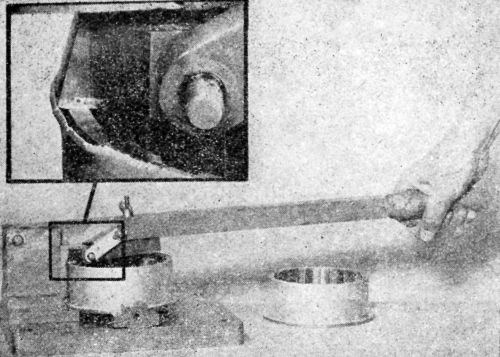
Figure 20 - Shear testing a front counterbalance bearing. Inset shows appearance of defectively bonded silver.
"The silver should be of sufficient thickness (0.008 to 0.010 in.) to provide stiffness so that a relatively large force can be applied to the silver before it is sheared. Because the chisel scratches the steel back, shear testing is suitable only for semi-finished parts."
The roll test
There are several devices described in the literature which in one way or another make use of the basic principle of shearing. Hallworth140 describes one variant which he calls the "roll test." Its applications are distinctly limited, but it should be highly effective on some parts. His remarks follow:
"Roll testing is essentially a roll peening operation suitable for use on semi-finished cylindrical parts. The device was developed by the Ford Motor Company for testing Double Wasp articulated rod pins. The pin is rotated between three rolls, two of which are power driven [Fig. 21]. By means of weights and a lever system, the third roll applies pressure to the part. After a thirty-second test, small areas of poor bond will appear as shiny smears or as broken blisters, while larger areas may be completely torn off the steel back [Fig. 22]. The roll test has been used successfully on articulated rod pins, valve tappet roller pins and counterbalance bearings."
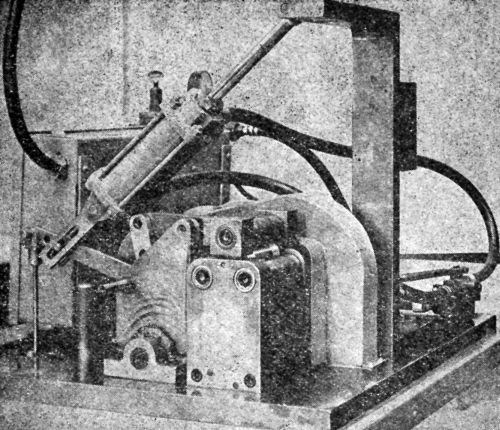
Figure 21 - Roll rig for roll-peen testing articulated rod pins. Pressure is applied to the pin by the top roll.
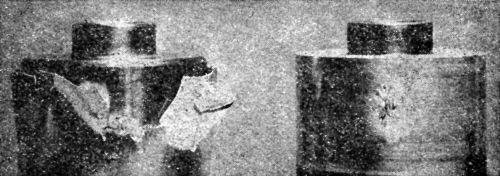
Figure 22 – Roll tested articulated rod pins having badly bonded silver.
The shot impingment test
There are several tests for adhesion which in one way or another make use of a peening operation. One of the most recent variants which has aroused much interest is the "BNF Adhesion Test" developed by A.W. Hothersall and C.J. Leadbeater.130 Considerable attention was given to this test in an earlier report on this project.
Hothersall and Leadbeater130 also describe a variant which they call the "shot impingement test." Because of an increasing interest in this test and the high opinion expressed by Hallworth of a similar method extensively studied by him (to be presented later), the work of Hothersall and Leadbeater is included here:
"Two forms of this test have been developed. In the first, a stream of shot was allowed to fall by gravity on the surface of the specimen.
"The following apparatus and methods are given by way of example:
Two pounds of iron or steel balls (diameter 0.065 in.), for example chilled iron shot of the type commonly used for 'shot-blasting', were placed in a reservoir to which was fixed an outlet in the form of a tube, 24 in.es long with ¼ in. internal bore. The shot was allowed to fall on the surface of the component to be tested. The open end of the tube was fixed at a distance of about ¼ in. from the specimen. The reservoir, tube and specimen formed an integral part of a container, in which the specimen was fixed, so that the spent shot was easily recovered for further use.
This apparatus was simple, easy to assemble and cheap, and was applicable to flat or convex surfaces, but it was not readily applicable to recessed or concave surfaces.
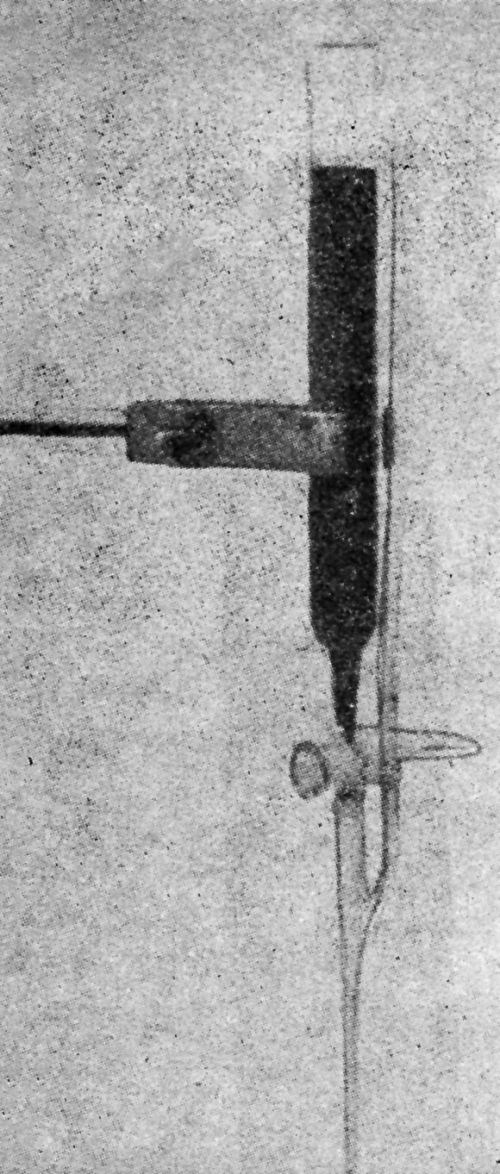
Figure 23 - Model of gun used for shot impingement test.
In a modified form of the gravity test applicable to concave or recessed areas, the shot were forced by means of a low pressure air stream through a nozzle onto the surface to be tested.
After preliminary trials, the following glass apparatus, illustrated in [Fig. 23] was made. A tube, 6-in. long, ¾ in. internal diameter, was used as the reservoir for round chilled iron shot (0.03-in. diameter approximately). One end of the tube was drawn out and attached to a tap (0.12-in. bore) which was connected to a nozzle, 3-in. long with 0.13-in. internal diameter. The reservoir was by-passed by a side tube of 0.12-in. diameter which was attached 3 in. from the open end and 3 in. from the nozzle. The total length of the apparatus was 11 in. [Fig. 24] shows the apparatus assembled ready for testing. The specimen was held by means of a universal clamp in a cylindrical glass vessel (e.g., a 5-L battery jar) which was covered by a metal plate lined with crepe rubber. The pistol was inserted through a hole in the cover plate and clamped with the nozzle near the specimen under test. Compressed air was brought to the apparatus through a rubber connection which was also connected to a pressure gauge. The reservoir was loaded with 125 g of chilled iron shot.
"The process of testing consisted in loading the reservoir with shot, connecting the air-blast to the reservoir, and then releasing the shot by opening the tap at the base of the reservoir. The by-pass tube provided an outlet for the air before the tap was opened; the stream of air emerging from it served to increase the momentum of the shot.
"Tests to determine the effect of varying the air pressure and the distance of the nozzle from the specimen were made on a piece of brass plated with a poorly adherent nickel coating, 0.0005 in. in thickness. Blisters which were readily visible were obtained with air pressures of 1-3 psi and with distances between nozzle and specimen of 1/8 to 1/2 in. With too high a pressure, the basis metal was completely denuded of deposit, while with too low a pressure, blisters did not form with the one charge of shot. With a pressure of 1-2 psi, the test could be performed in about two minutes.
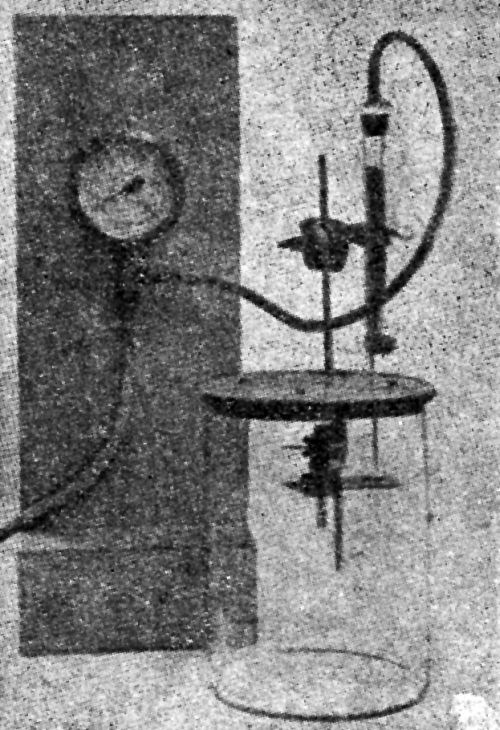
Figure 24 - Complete model of shot impingement test.
"The test was applied to a number of plated articles having coatings which were known from other tests to be poorly adherent. The basis metals were spring steel, medium carbon steel, brass and magnesium alloy. Satisfactory evidence of poor adhesion was obtained with all the specimens. A typical result is shown in [Fig. 25].
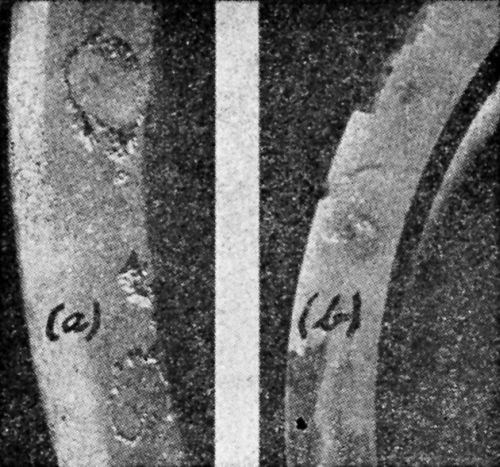
Figure 25 - Nickel on steel blistered by (a) shot impinging test, (b) BNF adhesion test.
"The shot impingement test has the disadvantage of requiring a supply of compressed air and involving difficulties in the collection of the steel shot when large objects are being tested. Thus, while giving the desired result, it appeared to be less suitable for general use than the BNF adhesion test described in this report."
The shot-peen variant
As developed by Hothersall and Leadbeater, the shot impingement test is applicable only to thin deposits on which it is successful in indicating a complete lack of bond. The same principle was used by Hallworth in one of the methods which he developed for testing thick deposits. His variant, which he calls the "shot-peen test," proved so successful that it is presented here in considerable detail. It is interesting to note, however, that he makes no claims for the method except in the complete absence of bond. He stated:140
"Shot-peen testing is one of the most recent methods devised for checking silver plate adhesion. In England, A.W. Hothersall and C.J. Leadbeater130 first used the method for spot testing very thin plates (0.0001-0.002 in.). Their apparatus, however, was not at all adaptable to heavy plates or to continuous production inspection. The test was further developed at Pratt & Whitney Aircraft for production inspection of plates up to 0.025-in. thick. At this writing, it appears to be the most adaptable test available for checking silver adhesion.
"The principle involved in the peen test is that the hammering action of the shot produces deformation of the silver. If the silver is poorly bonded and, therefore, unrestrained by the steel back, it will extend or flow and become blistered [Figs. 26 and 27]. The intensity of peening necessary to cause nonadherent silver to blister varies with the plate thickness, thin plates requiring less than thick plates. (Figure 16)(not shown here) shows the approximate intensity required to raise blisters on silver plated steel where the adhesion is slight. Standard Almen "A" strips are used to measure the peening intensity.141
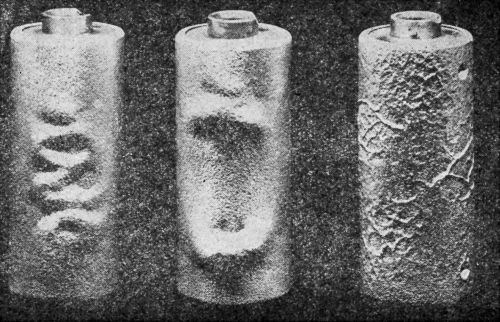
Figure 26 - Shot-peen tested articulated rod pins with defectively bonded silver plate.
"Parts are peen tested in a standard air operated cabinet of the type used for shot-peening steel engine parts. Although glass beads, sand, and steel shot were effective in revealing lack of adhesion of plate, best results have been obtained with malleable iron shot. Masking is necessary to prevent peening of the unplated areas, and small oil holes must be plugged to keep shot from jamming in the holes. The shot should be kept clean and free from broken particles which may become imbedded in the silver.
"The effects of peen testing a silver-plated bearing are two-fold: (1) the silver surface becomes a region of small peaks and craters (Fig. 28] and (2) slight work-hardening occurs to a depth of several thousandths of an inch.
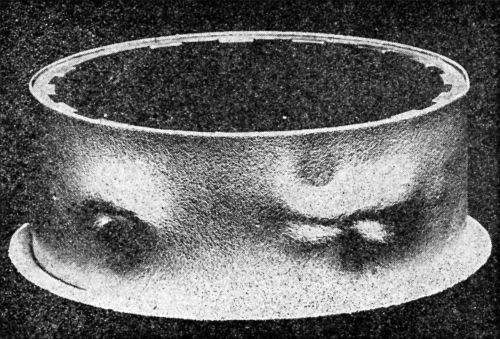
Figure 27 - Shot-peen tested part with two areas of bad bond.
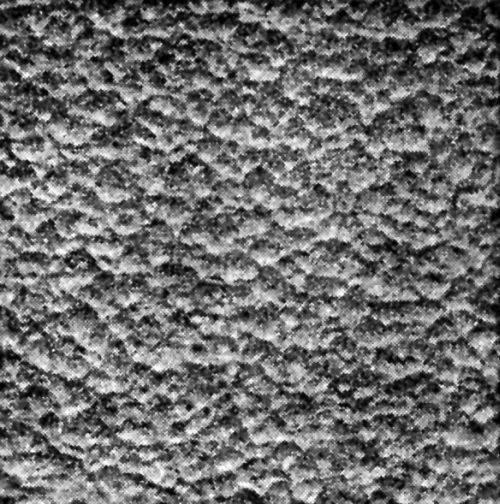
Figure 28 - Appearance of surface of shot-peen tested silver plate. About 100×.
"Parts are shot-peen tested following the plating operation, in which customary practice has always been to electroplate silver at least 60% thicker than the finished dimensions require. The surplus silver is removed when the bearing is machined to size. For example, a counterbalance bearing plated with 0.021-in. silver would have 0.010-in. silver machined off during finishing operations, more than enough to insure the elimination of all surface roughness and most of the work-hardened layer caused by peening. Shot-peening is the most adaptable of all the methods described in this paper, in that it may be used to test the entire silver-plated surface of any part regardless of its size or shape, provided only that the surface can be reached by a stream of air propelled shot. It is, however, limited to use on semi-finished parts. No investigation has been made of its effectiveness under any condition other than complete lack of bond."
Other tests
Hallworth140 makes the following interesting remarks concerning other methods:
"A number of other testing methods have been tried with little success. On the theory that a drop in silver resilience might accompany a bad bond condition, a series of tests were made with the Scleroscope. No correlation was found. Recently, however, another laboratory has reported some success in testing adhesion of babbitt by measuring the rebound stress in an air-operated repeating hammer. Physical properties, unsuccessfully utilized in an endeavor to find improved adhesion tests, include cross sectional electrical resistance, thermal conductivity and differential thermal expansion and contraction."
Final conclusion
To me the final conclusion of Hallworth, based upon his extensive laboratory search, concerning the ideal method for measuring bond strength and the practical value of methods for specific purposes, is most interesting. It is the same conclusion that I have reached as a result of my extensive survey of the published literature and the personal experiences of those actively engaged in the plating industry.
The conclusion of Hallworth140 follows: "The ideal bond testing method which instantly and non-destructively indicates adhesive strength has not yet been devised. However, by use of the methods outlined, silver plated engine parts can be produced with assurance that those which pass the test will give satisfactory performance."
Acknowledgement
The research reported herein was conducted under the supervision of Mr. C.E. Heussner, Materials Engineer, Chrysler Corporation, and Chairman of the Research Committee; Dr. R.M. Wick, Research Engineer, Bethlehem Steel Corporation, and Dr. Louis Weisberg, Consulting Chemist, New York City, Chairman and Vice Chairman respectively of the Research Directing Sub-Committee; and the following Project Sub-Committee: Dr. R B. Salton-stall (Chairman), The Udylite Corporation; Mr. F.C. Mesle, Oneida Ltd.; and Mr. E. Hahn, Ainsworth Mfg. Co.
Related Content
Zinc Phosphate: Questions and Answers
Our experts share specific questions about zinc phosphate and pretreatment
Read MoreUnderstanding and Managing White Spots on Anodized Aluminum
Having trouble with spotting defects when anodizing? Taj Patel of Techevon LLC offers a helpful overview of the various causes of white spots and potential solutions.
Read MoreCalculating the Cost of Powder Coating
How can you calculate the cost of powder coating a component if you only know its surface area? Powder coating expert Rodger Talbert has the answer.
Read MoreConveyors and Paint Systems
Choosing the right conveyor system, coating technology, and ancillary equipment.
Read MoreRead Next
Episode 45: An Interview with Chandler Mancuso, MacDermid Envio Solutions
Chandler Mancuso, technical director with MacDermid Envio discusses updating your wastewater treatment system and implementing materials recycling solutions to increase efficiencies, control costs and reduce environmental impact.
Read MoreA ‘Clean’ Agenda Offers Unique Presentations in Chicago
The 2024 Parts Cleaning Conference, co-located with the International Manufacturing Technology Show, includes presentations by several speakers who are new to the conference and topics that have not been covered in past editions of this event.
Read MoreDelivering Increased Benefits to Greenhouse Films
Baystar's Borstar technology is helping customers deliver better, more reliable production methods to greenhouse agriculture.
Read More


