For Quality Spray Painting, Remember the Fundamentals
Good spray painting—not unlike a good golf game—is accomplished by means of proper procedures and motions.
Good spray painting—not unlike a good golf game—is accomplished by means of proper procedures and motions. Though most finishers are taught the fundamentals of quality spray painting early in their career, many adopt bad habits over the course of time. By occasionally revisiting the fundamentals, finishers can not only produce a higher quality finish but also reduce waste—saving time and money.
Six to ten-inch distance
The spray gun stroke should be made by moving the gun parallel to the work and at a right angle to the surface. The distance from the gun to the work should be from six to ten inches for most coatings. The relation between gun distance and stroke speed is quickly understood and the average operator will move the gun in or out as needed to permit a comfortable speed while depositing a full coating of material. Holding the gun too close to the work will result in more paint being deposited on the surface, which could cause sags in the finish. In order to prevent these sags, the operator would have to move the gun faster. Conversely, holding the gun too far away from the work causes dry spray and excessive spray dust.
Overlap
Work with straight uniform strokes moving the gun across the surface so that the spray pattern overlaps the previous stroke by 50% (see Figure 1). Failure to maintain a 50% overlap can result in the occurrence of striping (sometimes referred to as “zebras”), excessive paint use and inconsistent film thickness.
Get the “trigger” feel
The trigger controls the action of the gun and the operator should learn to use the trigger during each stroke. To avoid building up the material at the ends of each stroke, the correct procedure is to begin the stroke, then pull the trigger, release it at the edge of the work before the stroke is completed.
Keep the gun perpendicular to the surface
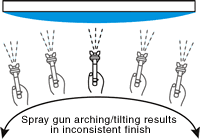
The obvious faults of arcing the stroke (turning the wrist or elbow at the end of the pass of paint) or tilting the gun are shown in Figure 2. In certain types of work it is often necessary to tilt the gun but this should be avoided on surfaces where the correct gun position is possible. Another important factor is to hold the gun perpendicular to the surface being sprayed. Do not “heel” or “toe” the spray gun.
Establish Standards
Establish standards that detail acceptable ranges for important paint line variables. These include fluid and air pressures, nozzle combinations, coating temperature and viscosity. Once these baseline values are established, they should be monitored on a regular basis to ensure consistent results.
| Faulty Spray Problems? Here’s How to Correct Them… | |
| CAUSE Dried material in gun’s side port restricts passage of air through port on one side. Results in full pressure of air from clean side of port in fan pattern in direction of clogged side. |
REMEDY |
| CAUSE Dried material around the outside of the fluid nozzle tip restricts the passage of atomizing air at one point through the center ring opening of the air nozzle. This faulty pattern can also be caused by loose air nozzle or a bent fluid nozzle or needle tip. |
REMEDY If dried material is causing the trouble, remove air nozzle and wipe off fluid tip using rag saturated with thinner. • Tighten air nozzle. • Replace fluid nozzle or needle if bent. |
| CAUSE A split spray pattern (heavy on each end of a fan pattern and weak in the middle) is usually caused by: • Atomizing air pressure too high. • Attempting to get too wide a spray with this material. • Not enough material available. |
REMEDY • Reduce air pressure. • Open material control to full position by turning to left. At the same time turn spray width adjustment to right. This reduces width of spray but will correct split spray pattern. |
| CAUSE • Air entering the fluid supply. • Dried packing or missing packing around the material needle valve, which permits air to get into fluid passageway. • Dirt between the fluid nozzle seat and body or a loosely installed fluid nozzle. • A loose or defective swivel nut, siphon cup or material hose. |
REMEDY • Be sure all fittings and connections are tight. • Back up knurled ring. Place two drops of machine oil on packing. Replace nut and finger tighten. In aggravated cases, replace packing. • Remove air and fluid nozzles and clean back of fluid nozzle and needle seat in the gun body using a rag saturated with thinner. • Replace and tighten fluid nozzle using wrench supplied with gun. • Replace air nozzle. • Tighten or replace swivel nut. |
| CAUSE A fan spray pattern that is heavy in the middle or a pattern that has an unatomized “salt and pepper” effect indicates that the atomizing air pressure is not sufficiently high or there is too much material being fed to gun. |
REMEDY • Increase pressure from air supply. Correct air pressures |
Read Next
Episode 45: An Interview with Chandler Mancuso, MacDermid Envio Solutions
Chandler Mancuso, technical director with MacDermid Envio discusses updating your wastewater treatment system and implementing materials recycling solutions to increase efficiencies, control costs and reduce environmental impact.
Read MoreA ‘Clean’ Agenda Offers Unique Presentations in Chicago
The 2024 Parts Cleaning Conference, co-located with the International Manufacturing Technology Show, includes presentations by several speakers who are new to the conference and topics that have not been covered in past editions of this event.
Read MoreEducation Bringing Cleaning to Machining
Debuting new speakers and cleaning technology content during this half-day workshop co-located with IMTS 2024.
Read More


.jpg;maxWidth=300;quality=90)


