Transition from a Simple Auxiliary Anode to a Fully-developed Conforming Anode System for Plating
This paper demonstrates that the use of an elaborate CAE designed conforming anode system enables plating complex exterior automotive part designs within specification. It will be shown that the increased fixed and variable production costs that are unavoidable when operating an elaborate conforming anode system can be partially earned back by a reduction in metal consumption, and by an increased capacity due to shorter plating times.
The presentation is a two-part discussion of the use of computer-aided engineering in designing a conforming anode for chromium plating of parts with complex geometries.
Introduction and design challenges presented by LaRon Brown, Ford Motor Company
The aesthetics of automotive design can challenge the capability of plating manufacturing. The design of a part is critical to the overall manufacturing feasibility and part performance. Both design and engineering must determine if a particular design can be plated to specification. Prior to the advent of computer-aided engineering (CAE) software, suppliers identified design challenges based on experience more than anything else. Prototype tooling and plating racks were developed after the molding die was cut. Thus, it was only after a part was molded that a design concern was discovered, such as low plate thickness or other shortcomings.
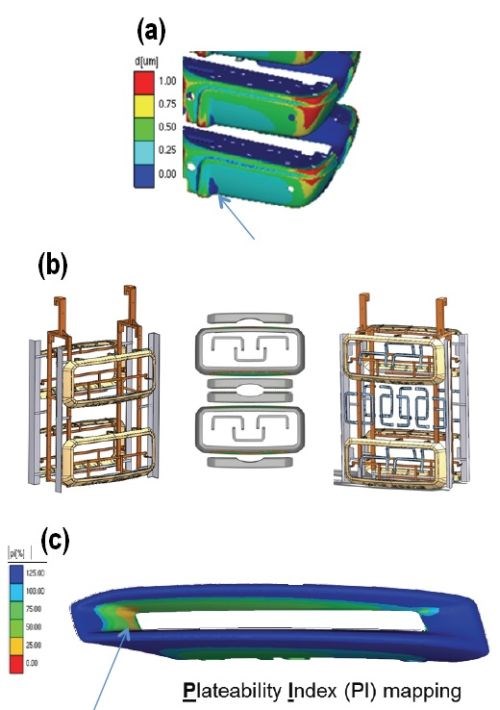
Figure 1 - Examples of design problems addressed by CAE software.
Elsyca NV, in Leuven, Belgium, has pioneered the development of CAE software in electrochemical process modeling. Their work extends to surface finishing and electrochemical manufacturing, as well as corrosion design engineering, cathodic protection and AC mitigation.*** This technology provides accurate verification of design constraints through computer simulation rather than subjective experience.
CAE software offers plating simulation technology which enables upfront consideration of design related manufacturing issues, as shown in Fig. 1. The software can be used to support supplier process quality and improve warranty. In Fig 1(a), an area (arrow) is found to have under-spec chromium thickness, which can be corrected by redesign, etc., to ensure in-field service with no corrosion. Figure 1(b) shows CAE software used for rack optimization. Further, cost savings can be gained in the design process by identifying areas of excessive plate thickness, as in Fig. 1(c).
Figure 2 shows another example where part design of a B-side flange takes the plating process into account, long before the first part is manufactured. At the left, the design concept involves a flange with a 300-mm depth, and CAE analysis shows that the nickel thickness would be below the spec of 21 μm over 90% of the part area. On the right, redesign to a shallower 88-mm depth is shown to meet the nickel thickness specification, with minimal plate thickness coverage increasing over 75% of the part.
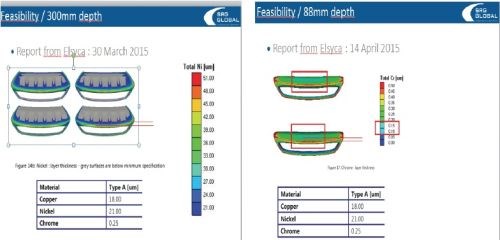
Figure 2 - Plate thickness analysis of a B-side flange in the design stage, showing the effect of flange depth on nickel thickness.
An example of rack optimization is shown in Fig. 3. Here, six grilles are arranged on the rack, with the outer surfaces facing out in a convex pattern, as seen in the top view (left). The anodes are arranged in a curved line opposite the rack. The table (right) shows the computer-calculated thickness for positions 1 and 2 on the rack, at the P-points, i.e., those critical quality points where the thickness spec must be met. The red areas in the table indicate where the specs are not met by the anode configuration. Adjusting the geometry can be done onscreen to correct these potential shortcomings.
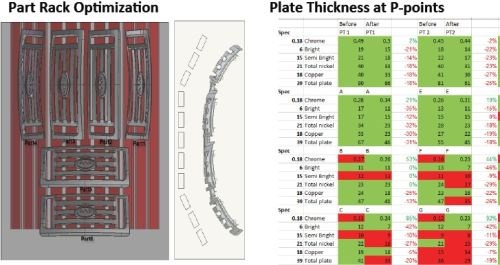
Figure 3 - Analysis of plate distribution on individual grilles for optimization between the rack and the anode configuration in the plating tanks.
Using Conforming Anodes to Improve Plate Thickness presented by Bart Van den Bossche, Elsyca NV
What follows is a case study of the use of conforming auxiliary anodes in the Cu-Ni-Cr of a truck grille. The grille is similar to those illustrated previously in Fig. 3. The front of the grille is a Class A surface, i.e., one that is visible in the product and thus must be of high efficiency and quality. The back of the grille is a Class C surface, i.e., one that is not visible and can have tool marks and other surface disparities that are not a factor in product appearance.† However, plated metal is deposited on the grille backside, albeit a smaller amount, because the anodes are placed opposite the front surface.
A study was first made of a grille produced via the “default” plating process, i.e., with no auxiliary anodes, and the main tank anodes fed by the main rectifier. The production cycle is as follows (Table 1), where J is the average current density, E is the excess plating factor to account for the deposit on the Class C backside surface and I is the total imposed current:
Table 1 - Default plating process conditions
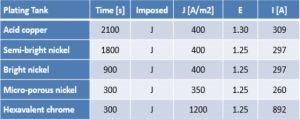
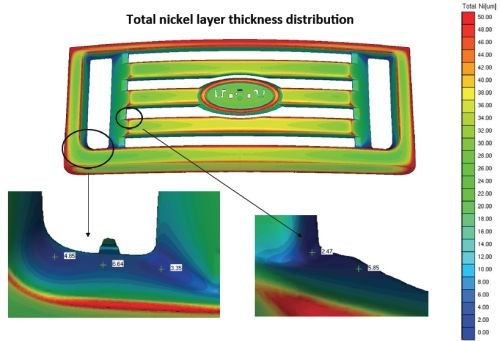
Figure 4 - Total nickel thickness distribution under default processing conditions.
Under these conditions, the CAE software developed the nickel thickness distribution is shown in Fig. 4, where 87.9% of the Type A surface was found to be above specification. Corresponding figures for copper and chromium were 86.3 and 97.3%, respectively. The nickel deposit was below specification in the fillet areas circled in the figure and shown in the enlargements. Also, the buildup on the outer corners was quite high, raising concern over nodular nickel growth in these areas.
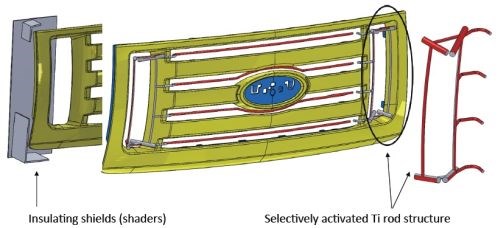
Figure 5 - CAE optimized anode and shield system.
A conforming auxiliary anode system was then developed and optimized. The result, shown in Fig. 5, uses insulating shields to protect the corners and reduce the risk of nodule nickel growth. A selectively activated titanium rod structure was used to increase current to the areas otherwise subject to low current density. The operating conditions are outlined in Table 2, where Imain and Iaux are the total imposed currents delivered, respectively, by the main rectifier through the main tank anodes, and the auxiliary rectifier through the conforming anode system.
Table 2 - Process conditions for the CAE optimized conforming anode system.
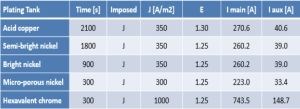
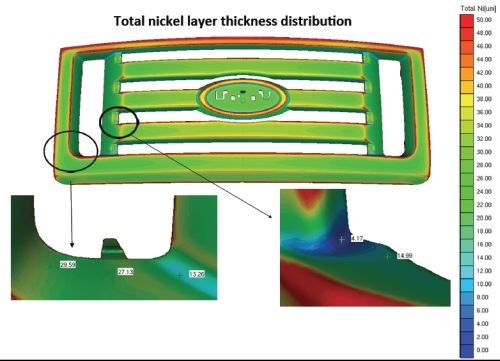
Figure 6 - Total nickel thickness distribution with the CAE optimized conforming anode system.
With the CAE optimized anode system, the computer-determined nickel thickness distribution is shown in Fig. 4, where 87.9% of the Type A surface remained above specification. The nickel deposit was considerably improved in the fillet areas circled in the figure and shown in the enlargements. Also, the risk of nodular buildup on the outer corners was considerably reduced. The CAE designed conforming anode system drastically enhanced the throwing power.
Some fillet areas (11%) were found to be above half-thickness specifications and hence would probably pass salt spray tests. A few fillets (<1%) still remained below half-thickness specifications, but could be mitigated by part redesign, e.g., increasing the fillet radius.
In terms of economics, additional handling of the front side conforming anode system would cause a significant increase of the variable cost. The rack hardware (fixed cost) would also become several times higher than the cost for racks without auxiliary anodes.
The copper and nickel material costs savings are hard to calculate because the default case does not meet specifications for about 25% of the Class A surface. As a rough estimate, it can be stated that the plating time of the nickels in the default case would need to be 50% longer, and hence 120 g of additional nickel is deposited, corresponding to a cost of about US $1 to 2 per part.
In summary, the examples presented here show the value of the CAE software of today to automotive design. The case of its use in automotive decorative plating is clear. With the ability to calculate plate distribution before tooling and prototype parts are even produced, design is immeasurably enhanced.
About the authors / presenters
LaRon Brown is Decorative Finishes Technology Specialist at Ford Motor Company, Dearborn, Michigan. She has a Six Sigma Black Belt Certification, SMI in paint and chromium plating processing, material development, plastics injection molded technologies and corrosion protection. She has diverse professional experience in the automotive industry and in injection molding processes in particular. She also has technical support responsibility for exterior chromium parts, development and CAE tools associated with the implementation of exterior decorative finishes.
Dr. Bart Van den Bossche graduated from the Vrije Universiteit Brussel (VUB, Belgium) with a M.Sc. degree in Metallurgical Engineering in 1991. He received a Ph.D. in Electrochemical Engineering in 1998. Bart is Elsyca’s Engineering Manager for Surface Finishing projects. Bart has been active in electrochemical process computer modeling for nearly 25 years, as reflected in a series of peer reviewed papers. In addition, he has a long track record as a consultant for electrochemical cell and tooling design in the plating, electroforming and electrochemical machining industry. As Elsyca co-founder, Bart is in charge of several Elsyca consulting projects.
*Compiled by Dr. James H. Lindsay, NASF Technical Editor
** Corresponding authors:
|
LaRon M. Brown, Technical Specialist Decorative Finishes Application and Development Body Exteriors - Core Ford PDC 2B-C71 Ford Motor Company 20901 Oakwood Blvd. Dearborn, MI 48124 Phone: 313-594-1509 Fax: 313-621-4541 E-mail: lbrow102@ford.com |
Dr. Bart Van den Bossche Elsyca NV Vaartdijk 3, Bus 603 B3018 Wijgmaal Belgium Phone: +32 16 47 49 60 E-mail: bart.van-den-bossche@elsyca.com |
*** B. Van den Bossche, et al., Plating & Surface Finishing, 95 (5), 35-38 (2009); 95 (10), 46-54 (2009); 95 (12), 24-35 (2009); 96 (9), 58-64 (2010) (these and earlier references available online at NASF/NCMS Surface Technology Resource Center Library: www.sterc.org).
†A Class B surface is one that is visible but where appearance is less important, such as interior surfaces in glove boxes, etc.
Related Content
Nanotechnology Start-up Develops Gold Plating Replacement
Ag-Nano System LLC introduces a new method of electroplating based on golden silver nanoparticles aimed at replacing gold plating used in electrical circuits.
Read MoreProducts Finishing Reveals 2024 Qualifying Top Shops
PF reveals the qualifying shops in its annual Top Shops Benchmarking Survey — a program designed to offer shops insights into their overall performance in the industry.
Read MoreHow to Maximize Nickel Plating Performance
The advantages of boric acid-free nickel plating include allowing manufacturers who utilize nickel plating to keep up the ever-changing regulatory policies and support sustainability efforts.
Read MoreTroubleshooting Alkaline Zinc
One of the most common problems that can arise when plating with alkaline zinc is an imbalance of brightener in the solution. In this helpful Ask the Expert article, Chad Murphy of Columbia Chemical discusses how different zinc metal concentrations and brightener concentrations can impact efficiency.
Read MoreRead Next
Education Bringing Cleaning to Machining
Debuting new speakers and cleaning technology content during this half-day workshop co-located with IMTS 2024.
Read MoreA ‘Clean’ Agenda Offers Unique Presentations in Chicago
The 2024 Parts Cleaning Conference, co-located with the International Manufacturing Technology Show, includes presentations by several speakers who are new to the conference and topics that have not been covered in past editions of this event.
Read MoreMasking Solutions for Medical Applications
According to Custom Fabricating and Supplies, a cleanroom is ideal for converting, die cutting, laminating, slitting, packaging and assembly of medical-grade products.
Read More


