Mastering Uniformity Through Surface Prep Standardization
By standardizing surface preparation processes and adopting surface energy measurement, a company can achieve uniformity, quality and cost reduction.
Surface preparation is a critical step in ensuring product performance, appearance and durability. However, variations in surface preparation processes can lead to inconsistencies, inefficiencies and compromised quality. By leveraging best practices, advanced technologies such as surface energy measurement and effective change management strategies, manufacturers can achieve uniformity, high-quality products and cost reduction. In fact, programs from automotive to aerospace manufacturing have saved 3% to 10% in rework by doing so.
The importance of standardization
Standardization offers numerous advantages to manufacturers, including:
- Reduced program cost. By ensuring multiple sites are performing the same standard surface preparation, measurement and monitoring, programs reduce costs that are incurred through human-induced variation.
- Consistency. Standardizing surface preparation processes ensures the same procedures are followed across all production lines and facilities. This eliminates variations that can lead to product defects, rework and customer dissatisfaction.
- Efficiency. Standardized processes optimize resource allocation, reduce waste and streamline operations. This leads to improved productivity and cost savings over time.
- Quality control. Uniformity in surface preparation processes enhances quality control mechanisms by enabling accurate monitoring, measurement and corrective actions. Deviations from standards become more noticeable and can be addressed promptly.
- Training and skill enhancement. A standardized process facilitates training and skill development for operators and technicians as they become proficient in executing a single, well-defined procedure.
Quality assurance
Concerns about compromising quality when implementing standardization can be addressed by implementing collaborative process development, best practices, performance metrics and continuous improvement.

Standardizing surface preparation processes using surface energy measurement ensures that every surface is treated consistently and optimally. All photos courtesy of Brighton Science
Involving cross-functional teams, including engineers, quality control experts and operators in the development of standardized processes, ensures that quality considerations are embedded into the process from the outset.
Standardization should be based on industry best practices and quality standards. By establishing clear performance metrics to assess standardized processes, regular monitoring and data-driven analysis help identify areas of improvement and ensure quality remains a priority.
When a culture of continuous improvement is implemented where feedback from operators and quality control teams is solicited, it enables adjustments to the standardized process based on real-world insights.
Leveraging advanced technologies
Modern technologies play a crucial role in ensuring standardized surface preparation processes maintain or enhance quality. Automated systems ensure consistent execution of surface preparation processes, minimizing human error and variability. Incorporating advanced measurement technologies guarantees accurate assessment of surface quality, enabling immediate corrective actions if deviations occur.
It is critical to use data analytics to monitor process performance, detect trends and predict potential quality issues before they impact product integrity. Digital simulations can help in optimizing and validating standardized processes before implementation, reducing the risk of quality-related setbacks.
Changing management strategies
Implementing standardized surface preparation processes requires effective management to address resistance and ensure successful adoption. Transparently communicating the rationale behind standardization and its benefits for both the organization and individual roles is important.
Also, it is advised to roll out standardized processes incrementally, enabling teams to adapt and learn gradually without overwhelming them. When employees are involved in the standardization process to gain their buy-in and input, it fosters a sense of ownership for them.
It is also critical to invest in comprehensive training programs to equip employees with the skills and knowledge needed to execute standardized processes effectively.
Measuring surface energy
By adopting consistent methods of measuring surface energy and tailoring preparation processes to specific requirements, companies can streamline
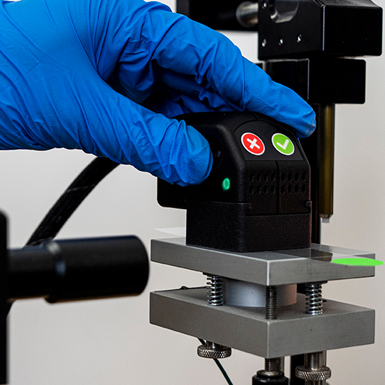
BC Mobile handheld units from Brighton Science measure contact angle and collect surface data not only in the lab but wherever is convenient.
operations, enhance product performance and ultimately save money through reduced material waste, rework and increased efficiency.
Brighton Science offers a subscription-based service that includes hardware and software that enables testing to assess surface readiness and share information across processes, functions and teams. According to the company, BConnect is easy to set up and operate and is completely customized for the customer’s goals.
The service standardizes surface preparation through the measurement of energy via water contact angle. Contact angle measurement involves depositing a droplet of a known liquid onto the surface and measuring the angle between the droplet, the surface, and the liquid-air interface. The contact angle provides insights into the surface’s wettability and surface energy. BC Mobile handheld units from Brighton Science measure this parameter and collect surface data not only in the lab but wherever is convenient.
Surface energy is the amount of energy required to create a new surface area on a material. It plays a crucial role in determining how well coatings,
Optimal surface preparation results in improved product quality, performance and durability.
adhesives and other materials adhere to a surface. A mismatch between surface energy values can result in poor wetting, reduced adhesion and increased likelihood of defects such as delamination or peeling.
Surface tension measurement quantifies the cohesive forces of a liquid that determine its ability to spread across a surface. By comparing the spreading behavior of liquids with different known surface tensions, the surface energy of a material can be estimated.
Inverse Gas Chromatography (IGC) is another surface energy measurement technique which involves exposing a material to a series of different gases and analyzing the interaction between the gas molecules and the material’s surface. This technique provides information about the material’s surface energy, polarity and specific interactions. However, it is impractical for production environments.
Benefits of standardization
Standardizing surface preparation processes using surface energy measurement ensures that every surface is treated consistently and optimally. This leads to predictable adhesion performance, reducing the likelihood of adhesion failures and defects. Inconsistent surface preparation can lead to higher material consumption due to increased need for rework or rejection of defective products. Standardization minimizes these issues, reducing material waste and associated costs.
Standardization enables the development of streamlined and optimized surface preparation protocols. This increases process efficiency by reducing the time required for trial-and-error adjustments and minimizing production delays. Optimal surface preparation results in improved product quality, performance and durability. Products with superior adhesion characteristics are less likely to fail prematurely, leading to reduced warranty claims and associated costs.
Standardized processes are also easier to teach, learn and transfer across teams and locations. A company should consider replacing water break testing with objective metrics that are easily documented and shared across the company.
In the automotive industry, standardizing surface preparation processes using surface energy measurement has led to a significant reduction in production costs. By implementing consistent protocols across multiple manufacturing plants, one company has reduced rework by 30%, has saved an estimated $2 million annually in material costs, and has improved overall product quality.
Related Content
Attention to Measurement
English vs. Metric — which should you use? Ron Kinne of Haviland Enterprises Inc. explains why you need a firm understanding of both for measuring various aspects of plating processes.
Read MoreAESF Heritage: The 2002 Hydrogen Embrittlement Seminar No. 4: Hydrogen Embrittlement – A Personal View
This is last of four papers presented during AESF Week 2002 at the Rosen Center in Orlando, Florida on January 30, 2002, as part of the Hydrogen Embrittlement Seminar. This paper presents a comprehensive overview of the research into hydrogen embrittlement at the turn of the century. The full paper on this work can be accessed and printed at short.pfonline.com/NASF24Sep4.
Read MoreSUR/FIN 2023: Capsules from the Technical Sessions I: Emerging Technologies
SUR/FIN 2023 in Cleveland this past June was a resounding success. Due to the efforts of the Technical Activities Committee, ably led by Bill Nebiolo this year, an outstanding program of technical presentations was offered. What follows are summaries of selected presentations from the Emerging Technologies sessions. Additional coverage will be provided in this space in the coming months. The full report can be accessed and printed at short.pfonline.com/NASF23Aug1.
Read MoreNASF/AESF Foundation Research Project #121: Development of a Sustainability Metrics System and a Technical Solution Method for Sustainable Metal Finishing - 15th Quarterly Report
This NASF-AESF Foundation research project report covers the twelfth quarter of project work (October-December 2023) at Wayne State University in Detroit. In this period, our main effort focused on the development of a set of Digital Twins (DTs) using the Physics-Informed Neural Network (PINN) technology with application on parts rinsing simulation.
Read MoreRead Next
Preparation for Electroplating
What you should know about cleaning and electrocleaning.
Read MoreDeveloping Standardized Testing for Trivalent Chromium Thickness: A Progress Report
The industry shift toward trivalent decorative chromium plating and away from hexavalent highlights a need for testing standards. As Chair for ASTM B08.10 Subcommittee on Test Methods for Metallic and Inorganic Coating, Mark Schario is leading the committee’s focus on developing standardized testing for trivalent chrome thickness. This presentation provides information on the initiative, testing methods and variables, initial data on thickness comparison and alloy composition, and summary of input and extended lab testing.
Read MoreA ‘Clean’ Agenda Offers Unique Presentations in Chicago
The 2024 Parts Cleaning Conference, co-located with the International Manufacturing Technology Show, includes presentations by several speakers who are new to the conference and topics that have not been covered in past editions of this event.
Read More


.jpg;maxWidth=300;quality=90)


