Parts Cleaning Goes Under the Microscope
Increase productivity through automated cleanliness control of manufactured parts.
The evolving nature of the automotive industry has resulted in stricter standards concerning cleanliness in components such as brake systems, fuel injector nozzles, power steering pumps and fluid hoses.
And because the cleanliness of a part’s surface is critical in making coatings adhere for final product finishing, an important part of this challenge is to develop a system to monitor adequate automotive part cleanliness.
Many methodologies provide only one parameter of diagnostic information, such as bulk particle weight or particle size. And although this can give clues as to what’s occurring in the manufacturing process, more often a single parameter is inconclusive, leaving companies with limited data to investigate the source of contamination.
But what if a complete diagnosis could be obtained with one test? Better yet, what if this test could be performed at the production line, and not require an off-site lab?
New analyzers on the market today are using electron microscopes to provide rapid, automatic identification and detection for quality control and clues to the source of the contamination.
Importance of Clean
Particles found in automotive mechanisms can be a result of numerous sources—either intrinsic or extrinsic to that source.

Newer analyzers on the market use electron microscopes for quality control and clues to the source of the contamination.
Intrinsic particles can originate in several ways: fragments of the mechanism material left by the manufacturing process; decomposition or erosion of friable components or structures (such as residual machining burrs); or wear particles produced by friction within the operating mechanism.
Extrinsic particles might include manufacturing residue from fabrication tools or processes, lubricant contaminants, or materials ingested from the environment.
Monitoring cleanliness in automotive part manufacturing is valuable in that it reduces field failure rates that occur in the first 10,000 miles. Recently, a top five automotive manufacturer reduced its field failure rates up to 75 percent in one year as a result of monitoring and making appropriate changes.
Cleanliness also becomes critical for surface finishing of these same parts since it is imperative that they are free of foreign debris in order to allow the coating chemistries to adhere to the substrate. Any chemical interference that does not allow the coating to reach its maximum potential can cause cracking, peeling or worse: failure of the coating to protect the part itself. Quality-conscious manufacturers find it increasingly necessary to ensure the critical cleanliness of their parts and processes as potential contamination sources increase and tolerances in engines decrease.
Since monitoring cleanliness has proven to be so beneficial for controlling costs, the International Organization of Standards developed the standard 16232-07. Adhering to standardized regulations creates mutual understanding between manufacturers and customers. European and American manufacturers led the automotive industry in adherence to the ISO mandate, resulting in a surge of innovative techniques for determining the cleanliness of manufactured automotive components.

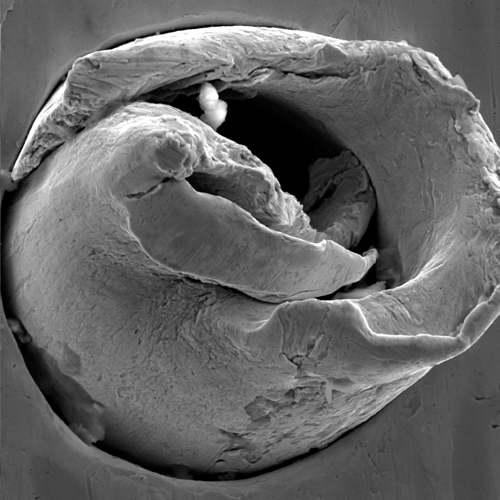
A scanning electron microscope is used to show a particle in the nozzle of a fuel injector part.
Current Methods
There are many options currently available to monitor particles on the surface of automotive components. Here’s a rundown of the features and benefits of each approach:
Bulk or Gravimetric Testing
Bulk or gravimetric measurements have long been used for quantifying the presence of foreign material by measuring the weight of a filter before and after a part is flushed. Typically, the part or assembly is flushed and the residue is collected on a pre-weighed filter. Drying and weighing the loaded filter then establishes the total mass of collected debris. A common limitation to this method is that it only provides a gross or undifferentiated measure of the amount of material that is present. The weight or volume of the filtered material sheds no light on the size, shape, or composition of particles that might be present. But the latter is precisely the kind of information that is required by the engineer who is trying to improve a design or control a process. Thus, though bulk methods are typically quick and simple to implement, they simply do not provide the information required to understand and improve manufacturing quality processes and prevent future issues.
Particle Counters
An improvement in many cases from bulk methods are particle flow-counters that operate by dispersing the particles in a fluid and then passing them through a flow cell, where their passage is detected by an optical or laser sensor. Such devices can accurately count thousands of particles per second, and often provide a graph of particle size distributions. However, particle counters do have limitations. Most counters assume the particles are perfectly round. This, of course, is a poor assumption since particles found on component surfaces are rarely perfectly round. And because particle counter manufacturers will report out an equivalent diameter using various algorithms, comparing particle size reported across different manufacturers can be difficult or inconclusive. Particle counters can also experience false positives, which are typically a result of air entrapment or water in the oil. So although these units are very useful for monitoring trends of established particle populations, they are less useful for understanding unknown or changing particle populations that could be a clear sign of changes in surface contamination on an automotive component.
Optical Microscopes
Using an optical microscope, individual particles can be observed and estimated for size by an operator. This kind of manual particle sizing is simple to perform, but its tedious and time-consuming nature is an obvious limitation. In recent years, optical microscopes have become computerized by equipping the microscope with a camera and a motorized stage. By interfacing both camera and stage to a computer equipped with appropriate software, it’s now possible to automate the particle detection/sizing process, routinely measuring distributions consisting of thousands of particles and sorting them by size and shape.
SEM/EDX
While optical technology can provide particle size and shape, what if you want to know the source of the particles?
Knowing the source of the particles allows for immediate process correction, which ultimately prevents field failure. Knowing the source also can provide clues as to the possible particle chemistries preventing coatings from adhering to parts. What if all of this can be done—particle size, shape and chemistry—automatically, in minutes, right on the production floor?
Historically, scanning electron microscopes (SEMs) have been known as manual imaging instruments, which require qualified users in specialized environments. Recent advances in SEM technology have provided more compact, easy-to-use instruments applicable to a more industrial setting. The SEM, when combined with an energy dispersive x-ray spectroscopy (EDX) detector, has the ability to perform quick morphological and compositional measurements.
An SEM not only measures and records the size and shape of a particle; it can also determine the elemental makeup of the particle, thereby allowing the user to monitor the sources of chemical contamination and not just rely on size and shape of the particles.
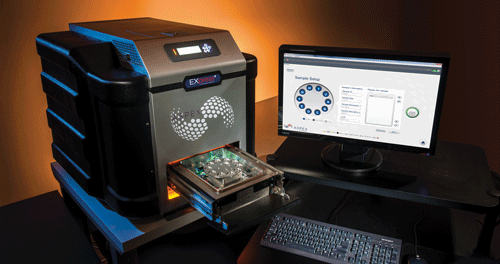
An automated SEM/EDX cleanliness control system uses a single hardware control configuration for both the SEM and EDX components, making it more compact and robust for industrial automotive applications. Simplifying the system even further, the instrument is set up to operate via preprogramed recipes that allow the user to walk-up to the system, load the samples, initiate the run and walk away, only to come back later to sample reports. All calibration and instrument operation is automated, which allows users to load the samples and start the analysis in only four mouse clicks.
Testing Standards
The sample preparation for SEM/EDX testing is the same as standard automotive sample preparation techniques used for gravimetric or optical analysis. A 25- or 47-mm-filter is used to collect particles from a component that is flushed. Once the filter is dry, it is loaded into the instrument and, instead of capturing a high resolution image of the frame, the analyzer moves the beam across the full field through a sequential array of fairly coarse steps—constantly searching for a particle of interest and moving to the next field.
A particle is detected when the contrast intensity level of the particle exceeds the predefined threshold background set for each analysis activity. This particle-sizing sequence initiates a complex feature algorithm to measure the particle’s morphological characteristics. After the particle is detected and measured, an energy dispersive X-ray spectrum is acquired, and chemical composition of the particle is obtained. All of this is done automatically, counting thousands of particles in mere minutes, and providing the size, shape and chemistry of every particle.
User-defined rules place them into a “class.” For instance, if the user is interested in only stainless steel particles, a rule can be put in place to classify all particles with stainless steel content. Those particles will be then grouped and reported out in the assigned class. If needed, the particles can be relocated and further examined.
Smaller, Lighter, Faster
As consumer and engineering demands for “smaller, lighter and faster” continue to increase, so will the need to quickly determine sources of contamination in parts with ever-lower thresholds for impurities.
Although traditional methods of cleanliness monitoring can often provide bulk particle amounts, they don’t offer clues to the source of the contamination. But new analyzers on the market provide rapid, automatic identification and detection for quality control.
What’s more, the data-driven knowledge derived from this analysis provides a firm foundation for making confident decisions to improve the production process and minimize the risks of contaminants in automotive manufacturing.
Susan R. Benes is Product Marketing Manager for FEI Co. For more information, visit fei.com.
Related Content
3-Stage Versus 5-Stage Washers
Columnist Rodger Talbert explains the difference between a five-stage washer and a three-stage washer, and how one provides better corrosion protection over the other.
Read MoreFrom Drain to Gain with Smart Wastewater Recovery
Incorporating digital monitoring to maximize performance.
Read MoreSolvent Versus Aqueous: Busting the Myths
Is aqueous cleaning “greener” than solvent cleaning? Is solvent a more effective cleaner than aqueous? These and many other questions are answered here to debunk the misconceptions that many manufacturers have held onto for years.
Read MoreReplacing Open-Top Vapor Degreasing in Aerospace Manufacturing
Options and considerations for cleaning aerospace parts as regulations tighten on vapor degreasing solvents.
Read MoreRead Next
Just How Clean Is Clean?
Most finishing consultants have lost count of the number of times that inadequate cleaning and pretreatment was the cause of defective painting or plating. Skip plating, blistering, delamination—these are just some of the commonly found defects caused by poor cleaning.
Read MoreDelivering Increased Benefits to Greenhouse Films
Baystar's Borstar technology is helping customers deliver better, more reliable production methods to greenhouse agriculture.
Read MoreEducation Bringing Cleaning to Machining
Debuting new speakers and cleaning technology content during this half-day workshop co-located with IMTS 2024.
Read More


