The Adhesion of Electrodeposits to Plastics
The 1966 Carl E. Huessner Gold Medal Award was given to Dr. Edward Saubestre and co-workers for Best Paper appearing in Plating in 1965, and their paper is republished here in a series on the AES/AESF/NASF Best Paper Awards. This paper is a comprehensive treatise on the Jacquet peel test, a primary test method for determining adhesion on plated plastics.
by
Edward B. Saubestre, Lawrence J. Durney, Juan Hajdu & Edwin Bastenbeck
Enthone, Inc.
West Haven, Connecticut, USA
The 1966 Carl E. Huessner Gold Medal Award for Best Paper appearing in Plating in 1965
Presented at the AES 52nd Annual Convention in New York, New York, July 13, 1965
Originally published as E.B. Saubestre, et al., Plating, 52 (10), 983-1000 (1965)
Editor's Note: This paper is part of a series on the AES/AESF/NASF Best Paper Awards. In 1965, Edward B. Saubestre and co-workers received the Carl E. Huessner Gold Medal Award for Best Paper appearing in Plating. A printable PDF version is available by clicking HERE.
ABSTRACT
The use of electrodeposited plastics is growing rapidly, especially in automotive and appliance fields. With this growth, there arises a need for valid testing techniques, to measure such properties as corrosion resistance, adhesion of coatings, etc. Adhesion testing of plated plastics is generally done by means of pull testing, using various adaptations of the Jacquet test. Although this is a valid test, it is subject to widespread misapplication due to lack of understanding of the fundamentals involved in this test. Some of the pertinent equations relating to pull testing are developed in the paper, wherein it is shown that a specific parameter (which includes pulling force, width of the test strip, thickness of coating, and modulus of elasticity) measures a combination of adhesion and ductility. Practical implications for commercial plated plastics are given.
Nature of the metal-to-plastic bond
A. General considerations
Any discussion of the nature of the bond between a plastic and a metal must begin with the seemingly obvious question, Where does the bond break? The seemingly equally obvious answer, Between the plastic and the metal, turns out to be rarely, if ever, correct. Bikerman1 has shown why failure of adhesion can rarely occur exactly at an interface, based on considerations of crack propagation. In the specific case of the Jacquet Test for peeling of metals from plastics, it will be shown below that dimensional analysis also shows that the break cannot occur at the plastic-metal interface.
The break may actually occur in any one of three places, of which two are of practical importance. The bond may break within the metal, within the plastic, or along a relatively weak boundary layer between the two which forms at one stage or another within the plastic body. Primarily because of tensile strength and Young's Modulus considerations, a break within the metal is most unlikely in most practical situations. Therefore, the bond breaks either in the body of the plastic itself, or along a weak boundary layer within the plastic. Bikerman2 refers to bonds that break within the plastic as "proper bonds" and those that fail along weak boundary layers as "improper bonds."
In practical terms (referring to metal-plated plastics), the former refers to "good" adhesion of metal-to-plastic, the latter refers to "poor" adhesion. Obviously, then, to eliminate "poor" adhesion of metal-to-plastic, it is necessary to investigate what causes the formation of weak boundary layers, and then to eliminate those causes. There are two schools of thought on why failure of the metal-to-plastic bond can occur in a weak boundary layer in the plastic, and it is probable that both approaches are of practical significance for plated plastics.
The first which might be called the "molecular theory" school,3 claims that bond failure is caused primarily by a weak chemical-electrical interaction between metal and plastic. According to this school, strong attraction between the atoms of metal and the polymer molecules of plastic is required for a strong bond. A valence bond between the different substances found across the interface would be ideal, but interaction between dipoles in the two phases is more likely. This hypothesis has been objected to by Bikerman4 on the ground that substances (such as polyethylene) which contain no dipoles adhere well to metals, with which no chemical reaction is possible; furthermore, he points out that when a brittle polar, a brittle non-polar, and a ductile non-polar material are compared, the two brittle materials behave similarly, while there is no similarity in the behavior of the two non-polar materials. On the other hand, the "molecular theory" helps to account for a number of readily observed phenomena. It explains, for example, how oxidation of polyethylene produces a stronger joint with metals,5 because of dipole interactions between the metal and polar groups produced by oxidation in the polyethylene. It could also explain why use of chromic acid-containing oxidizing acids improves adhesion of metals to ABS plastics.6 (See below, however, for an alternative explanation). It also explains why polyethylene, which normally bonds poorly to copper, can be made to produce a good bond to it by chemically oxidizing the copper surface so as to produce a thin layer of black cupric oxide.7 A further objection has been made to the "molecular theory"4 that bond strengths are not nearly as high as they should be were dipole interactions effective in establishing overall bond strength. This objection, however, has been met by pointing out that bond strengths are not as high as might be expected in terms of intermolecular forces because, in part, of the large size of the long-chain polymer molecules.8 The configurations which these adopt to give maximum interaction with the metal sterically hinder other molecules trying to attach themselves to the surface,9 thus limiting the amount of surface available for bonding. In summary, according to the "molecular theory," the way to avoid poor bonding of metals to plastics is to create dipole interactions at the interface between metal and the plastic boundary layer. In practical terms, this would generally mean the creation of oxidative linkages such as the cited methods for oxidation of polyethylene and ABS before metal bonding.
The second school of thought, which might be referred to as the "rheological theory,"10 explains bond failure in weak boundary layers of the plastic as being the result of a type of adhesive (or stress-strain) failure. Such adhesive failure in a weak boundary layer may occur owing to the formation of oils or low-molecular-weight polymers exuded from the bulk of the plastic into the surface layer, loosely bound oxides, moisture, gases or other substances in which shear or tensile failure may occur more readily than in the main body of the materials being joined. An outstanding example of this phenomenon is the deleterious effect of moisture on the bonding of metals to ABS plastics. A bake-out of moisture before conditioning and electroless plating of ABS, or immediately after the electroless plating step, or even after final plating with (for instance), copper, nickel, chromium, can considerably improve adhesion. In fact, it can be stated almost categorically that the adhesion of metals to ABS plastics improves with aging, owing to elimination of moisture in the weak boundary layer.6 Bikerman11 has given further weight to this argument by noting that "syneresis" can be a source of trouble, and that eliminating the result of syneresis will improve bond strength considerably.* For example, in the specific case of polyethylene investigated by Bikerman, it was found that low-molecular-weight hydrocarbons and oxygenated impurities only loosely bound to the surface constituted the principal phase of the weak boundary layer formed by this syneresis. These were removed11 and found to comprise less than one per cent of the plastic, and not to affect mechanical properties (Young's Modulus; breaking strength), or interfacial properties (contact angles for water were the same for treated or untreated polyethylene), but to eliminate IR spectroscopic peaks for carbonyl groups. The result was that poor bonding was converted to good bonding. This approach also offers another explanation of the effect of the chromic acid treatment of plastics.12 For example, it was shown that chromic acid treatment of polyethylene (which admittedly improved bonding to metals) did not result in the formation of an oxidized layer by IR spectroscopy.13 Bikerman11 concludes that the effect of the chromic acid treatment is to destroy some of the low-molecular-weight ingredients present in the weak boundary layer, thus eliminating the effect of syneresis in the surface layer. It has been suggested that another support for this approach is the fact that passing a stream of hot nitrogen gas over polyethylene will have the same effect as the treatments discussed above in improving bonding properties;14 i.e., evaporating impurities is the key phenomenon, since no oxidation can occur under these conditions. Some related observations dealing with fiber-elastomer adhesion have also appeared recently.15 On the other hand, the same author discussed the resistance of adhesive bonds to water, (water reduced adhesion to zero if the specimen were peeled apart when wet; if allowed to dry before adhesion testing, the bonds retained their original strength), and concluded that the reversible behavior noted could most readily be explained by postulating that adhesion was caused by hydrogen bonds. In the presence of liquids of high energy density, hydrogen bonds were correspondingly weakened.
B. Goal of the current investigation
From this review of the literature on the bonding of metals to plastics, the following conclusions are drawn:
- An adequate test method for evaluating the bonding of metals to plastics must involve rheological failure, since simple tensile failure at the metal-to-plastic interface can occur only in the case of so-called "improper bonds," which are of no commercial importance except in the very limited field of application for the production of what might be termed "plated-plastic-junk."
- Experiments should be conducted to determine, on a scientifically acceptable basis, the nature of the bond cleavage between plastic and metal.
- Experiments should be conducted to determine, on a practical (commercial) plane, which operational factors contribute to the development of good bonding between plastic and metal, and more particularly, in view of major industrial (especially automotive) interest, which factors lead to good bonding of copper to ABS plastics.
- Comparisons should be established experimentally between rheologically acceptable tests and other industrially acceptable tests for determining the bonding of metals to plastics, particularly ABS plastics.
- Simple chemical procedures should be evaluated for experimentally verifying the existence of weak boundary layers as previously discussed.
- A correlation should be made between methods of testing plated plastics and those for testing plated metals.
The following sections will detail our attempts to meet these six objectives.
C. The Jacquet test
The Jacquet, or "pull," test is the most commonly used industrial test for adhesion of metals to plastics. Figure 1 indicates the common geometry of the Jacquet test. A relatively thin metallic strip (generally, the electrodeposited coating under test) is pulled at a 90° angle from the underlying plastic substrate. The force required, either to initiate or to sustain at a steady rate, peeling of metal from plastic is recorded as the numerical value for the test (Appendix II contains further details). It is evident that either the plastic substrate or the metallic film must yield plastically in order to permit the radius of curvature which results from pull testing. Experimental data presented later in this paper will prove that the plastic yielding occurs entirely in the plastic film.

Figure 1 - Nature of Jacquet tests.
It will be assumed that both the plastic-yielding substrate and the metallic film obey Hooke's Law, which says that the intensity of the load applied (the stress, commonly expressed in lb/in.2) divided by the resulting elongation (the strain, commonly expressed as in./in.) is a constant (Young's Modulus; the modulus of elasticity). When the plastic-yielding film is subjected to a loading, Hooke's Law being obeyed, the following relationship must hold:
(1)
where Ef is Young's Modulus for the plastic film, S is the stress on the plastic film, y is the deflection of the plastic-yielding film under load, and tf is the thickness of the original (unstressed) plastic-yielding film.
Note that in order for the dimensional analysis to be correct, it is necessary that the yielding under load take place in a region of finite original thickness. This is proof, from dimensional analysis alone, that the bond must break at a point somewhat removed from the actual interface between metal and plastic. If the break were to occur exactly at the interface, then, from the above analysis, it follows that the breaking stress would approach zero, i.e., breaking of the bond at the true plastic-metal interface occurs only when the bond strength is virtually zero. When there is any significant bond strength, the break must occur other than at the interface.
Thus, the Jacquet test meets the rheological requirements of Bikerman's models1,4,10 in that it tests the breaking of bonds in the plated plastic and not at the interface. For these reasons, we believe that the Jacquet test is a valid and useful one for general industrial use in determining the adhesion of plated plastics. It must be remembered, however, that the Jacquet test measures, not pure adhesion, but a complex of factors. Appendix I contains a mathematical development of the Jacquet test, from which it is concluded that the resulting numerical reading for "adhesion" is actually a measure of all of the following:
- Thickness of the electrodeposited metal
- Thickness of the plastic-yielding film
- Young's Modulus of the deposited metal
- Young's Modulus of the plastic-yielding film
- Tensile strength of the plastic-yielding film.
Note particularly the first item: thickness of the electrodeposited metal. It follows from the equations developed in Appendix I that the thicker the electrodeposited coating, the higher the Jacquet test value obtained, all other things being equal. For example, for a given chemical conditioning process, on a particular plastic substrate, the film properties will likely be essentially constant, so that, as a first approximation, the Jacquet test adhesion value is proportional to the % power of the thickness of the electrodeposited coating. Naturally, it does not follow then that mere obtaining of a higher Jacquet test adhesion value with the use of thicker coatings is indicative of better adhesion. Indeed, as will be shown below, the converse is frequently the case.
For copper-plated ABS plastics, substitution of the proper physical constants (Appendix I) leads to the following relationship:
(2)
where F is the reading obtained by use of the Jacquet test on a 1 in. wide strip (lb.), and tm is the thickness of the electrodeposited copper (in.). Thus, for example, for a copper coating of 2 mil thickness, F is 9.5 lb. for a 1 in. wide strip. In the data to be presented below, the results obtained experimentally with the Jacquet test will be compared with the above figure, and it will be found that correlation is quite good in general. The constant (shown as 1000 above) will be referred to as "K." Its physical significance is discussed in Appendix I.
Appendix II contains detailed information on how the authors conducted the Jacquet Test, using two types of apparatus.
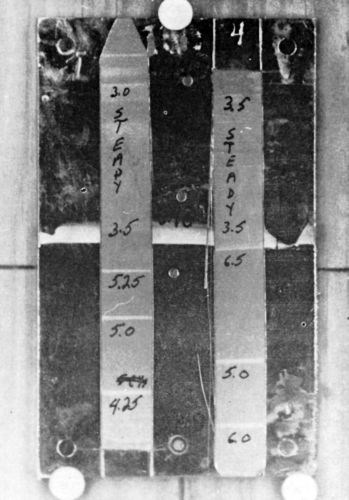
Figure 2 - Appearance of a test plaque after Jacquet testing.
D. Appearance of Jacquet test strips and plaques
The appearance of a typical Jacquet test plaque following pulling off of a strip of copper is shown in Fig. 2. The top portion of the plaque was coated with 1 mil (nominal) of electrodeposited copper, the bottom portion with 2 mil (nominal). Spot checks with the Kocour tester gave 0.94 and 0.93 and 1.97 and 2.08 mil respectively. Test strips were pulled both from the thin to the thick portion and vice versa. The numbers shown in Fig. 2 are direct readings (i.e., lb./0.5 in. width of strip) obtained by use of the strain-gage method (Appendix II). The readings were obtained at the site indicated on the plaque. The first point to note is the verification of the relation given above between the thickness of electroplate and the reading obtained in the Jacquet Test. A second point to note is the presence of a series of light-colored bands, which correspond to areas of crack propagation in the plastic. It will be noted that at higher values of pull test results (i.e., areas of greater copper thickness), the bands are spaced relatively far apart, while at the lower values of pull test results, the bands are sometimes so close together as to constitute virtually a steady pull. These visible effects of Jacquet testing suggested two things: (1) that the bond break occurs in the plastic and (2) that the characteristics of the bond break in the plastic may depend upon the total force applied in pull testing.
Accordingly, a microscopic examination was made of the surface of the plaque at the point where the thickness of copper plate (hence, force applied in the pull test) changed abruptly. Figure 3 shows two typical results of these examinations. It will be noted that there is considerable evidence of gouging out of pieces of plastic in the area of the higher pull test value. There is no evidence of this in the area of lower pull test value; rather, there is evidence of a more uniform attack upon the plastic substrate.
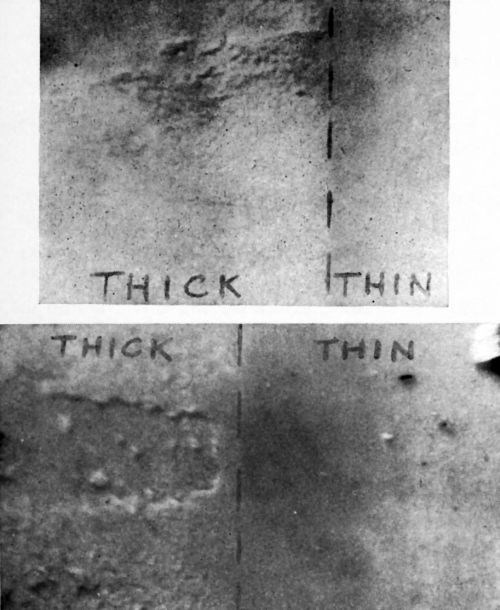
Figure 3 - Microscopic view of a test plaque surface after Jacquet testing.
In the light of these observations, efforts were next made to isolate and examine directly the detached plastic film, which could generally be observed visually as a slight "whitening" of the underside of the peeled-back copper strip.
E. Nature of the plastic film
First, an attempt was made to photograph cross-sections of the peeled-back copper strip (Fig. 4). As will be noted, this method did not permit the direct photographing of the detached plastic film because of its fragility. All that appears in Fig. 4 is a trace of evidence that one side of the copper strip has a little plastic on it.
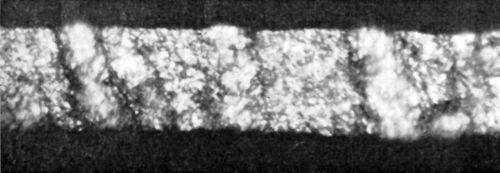
Figure 4 - Cross-section of a peeled-off copper strip (0.6 mil thick).
In the next experiment, the 0.5 in. copper strip was cut into 2 in. long segments (so that the thickness of the copper film would be a constant) and then was dissolved in a petri dish containing 25% ammonium persulfate at 50°C (120°F). After all of the copper had been dissolved, a 0.5 in. × 2 in. thin, quite uniform, translucent, white plastic film was left in the dish. This film was rinsed in deionized water, then in methanol, and dried. This was the first irrefutable evidence for the existence of the plastic film postulated earlier. Figures 5 and 6 show the appearance of these films as seen under the microscope by reflected light (recall that these films are almost transparent). The two photographs reflect two different conditioning procedures. Figure 5 shows the appearance of the plastic film obtained in a single-step conditioning cycle; Fig. 6 shows that obtained in a two-step conditioning cycle (these cycles will be detailed later). It is evident that the chemical conditioning treatment employed in the plating cycle has a considerable effect on the grain structure of the detached plastic film formed during Jacquet testing. As seen in the photographs, and as was generally observed whenever copper strips were dissolved away, the plastic films obtained are generally quite uniform in appearance. However, plastic films resulting after dissolution of thick copper strips (i.e., high pull test values) showed occasional evidence of coarse-grained agglomerates rising above the plane of the film. These are thought to relate closely to the gouged out areas of plastic shown in Fig. 3 under areas previously covered by thick copper coatings.
It was next decided to determine whether various processing variables had any effect on the nature of the detached plastic film.
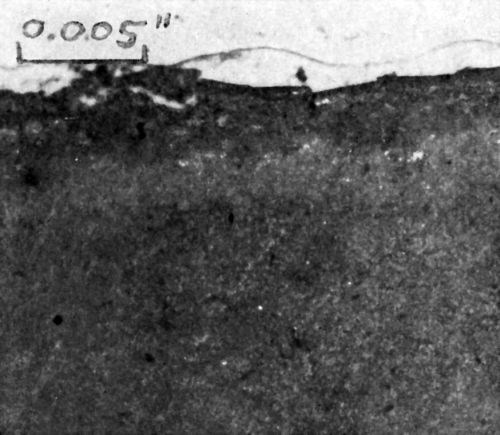
Figure 5 - Reflection photo of the detached plastic strip after single-step conditioning.
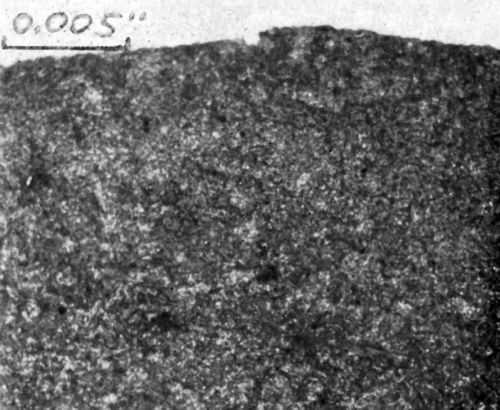
Figure 6 - Reflection photo of the detached plastic strip after two-step conditioning.
F. Effect of processing variables on the nature of the plastic film
Table 1 shows the effect of thickness of copper electrodeposit (hence, effect of force required for the Jacquet Test) on the thickness of the detached plastic film. The copper plate was deposited from a proprietary copper bath,** and had a stress of 4100 psi tensile, as measured by the Brenner Spiral Contractometer. The film was isolated as noted above. The double conditioner cycle was used. The value of "F" was obtained using the simplified strain-gage method (Appendix II). For single panels, it is noteworthy that the thickness of the detached film is independent of copper electroplate thickness, and likewise necessarily independent of force developed in the Jacquet test. Interestingly, for a given panel, it is also independent of K, the measure of bond strength. On the other hand, there is a marked (2:1) variation in thickness of the detached film from one test plaque to another. This could be attributed to the effects of chemical conditioning, which are believed to be a very sensitive indicator of minor differences in composition and molding conditions between one plastic surface and another. Accordingly, a brief study was made of the effects of chemical conditioning on the nature of the detached plastic film. (See next section.)
We first decided to run a few panels with direct nickel plating over the electroless copper film to see if this would have any effect on the results being obtained with copper electrodeposits. In this connection, it must be remembered that the Jacquet test involves Young's Modulus for the metal deposit. Therefore, using a figure of 24,000,000 psi for electrodeposited nickel, the theoretical value of K is 1100, rather than 1000 as for copper (i.e., theoretically a nickel deposit on plastic should have a 10% higher value of adhesion than a copper electrodeposit). The proprietary nickel bath*** used produced deposits with a compressive stress of 7500 psi, as measured by the Brenner Spiral Contractometer. Table 1 indicates the results obtained. Unfortunately, great difficulty was experienced in obtaining reproducible results in the laboratory, and as a result, the data reported in Table 1 are fragmentary. Nonetheless, they serve to indicate that, at least as a first order approximation, the concepts being discussed in this paper apply to direct nickel plating as well as to direct copper plating.
Table 1 - Effect of plating thickness on the thickness of the detached plastic film.

In the study of the effects of the chemical conditioning cycle on the nature of the detached plastic film, the single-conditioning cycle was used because this cycle calls for conditioning times as long as thirty minutes, permitting the study of a wide time range (by contrast, conditioning times in the double-conditioning cycle do not exceed two minutes). A one-minute conditioning treatment was applied to part of each of four panels, while the balance of each panel was conditioned for 5, 10, 15 and 30 minutes respectively. In this way, it was possible to examine panel-to-panel variations and the effect of increasing conditioning time as well. Results obtained are shown in Table 2. Figure 7 indicates that on the basis of these preliminary data, the thickness of the detached plastic film appears to increase with the logarithm of the time of conditioning. Results from one panel to the next were reasonably reproducible in this series of tests.
Table 2 - Effect of conditioning time on the thickness of the detached plastic film.
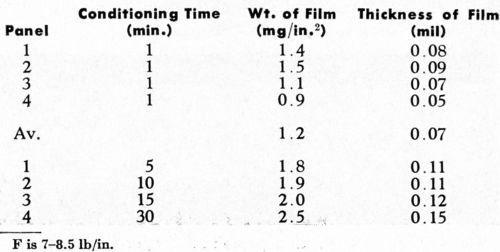
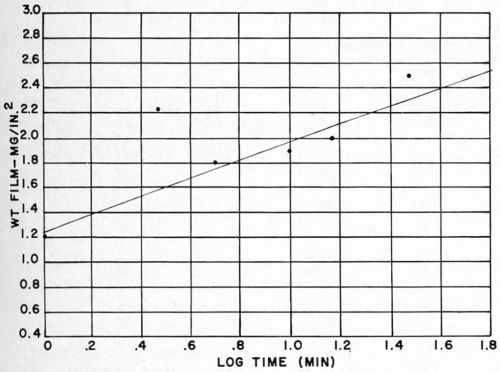
Figure 7 - Effect of time of conditioning in single-step conditioning on the thickness of the detached plastic layer.
G. Effect of conditioning on plastic surface layers
Studies of plastic surface layers up to this point have concentrated on the nature of the detached plastic film. As is evident from Fig. 1, however, during Jacquet Testing tearing takes place somewhere between the metal-plastic interface and the boundary of the layer of plastic which yields plastically during pull testing. In the theoretical development of Appendix I it was shown that tf, the total thickness of the plastic-yielding film, is the key parameter and not merely the detached portion of the plastic film. Accordingly, in the next part of this study, attempts were made to determine whether the plastic-yielding film could be identified before Jacquet testing, so that a better estimate could be made of the value of tf.
Cross-sections of copper-plated specimens were prepared by cold mounting, followed by polishing with dry 120 grit emery paper, wet 400 grit paper, immersion in 25% ammonium persulfate solution to remove the copper smear; they were then rinsed in methyl ethyl ketone, very lightly polished, dipped a few seconds in persulfate, solvent rinsed and dried. Two characteristic cross-sections are shown in Figs. 8 and 9. Immediately evident is the existence of a dark layer in the plastic immediately below the metal-plastic interface. More faintly detectable is a second, deeper layer, which has a slightly altered appearance relative to the bulk of the plastic. In these photographs, the copper electrodeposit is 2.8 mil thick; the first degraded plastic layer is 0.42 mil deep; the total depth of the two types of altered plastic is 1.04 mil.
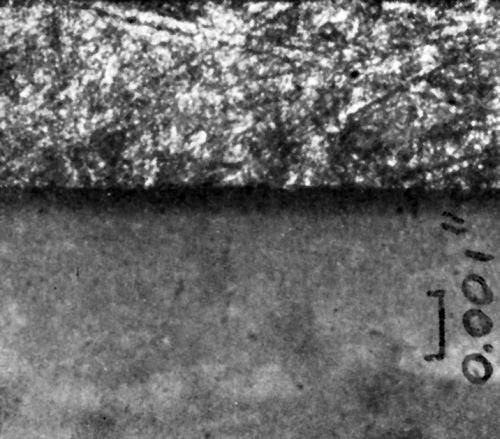
Figure 8 - Cross-section of chemically conditioned copper plated plastic.
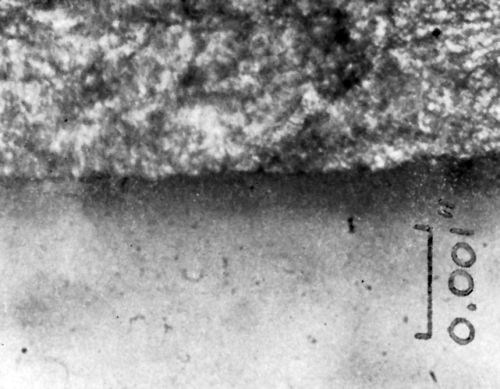
Figure 9 - Cross-section of chemically conditioned copper plated plastic.
For Figs. 10 and 11, the same mounting procedure was followed as before, except that an additional step was added at the end to help bring out the chemical differences in the various plastic layers. This final step consisted of immersing the mount in 0.5% fuchsin dissolved in glacial acetic acid. The dye is then eluted with ethyl alcohol for three minutes. As can be seen in the photographs, this procedure brings out more clearly the existence of two different altered plastic layers beneath the metal coating. In Figs. 10 and 11, the copper electrodeposit was 0.835 mil thick. The first layer of degraded plastic immediately beneath the metal was about 0.31 mil deep; the combined depth of the two types of plastic layers was between 1.15 and 1.25 mil.
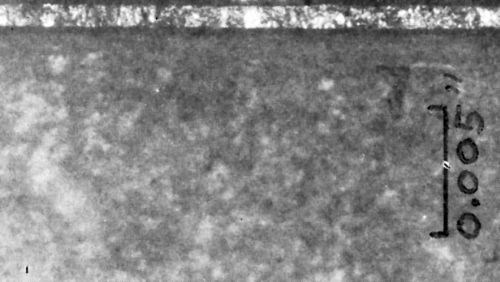
Figure 10 - Cross-section of chemically conditioned copper plated plastic.
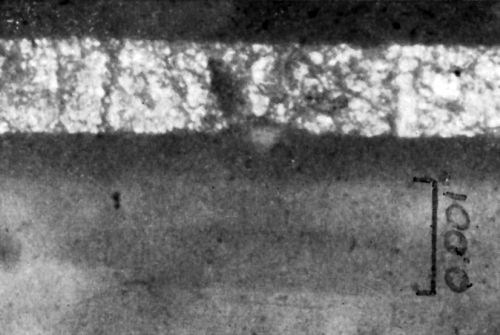
Figure 11 - Cross-section of chemically conditioned copper plated plastic.
It is believed that the very dark first layer of altered plastic directly beneath the metal-plastic interface is the layer in which detachment of the plastic film occurs during Jacquet testing. The total depth of apparently altered plastic is believed to be the layer which engages in plastic yielding during pull testing, as defined in Appendix I. If this is so, then the value of tf = 1.0 mil assumed in the theoretical treatment is experimentally verified.
H. Crack propagation in the plastic base
As noted previously, when the strain-gage method of Jacquet testing is employed, a characteristic crack pattern develops in the plastic base when F is relatively high in value (thick electrodeposits), while a fairly steady pull (or at least, the development of very closely-spaced cracks) occurs for low F values (thin electrodeposits)(See Fig. 2). We will refer to the transitional value as Fc. When F > Fc, the crack between the plastic boundary layer and the metal travels at a great speed; after a certain distance of travel along the strip being pulled, its energy is dissipated and the fracture stops. The distance, a, which the crack travels before its energy is dissipated is a function of F. For a specific set of conditions, the crack propagation length is:
(3)
where B is the fracture toughness of the composite metal/ plastic system (The theoretical development of this relationship is given by Ripling, et al.16). Thus, if a given ABS plastic panel is plated with two different thicknesses of electrodeposit (thereby resulting in two different values of F), the spacing of crack propagation patterns on the panel after Jacquet testing should obey the following relationship:
(4)
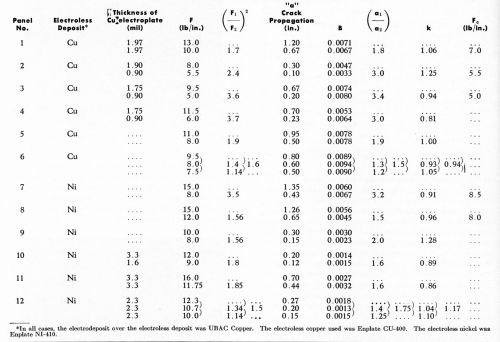
since B should be a constant. Table 3 indicates some typical results obtained, in which:
(5)
a quantity that should equal unity if experimental results are to follow theoretical considerations.
One interesting result of Table 3 is that k ranges from 0.81 to 1.28. This remarkable agreement with theory indicates that the Jacquet test for "good" adhesion conditions is in agreement with theoretical models previously discussed, in which failure occurs not at the interface, but at some distance from it.
Another interesting observation in Table 3 is the fact that B appears to be much better for electroless copper than for electroless nickel, even though Jacquet test values are comparable for a given thickness of electrodeposited copper. In like fashion, the value of Fc is higher for electroless nickel than for electroless copper, i.e., there is a higher level of Jacquet test values for electroless nickel in which improper bonding is obtained.
Therefore, it is concluded that, for a given electroplating system (UBAC copper), electroless copper plating offers evident advantages over electroless nickel plating, insofar as these tests are concerned.
Table 3 - Crack propagation in Jacquet testing.
Effect of processing factors on adhesion of metals to plastics
A. Introduction
As previously noted, the Jacquet test relates to the % power of the thickness of the electrodeposited coating. The experimental data were therefore analyzed with this assumption in mind, that is to say, that "adhesion" test data were related to "K" values, where:
(7)
As noted in Appendix I, the theoretical value of K for copper is 1000, and for nickel 1100. Likewise, this same relationship will be used to express the theoretical value of F as a function of tm in the graphs presented below.
The other commercially important variables which affect the Jacquet Test include:
- The type of plastic substrate (this paper is limited to ABS plastics).
- The electroplating system chosen (three copper solutions are considered).
- Chemical pre-treatment of the substrate prior to electroless copper plating (some consideration will be given to this factor below).
- Aging of the electrodeposited plastic (periods up to one week will be considered).
B. Effect of electroplating thickness
In these studies, the simplified strain-gage method of reporting data was used (see Appendix II). The panels used were 4 × 6 in. plaques of ABS plastic (Cycolac EP-3510, Marbon Chemical). The following generic treatment cycle was used:
- Clean in a mildly alkaline solution designed for ABS.
- CWR (cold water rinse).
- Neutralize in an acidic solution.
- CWR
- Condition in an acidic, dehydrating, oxidizing solution containing hexavalent chromium (Patent applied for).
- CWR
- Secondary conditioning in oxidizing acid.
- CWR
- CWR
- Sensitize in an adsorbing reductant, as in tin (II) or titanium (III) solutions.
- CWR
- CWR
- Activate in noble metal salt, as of Pd, Pt, Au, Ag.
- CWR
- CWR
- Electroless copper plate in an alkaline formaldehyde type of solution.
- CWR
- Bright acid copper sulfate electroplate.
- CWR
- Cure in hot water.
- Dry.
The specific cycle used was a proprietary one, which corresponds to the above steps:
1. Enplate PC-452, 60 g/L (8 oz/gal), 65°C (150°F), 3-5 minutes.
3. Enplate AD-480, 7.5 g/L (1 oz/gal), Room temperature (RT), 15 seconds.
5. Enplate Conditioner 470, full strength, 60°C (140°F), 1 minute.
7. Enplate Conditioner 471, RT, 2 minutes.
10. Enplate Sensitizer 432, 1:15, RT, 1 minute.
13. Enplate Activator 440, 1:15, RT, 20 seconds.
16. Enplate CU-400, 2A, 5B, 9 water (vol), RT, 10 minutes.
18. UBAC copper, air-agitated, to desired thickness.
20. Age 20 minutes at 70°C (160°F).
The results obtained are shown in Table 4. In the table, each panel was plated to two different nominal thicknesses, and two actual thicknesses were measured in each section of the panel using the Kocour tester. These are referred to as the thick and thin sections respectively of the panel. In the “A” test on each panel, the pulling was done from the thick to the thin section of the panel. In the “B” test, the pulling was in the reverse direction.
Table 4 - Effect of plating thickness on the Jacquet test.
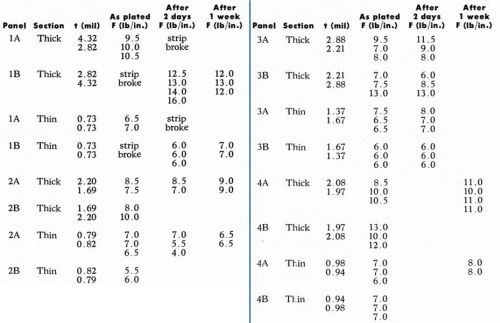
In all cases, the panels contained two nominal electroplating thicknesses, in order to permit evaluation of the effect of electroplating thickness independently of the effects of the chemistry and molding conditions of the substrate. The pulled strips were 0.5 in. wide, but the data were transcribed to the more conventional lb/in. value. Data were taken in both directions, i.e., from thick to thin section of the plated panel and vice versa, in order to determine if the direction of running the pull test is of significance. Data were taken immediately after the completion of Step #21 in the above cycle and again after two and seven days had elapsed.
The data show that the direction of pulling is of no significance. Therefore, data for both directions of pulling were averaged in subsequent studies.
The effect of plating thickness is shown in Figs. 12 and 13. It was found that in every case, the thicker portion of an individual panel has a higher F value and a lower K value. That the thicker portion of the plated plaque should have a higher value of F is to be expected, based on previous discussions. What is rather more surprising is that K obviously decreases with increasing plating thickness. This is unexpected. The explanation is not yet clear; perhaps it is due to the influence of internal stresses in the electrodeposit. This effect has not been considered in the theoretical discussion. It is also possible that the decrease of K is due to Newtonian behavior of the plastic. This point will be considered below. In any event, two general conclusions may be drawn from these data:
- F increases with increasing plating thickness.
- K ("adhesion") decreases with increasing plating thickness.
These conclusions are important commercially in that they amplify and serve to condition the oft-repeated statements to the effect that "greater plating thicknesses may be required to meet the minimum pull test values." It follows from our results that such statements may be quite misleading; indeed, increasing the thickness of electrodeposit, while increasing the value obtained in pull testing, may actually result in decreased "adhesion," as determined by "K."
We were gratified to note that the experimental data correspond in order of magnitude to the theoretical predictions. It is concluded therefore that the theoretical analysis serves to set a limit on the ultimate "adhesion" values which are attainable for electroplated plastics. It is clearly evident from Figs. 12 and 13 that for copper electrodeposits less than about 1.2 mil thick, the Jacquet test values obtained experimentally are slightly greater than the theoretical value, while for thicker deposits, experimental values are usually less than theoretical values.
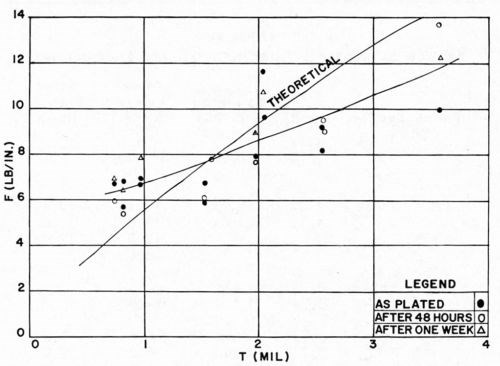
Figure 12 - F vs. thickness of bright acid copper on ABS.
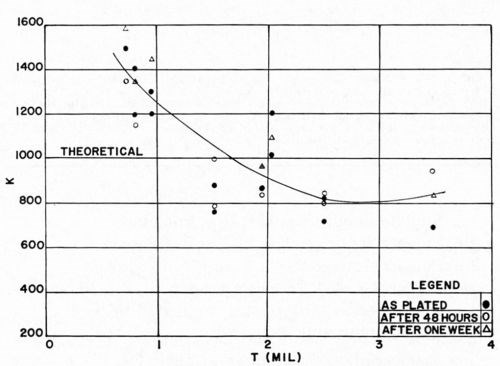
Figure 13 - K vs. thickness of bright acid copper on ABS.
C. Effect of aging of the electrodeposited plastic
Figures 12 and 13 also illustrate the effect of aging of the electrodeposited plastic on the Jacquet test. After two days of aging, F increased about 0.5 lb/in. on an average, and about 0.75 lb/in. after one week. It should be borne in mind that a preliminary aging step was incorporated in the plating cycle. If the plaques had not been so cured, the effect of aging would have been even more pronounced. It is evident from the data that the 20-minute cure in hot water suffices to develop substantially the ultimate bond to be attained for the given system, although further aging does improve results a bit further.
D. Effect of type of ABS plastic
Three types of ABS plastics were examined in these tests. Plastics A and B are designed for electroplating use, but "A" is produced to exacting quality control standards, while "B" is not. Plastic C is not designed for electroplating use. The cycle used was that noted previously, except that Steps 6 and 7 were eliminated. In addition, times and temperatures differed slightly; differences are noted:
Step 1: 2 minutes
Step 3: 10-15 seconds
Step 5: 65°C (150°F), 15 minutes
Step 13: 1 minute
Step 16: 15 minutes
All other conditions remained as before. The test results were obtained on a tensometer (Instron Tester), operated at a rate of pull of 1 in./min. The maximum and minimum readings on the recording chart were noted, the arithmetic average was used as the average F value. The results are shown in Figs. 14 and 15. It will be readily noted that Plastic C, which was not designed for electroplating, gives markedly poorer results than Plastics A and B. Thus, the type of ABS used is of considerable importance in electroplating. Within the limits of the experiments conducted, no difference could be detected between the quality-controlled grade of ABS, and the one which is not controlled, with respect either to the test values obtained, or to the reproducibility of the data.
In comparing the results of these experiments with those of Figs. 12 and 13, it should be remembered that a different Jacquet test method was used. The FMAX and KMAX values of these data correspond essentially to the F and K values of the previous studies. With this in mind, it is seen that the same effect of thickness is observed on F and K. However, the results obtained in these experiments on Plastics A and B were generally slightly lower than those obtained in the earlier experiments. This was thought to be due to the different conditioning cycles used, and this point was examined briefly as reported below.
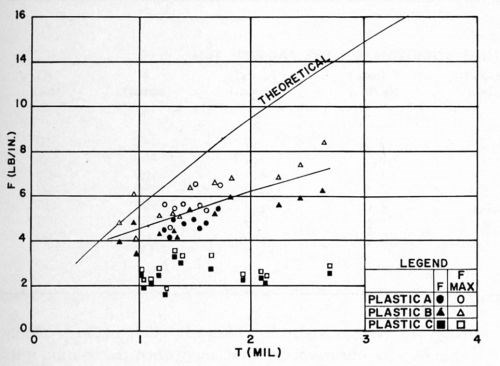
Figure 14 - F vs. thickness of bright acid copper on various types of ABS plastics.
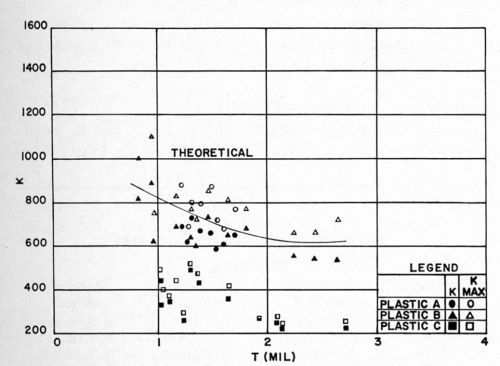
Figure 15 - K vs. thickness of bright acid copper on various types of ABS plastics.
E. Effect of conditioning
These studies did not include any comprehensive investigation of the effect of conditioning, in that only commercially useful conditioning methods were employed. As noted above, however, some quantitative differences were noted between the data of Fig. 12 and of Fig. 14, which were thought to be due to the different conditioning cycles used. Accordingly, a brief study was made of three conditioning cycles:
No. 1. The same as in Section D above.
No. 2. As in No. 1, except that the chromic acid content of the conditioner was doubled.
No. 3. The same as in Section B above.
The results are shown in Fig. 16. Plastic A was again used in these studies. Although no startling differences were found, to the extent that any differences exist, it appears that cycles No. 2 and No. 3 are slightly superior to cycle No. 1. This probably accounts for the slightly superior results shown in Fig. 12 relative to those in Fig. 14.
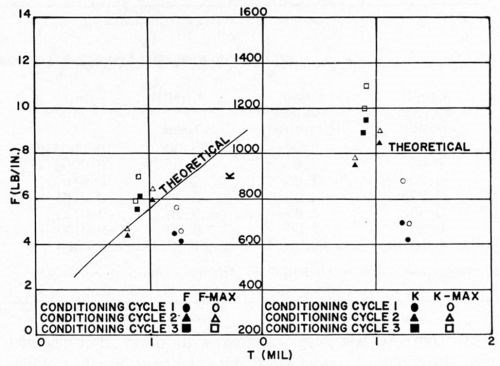
Figure 16 - Effect of conditioning cycles on adhesion of bright acid copper to ABS plastics.
F. Effect of copper electroplating solution
There have been conflicting reports from the field as to the effect of the copper electroplating solution on the bond between plastics and electrodeposits. For example, when copper pyrophosphate solutions are used, there is evidence that optimum bonds are frequently obtained only when a preliminary strike in an acid sulfate bath precedes it. We made a study of the effect of two types of acid copper solutions: one was a standard dull acid sulfate bath, 210 g/L (28 oz/gal) copper sulfate; 53 g/L (7 oz/gal) sulfuric acid; the other was a proprietary bright acid sulfate bath. Deposits from both had comparable tensile stresses, being 3200 psi for the dull acid bath, and 2800 psi for the proprietary bath. In this way, it was hoped to minimize differences which might be due primarily to internal stress of the electrodeposit. The ABS plastic used was Cycolac EP-3510, the conditioning cycle was that of Section D, and the method of Jacquet testing was the use of a tensometer (Instron) operated at a rate of pull of 1 in./min. As previously, maximum, minimum, and average pull readings were noted. The results obtained are shown in Figs. 17 and 18. The outstanding conclusion is that, the internal deposit stresses being comparable, the type of acid copper electroplating solution has little or no effect on the pull test results. In absolute terms, the results resemble closely those obtained in earlier experimental work as quoted above.
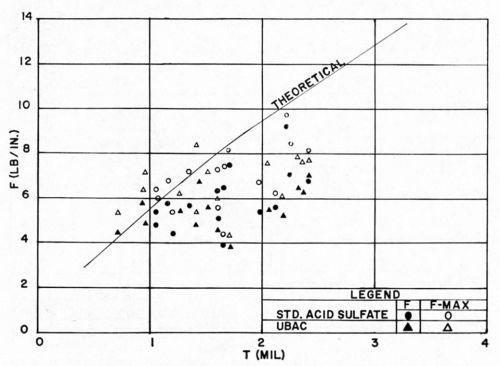
Figure 17 - F vs. type of copper electroplating bath.
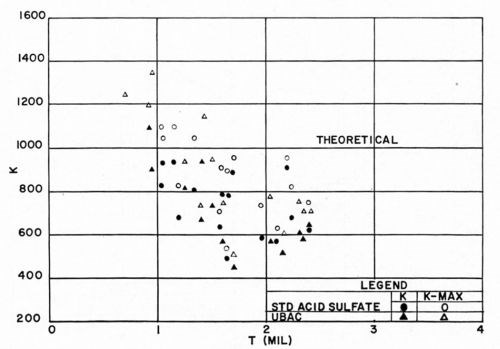
Figure 18 - K vs. type of copper electroplating bath.
By contrast, we were supplied with data that showed that the choice of copper electrolyte can have an effect, when no effort is made to maintain a constant internal stress. In these experiments, relatively low values were obtained with the Jacquet test, when using the proprietary copper (We do not know whether these low readings were due to the manner of using the proprietary bath, the conditioning cycle, molding conditions, or aging.). On the other hand, much better results were obtained by using a special strike of the following composition:
Copper sulfate 240 g/L (32 oz/gal)
Sulfuric acid 60 g/L (8 oz/gal)
Chloride (as HCl) 0.013 mL/L (0.05 mL/gal)
Duponol 80 0.04 mL/L (0.15 mL/gal)
Dextrin 0.03 g/L (0.004 oz/gal)
Wes-X 310 0.03 g/L (0.004 oz/gal)
Daybrite DB 45 0.023 g/L (0.003 oz/gal)
The results are detailed in Table 5. It is not possible to draw a direct comparison between this work and ours, but these data show that, in some circumstances, the formula of the copper sulfate bath can be of importance.
Table 5 - Effect of type of copper electroplating solution on the Jacquet test.

G. Effect of composite coatings
Most commercial electroplated plastics are copper-nickel-chromium plated. This means that the theoretical analysis of the Jacquet test results obtained will be more complex than that which has been considered in this paper. Although we made no study of composite coatings as such, the submitted data just referred to above contained some information on the effect of depositing two types of copper coating, whose K values are quite different. This is illustrated in Table 5. It is noteworthy that even when the coating with the higher K value constitutes over 20% of the total coating thickness, the value of K closely follows that of the coating of the lower K value. We suspect that this important relationship would apply also in a similar manner to copper-nickel-chromium systems.
H. Effect of plastic molding conditions
It is generally recognized commercially that it is quite difficult to injection-mold an ABS piece and maintain absolutely uniform molding conditions on all surface areas. Although many factors enter in, gating is a prime example of how improper molding conditions can affect the subsequent adhesion of electrodeposits. Improper design of the gate and incorrect ram speeds can lead to the presence on the surface of the molded piece of stressed areas in the vicinity of the gate which are unsuitable for electroplating. The presence of such stressed areas is most easily detected, before chemical treatment of the plastic surface, by immersing the plastic piece in glacial acetic acid for one to two minutes at room temperature. The development of white areas on the surface is indicative of undesirable surfaces for plating. In checking the test plaques used in the experiments reported in Figs. 14 and 17, it was noted that a pronounced white area developed during the glacial acetic acid test in the immediate vicinity of the gate area. Reviewing earlier experiments, it was noted that there was excellent correlation between FMAX and FMIN and the location of the gate on the test piece. For illustrative purposes, some of the data shown in Fig. 14 were examined in detail. The results are tabulated in Table 6, and two tracings of the original chart recordings are shown in Fig. 19. Strikingly shown in Fig. 19 is the gate effect, along with its effect on FAVG as used in earlier tables. It is because of this gate effect on FAVG that we prefer to concentrate attention on the value of FMAX and KMAX.
Table 6 - Effect of Gate on Jacquet test - Plastic B.

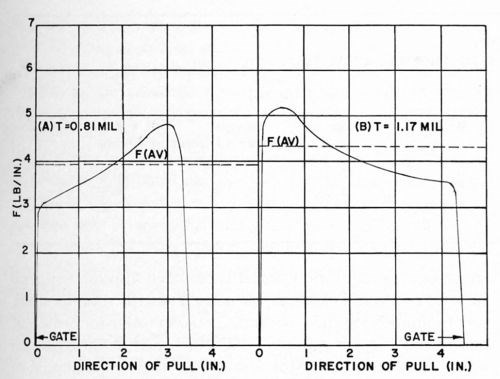
Figure 19 - Effect of gate on F.
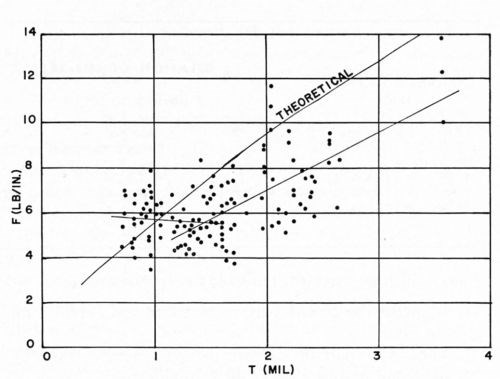
Figure 20 - F vs. thickness of bright acid copper on ABS (for all conditions of Figs. 12-18).
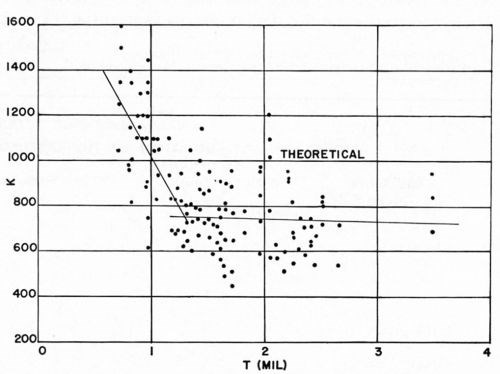
Figure 21 - K vs. thickness of bright acid copper on ABS (for all conditions of Figs. 12-18).
I. Analysis of experimental results
Figures 20 and 21 combine all of the F and K values previously reported, except for the values for Plastic C in Figs. 14 and 15 since this plastic was known to be unsuitable for plating. Although these experiments represent a wide variety of specific conditions, they all lie within the range of commercial practice in electroplating ABS plastics. Therefore, these two figures serve to illustrate the sort of results that can be expected in ordinary commercial operations. It can be seen that, in a general way, the experimental results agree with the theoretical analysis made earlier, at least in order of magnitude. In accordance with theoretical predictions, the value of F obtained in the Jacquet test increases with increasing thickness of copper electrodeposit. More detailed consideration, however, shows that up to about 1.2 mil of copper thickness, the relation of F and K to copper thickness appears to be different from that for thicknesses above 1.2 mil. Accordingly, a "best fit" curve was drawn (see Appendix III) for both F and K vs. copper thickness in the range 0-1.2 mil, and from 1.2-3.5 mil. It can be seen that the value of K obtained in the Jacquet test (a measure of "adhesion") generally decreases with increasing thickness of electrodeposit in the 0-1.2 mil range, whereas it should theoretically have a constant value. Furthermore, the absolute value of K in this range of copper thickness is greater than the predicted value. This probably arises from the invalidity of some of the assumptions made in developing the theoretical equation in the case of thin coatings. For thicker coatings (the 1.2-3.5 mil range), K appears to be a constant, but its value (about 700-750) is less than the predicted value of 1000. These lower-than-predicted values of K probably arise either from the influence of the internal stress of the electrodeposit, or from Newtonian behavior of the plastic. The former factor has not been considered from a theoretical point of view, but the latter factor has been considered (see Appendix I). It has been noted previously by others that as the force required in peel testing to remove metals from plastics increases, there is increasing tendency for the boundary layer of the plastic to flow during peel testing as a Newtonian adhesive. For such a fluid, the stress-strain relationship is not the one discussed above under the section dealing with the Jacquet test, but rather, is the following:
(8)
where m is less than unity. Using the same values that were given in Appendix I for the various constants involved, we can calculate that for m = 0.5, K is 647; for m = 0.55, K is 767. Thus, we might be able to account for the lower K values noted at the greater thicknesses of copper.
Comparison of the Jacquet test with other tests
A. Tensile tests
Although it is generally more practical to test plated ABS plastics by means of peeling tests of one sort or another, it is often desirable to compare the readings obtained in such tests with those obtained in tensile tests, since the latter are so commonly specified in testing plated metals. From the analysis shown in Appendix I, it follows that, for the values of physical constants used:
Tensile strength (psi) = 5.5 K
Thus, in Fig. 21, where it was noted that the steady state value of K was about 750, the tensile strength of the bond would be about 4000 psi. In the same manner, the data in Figs. 12-21 may be converted to the equivalent tensile strength reading.
B. Relation of Jacquet test and thermal cycling tests
In addition to the Jacquet Test, thermal cycling tests are frequently used in the industry to determine the quality of the adhesion of electrodeposits to plastics, the theory presumably being that the difference in thermal expansion coefficients between plastic and metal will set up sufficient strains at the neighborhood of the interface as to cause rupture of the bond if the adhesion is relatively poor. There are a number of variations of the thermal cycling test, but the version which we used is believed to be representative:
- Immerse the plated part in water at 82°C (180°F) for one hour.
- Allow the part to return to room temperature by removing from the water for 15 minutes.
- Immerse the part in a cold box at -18°C (0°F) for one hour.
- Allow the part to return to room temperature by removing from the cold box for 15 minutes.
- This constitutes one complete thermal cycle. Steps 1-4 are repeated as often as desired. Our criterion was 15 cycles.
Table 7 - Relation of the Jacquet test to thermal cycle tests.

The results of a comparison between the Jacquet test and the thermal cycling test are shown in Table 7. The parts used in these tests were syrup server tops which were selected because they were known to be good quality moldings specifically designed for subsequent electroplating. All the parts tested passed 15 cycles of thermal testing without any sign of blistering or peeling. Thus, in the range of 1-3 mil of copper coating, parts whose adhesion to the plastic is at least 50% of the theoretical amount and whose Jacquet test value is about 5.5 lb/in. or more will withstand the thermal cycle test. In order to explore further the correlation between the Jacquet test and the thermal cycling test, we next selected an ABS plastic said by its manufacturer to be unsuitable for electroplating use because of the pigments employed. The thought was that if lower pull test results were obtained, failure of the thermal cycling test might occur. Accordingly, test plaques of such materials (Cycolac H-9731; T-9723, Marbon Chemical) were processed using the double conditioner method and electroplating with UBAC copper. Results obtained are shown in Table 8. It will be noted that, indeed, lower Jacquet test results were obtained, and there was corresponding failure of the thermal cycling test. Sometimes, the thermal shock test is used as a quality control test, rather than the thermal cycling test. These two tests are quite similar, except that in the thermal shock test, no relaxation period is provided at room temperature. As a typical example, we carried out the thermal shock test by immersing the part in 82°C (180°F) water for one hour, and quenching in brine at -18°C (0°F), and holding for one hour. This constituted the first cycle. After examination of the part, the second cycle was carried out by holding the part for one hour in brine at -18°C, then immediately immersing in 82°C water and holding for one hour. Then after another examination of the part, the test repeats as above.
To compare the thermal cycling and thermal shock tests, we repeated the work reported in Table 8, using identical processing conditions and substrates. Based on the meager results reported, no great differences can be noted between the two tests.
Table 8 - Relation of the Jacquet test to thermal cycle tests.

However, in comparing these two thermal tests with the Jacquet test, a problem arises in that failure in the thermal tests does not occur over broad areas of the plaque, but only in highly localized areas, which are believed to be areas of concentrated stresses in the plastic. This observation accords with general commercial experience.
Accordingly, some further studies were made to determine whether or not thermal tests measure the same interfacial parameters as the Jacquet test. In these studies, ABS plastic plaques (Cycolac EP-3510) were cleaned and acid dipped as previously and, while being handled with great care to avoid surface contamination, had small circular patches of plater's vinyl tape applied to four areas of the surface, as shown in Fig. 22. The plaques were then conditioned using the double conditioning cycle. After the second conditioning step, the patches were removed, and the plating cycle was continued in the normal way through copper and/or nickel electroplating. Thermal cycling tests were conducted as above. In these studies, the acid copper electroplating bath was operated to produce deposits of 4100 psi tensile stress, and the nickel bath was operated to produce deposits of 7500 psi compressive stress.
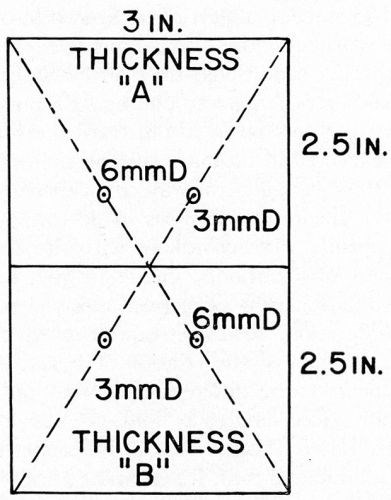
Figure 22 - Test plaque for evaluating thermal cycling tests.
The Jacquet pull test values in the area of the vinyl patches would naturally approach zero. In this way, it was hoped to simulate synthetically the manner in which blistering usually occurs on commercial parts tested in thermal cycling shock tests: viz., the existence of a localized area of low Jacquet test value surrounded by areas of "normal" (for the particular conditions) Jacquet test values. These localized areas of low Jacquet test value on commercial parts are ordinarily caused by surface imperfections in the plastic, unannealed stresses, molding deficiencies of various types, especially in the vicinity of the gate, etc.
Table 9 - Thermal cycle tests on locally defective areas.

The results obtained are shown in Table 9. In all cases of failure in the thermal cycling test the blister corresponded almost exactly to the size of the patch, and furthermore, the bond broke at the interface of metal and plastic, there being no evidence for the formation of any detached plastic film. The latter statement agrees with commonly reported observations on industrial parts which fail thermal tests for one reason or another. This would also be consistent with the theoretical development of this paper in that separation of the bond at other than the interface implies a degree of true adhesion. Thus, we come to the following important conclusion: by the very nature of the failure obtained, the Jacquet test and thermal cycling (or shock) tests measure different things. Therefore, one test cannot substitute for the other. The only obvious exception to this statement is the case in which the adhesion of the electrodeposit to the plastic is so poor that even Jacquet test failure occurs at the interface. It is self-evident that such cases are of no commercial interest whatsoever.
Because of the evidently limited scope of the work reported in Table 9, it is not feasible to draw too many detailed conclusions. However, we offer the following general observations:
- Thermal cycling test results improve with increasing total plate thickness. This seems to offer experimental support for the time-honored "dodge" of offsetting poor intrinsic adhesion between plastic and electrodeposited metal by "encapsulating" the plastic with relatively thick electrodeposits. By poor intrinsic adhesion, we refer to relatively low values of K in the Jacquet test (say, arbitrarily, less than 50% of theoretical).
- Within the limits of the particular experiments conducted, it would appear that the use of a substantial copper undercoat may be helpful under nickel. For example, 0.27 mil of direct nickel led to blistering after plating on the patch areas, whereas this was not the case for 0.24 mil of copper. Likewise, 0.41 mil of total plate led to blisters over the patches after plating when the deposit was roughly 50-50 copper and nickel, whereas much thinner straight copper coatings did not lead to failure after plating.
- In general, results obtained with the 3-mm patch were worse than the results obtained with the 6-mm patch. This is contrary to what we would have expected intuitively. However, as noted in the case of Panel 4, the results were perfectly reproducible. We offer no explanation at present; however, if these data could be further verified in additional experiments, it would seem to imply that thermal tests may be particularly sensitive to highly localized adhesion failures.
C. Glacial acetic add test
This is frequently used as a quality control test to determine whether or not a given ABS plastic molding is suitable for plating. It consists of immersing the molding in glacial acetic acid at room temperature for about 2 minutes. Two sorts of observations may be made:
- White-colored areas may appear on the plastic; these areas may be particularly pronounced at the gate area. They are indicative of stressed plastic surfaces, and a part which contains such areas alternating with areas which have not become discolored will be difficult to plate satisfactorily. In general, the white areas require a minimum conditioning time, while the unaffected areas require more severe conditioning conditions.
- Cracks may appear on the surface of the plastic, with or without formation of the discolored areas noted above. Such cracks indicate that the molding has not been properly annealed.
Regarding the correlation of this test with others, it was noted repeatedly that the whitish areas on the surface after the acetic acid test almost always correlated well with the areas of failure in the thermal cycle test. Thus, these two tests probably measure the same thing. From this, it naturally follows that the whitish areas in the acetic acid test do not measure the same thing as the Jacquet Test, and would not be expected to correlate with it.
On the other hand, the crack patterns which develop in the glacial acetic acid test do not correlate with thermal test results. In general, however, parts which crack in the acetic acid test yield low readings in the Jacquet Test. It does not, however, necessarily follow from this correlation that the crack pattern and the Jacquet Test measure the same phenomena.
D. Correlation of Jacquet tests of electrodeposits on metals and on plastics
It has been noted that the bond failure between a plastic and an electrodeposit is most unlikely to occur at the plastic-to-metal bond when examined by the Jacquet Test, except in cases of extremely poor adhesion. The same should hold true for bond failure of metal-to-electrodeposited metal when tested in this manner. The bond break could be either in the electrodeposited coating itself, or in the metallic substrate.
In the AES-sponsored project on the adhesion of electrodeposited metals headed by Ferguson,17 a literature survey turned up no references on the use of the Jacquet test.18 Brenner, however, had done some work in this area and Ferguson learned of it privately and was able to get full details.19 The work of Linford and his co-workers20 is not germane to the present discussion, since they were dealing with failures in "molecular" bonding and not in “rheological” bonding failures.
Brenner, in his communication to Ferguson, assumed that the bond failure would occur, not at the interface, but somewhere in the upper layer of the substrate; this was confirmed by his ability to determine the locus of the break by weight loss of the substrate after testing.
Table 10 - The Jacquet test on electroplated metals.
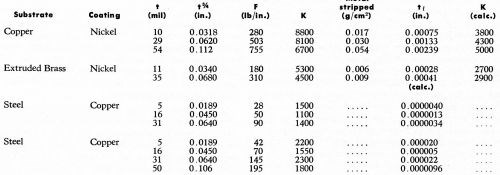
Table 10 covers the principal results obtained by Brenner for copper plating on steel and nickel plating on copper and extruded brass. In evaluating K, the following values were used:
Em (Ni) = 24,000,000 psi21
Em (Cu) = 16,000,000 psi22
The following data are from the ASM Metals Handbook:
Ef (Cu) = 17,000,000 psi
Ef (brass) = 15,000,000 psi
Ef (steel) = 28,000,000 psi
σt (Cu) = 55,000 psi
σf (brass) = 48,000 psi (extruded)
σf (steel) = 100,000 psi
Specific gravity (Cu) = 8.9
Specific gravity (brass) = 8.4
From Table 10 it will be noted that the theoretical analysis offered in this paper is in agreement with experimental data, at least in order of magnitude. This is quite interesting, in view of the fact that we have considered only metal-to-plastic bonds, where F is of the order of 5-10 lb/in., and in Brenner's work, we are considering metal-to-metal bonds where F is 50-750 lb/in. Thus, over very widely divergent systems, it is seen that the equations offered in this paper appear to be valid.
Another important and interesting observation is that Brenner also found that the bond does not break at the interface, but in the substrate, exactly as found by us for electroplated plastics. Brenner's weight loss data show that for copper and brass, the value of tf is 0.75-2.5 mil. Most interestingly, this too is in the same order of magnitude as the value of tf for plastics. Brenner did not determine the value of tf for copper-plated steel. However, by using the earlier theoretical analysis, it is possible to calculate its value. As noted in Table 10, for steel, tf is 0.001 to 0.02 mil. Even if we assume, based on Brenner's data for copper and brass, that the actual value of K is three times the calculated value, it is evident that the value of tf for steel is much smaller than that for brass, copper or ABS plastics.
Based on limited evidence available, we conclude that out studies on the adhesion of electrodeposits to plastics apply also to the adhesion of electrodeposits to metals. It would be interesting to see more work done on the latter class of systems to determine if this conclusion is indeed correct.
Summary and conclusions
- It is concluded that the “rheological theory” as expounded by Bikerman1,10 best explains the nature of the metal-to-plastic bond. An important consequence of this theory is that the bond failure, for a proper bond, occurs not at the interface but in a boundary layer of the plastic surface.
- It is concluded that the Jacquet test is a convenient and theoretically sound test for determining the merit of plastic-to-metal bonds, and two methods for carrying out this test are detailed.
- The equations which underlie the Jacquet test have been developed, and show that this test does not measure adhesion, pure and simple, but a complex of factors, of which an important one is the thickness of the electrodeposited metal on the plastic.
- On the basis of various assumptions, and estimated values of certain physical properties, it is concluded that the following relationship holds for copper-plated ABS plastic:
(9)
where F is the Jacquet test reading in pounds for a 1 in. wide strip, K may be regarded as figure of merit for adhesion as evaluated by the Jacquet test, and tm is the thickness of the electrodeposit in inches. Thus, in a given study, a value of K of 1000 would indicate that a "perfect" bond had been obtained.
- That the bond between plastic and metal breaks in a boundary layer in the plastic was proven experimentally, both by microscopic examination of the plastic surface after peeling away a copper strip (Fig. 3) and by actually isolating the detached plastic film thereby produced (Figs. 5 and 6).
- The thickness of the detached plastic film is about 0.1 mil, and is quite uniform in structure. The structure is affected by the chemical conditioning method used, and its thickness increases with increasing conditioning time. It is not affected by thickness of copper electrodeposit, use of direct nickel plating, or the values of F or K.
- The thickness of the total layer of plastic which is affected by chemical conditioning, and which apparently takes part in the plastic yielding of the Jacquet test is about 1 mil (Figs. 10 and 11).
- A study of various processing factors on adhesion of metals to plastics showed general agreement with theoretical considerations, with the value of F increasing with increasing thickness of electrodeposit. In general, K was highest for copper coatings of 1.25 mil or less, and lower for thicker electrodeposits. It is therefore concluded that statements to the effect that thicker electrodeposits on ABS plastics are desirable in that they yield higher values of F in Jacquet tests are ambiguous and must be carefully interpreted.
- Exposure of electroplated ABS to hot water for 20 minutes (after plating) essentially "pre-ages" the part, although some modest further aging occurs on standing.
- The type of ABS used is of importance, some grades being more amenable to plating than others.
- Conditioning treatments affect F values, even within the scope of commercially useful conditioning cycles.
- The effect of the type of copper electroplating solution on F values has not been established. When stresses were controlled so as to be equal to one another, both conventional acid sulfate and proprietary bright acid copper solutions gave comparable results. On the other hand, other data were adduced, in which differences were noted between different copper plating solutions.
- When composite copper electrodeposits are used, which have widely different K values individually, the value of K for the composite coating follows the value of K for the coating with the lower K value, even when over 20% of the composite coating consists of copper with the higher individual K value.
- Plastic molding conditions have a major effect on the results of the Jacquet test. Specifically, stresses induced in the surface of the plastic in the vicinity of the gate result in markedly lower F and K values.
- It was concluded that the relationship between the tensile strength of the bond and the results obtained in the Jacquet test is: Tensile strength (psi) = 5.5 K
- The Jacquet test was compared with various thermal tests, and it is concluded that the two types of tests measure different things, so that one test cannot substitute for the other. In a general way, however, parts which have low Jacquet test readings are more likely to fail thermal tests, although there is no simple relationship between the tests. Thermal tests seem to measure highly localized substrate surface phenomena.
- When plastics are electroplated with 1-3 mil of copper, they pass thermal tests as long as the adhesion is 50% or more of the K value predicted and the peeling force in the Jacquet test is 5.5 lb/in. or more.
- Thermal test results improve with increasing total plate thickness, even though Jacquet test results may be comparable. This justifies the "encapsulation" approach when intrinsic adhesion is relatively poor.
- Use of a substantial copper undercoat may be helpful before nickel plating in passing thermal tests.
- The glacial acetic acid test was found useful in observing two sources of surface weakness: presence of locally stressed areas (especially in the vicinity of the gate) and the presence of an improperly annealed surface (as shown by cracking of the surface). The former observations correlate well with thermal tests, the latter observations correlate with Jacquet test results, at least on a go-no go basis. Thus, it is concluded that the acetic acid test can be used as a simple chemical test for observing weak boundary layers which will subsequently cause the formation of improper bonds between ABS plastics and metal.
- The work in this paper was compared with work done many years ago by Brenner on the use of the Jacquet test on plated metals. It is concluded that the studies presented in this paper apply also to the adhesion of electrodeposits to metals.
Footnotes:
*The term "syneresis" is used by Bikerman to refer to the tendency of solidifying thermoplastic materials to "throw out" onto the surface a potentially weak boundary layer consisting of relatively more liquid substances.
**UBAC, Udylite Corporation, Detroit, Michigan.
***Nuodex, Heyden Newport Chemical Co., Elizabeth, NJ.
Theory of the Jacquet test
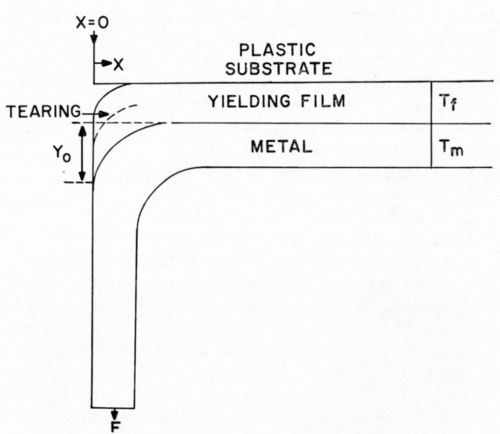
Figure 1 (from previous text) - Nature of Jacquet tests.
Figure 1 indicates the common geometry of the Jacquet test, redisplayed above for convenience. It will be assumed that both the plastic-yielding substrate and the metallic film obey Hooke's Law. Later, we will discuss a modification of this development in which it will be assumed that the metallic film obeys Hooke's Law, but that the plastic-yielding substrate behaves as a Newtonian adhesive. Referring to Fig. 1, the following definitions will be used:
S = stress on the plastic film (lb/in.2)
F = force applied to the metallic strip, per unit of width (w) (lb/in.)
M = bending moment (lb/in.)
Iz = moment of inertia of the metallic strip relative to the Z-axis = wtm3/12 (in.4)
K = F/tm¾
Et = Young's Modulus for the plastic film (lb/in.2)
Em = Young's Modulus for the metallic coating (lb/in.2)
af = tensile strength of the plastic-yielding film
y = deflection of the plastic-yielding film under load (in.)
tf = thickness of the original (unstressed) plastic-yielding film (in.)
tm = metallic coating thickness (in.)
w = width of the metallic strip in the Z-plane (in.)
X, Y = planes are shown in Fig. 1.
Z-plane is perpendicular to the plane of the paper.
When the plastic-yielding film is subjected to a loading, Hooke's Law being obeyed, the following relationship must hold:
(1)
If we assume that shear stresses in the plastic-yielding film are negligible, i.e., that each fiber or column reaches from the undeformed plastic layer to the bending metal coating in the direction of the applied force without any interference by the neighboring ones, then tearing occurs when the extension of the column nearest to the load reaches the greatest value possible. This means that the maximum stress in the plastic-yielding film is:
(2)
This stress must now be equated with the corresponding load on the metal strip being deflected. It is assumed that the radius of curvature is extremely small, which is a reasonable assumption for the thin metallic coatings which we will be considering. This assumption leads to the boundary condition that the bending moment (M) is zero at x = 0. This enables us to use the equations for a beam on an elastic foundation in a straightforward manner.23
(3)
Equating the two values for the limiting stress, we obtain:
(4)
Let:
(5)
Then integration of equation (4) leads to:
(6)
The previous assumptions lead to the following boundary conditions:
(7)
(8)
(9)
(10)
It can be shown that A and B are zero, and that C and D have finite values. This then leads to the following equation:
(11)
If we consider xt (the total length of the strip) to be very greatly larger than that portion of the length of the metallic strip which is undergoing bending, equation (11) reduces to:
(12)
where y0 is the maximum deflection at bursting of the plastic-yielding film (x = 0).
Substituting for α as above defined,
(13)
Transforming:
(14)
For a solid obeying Hooke's Law, the maximum strain at rupture is:
(15)
where the tensile strength is equivalent to the maximum stress of equation (2).
Substituting equation (15) into (14) leads to the following:
(16)
Equation (16) is the significant equation for the Jacquet test far adhesion of electroplated plastics.
It should be remembered that equation (16), despite the fact that it takes many surface and interfacial phenomena into account, still implies the use of a number of simplifying assumptions, which are not necessarily entirely valid for all practical circumstances. In particular, there is no apriori reason to believe that stresses do not occur in the deforming plastic-yielding layer in the immediate vicinity of x = 0. Nonetheless, it is possible to use equation (16) as a means of determining approximately the ultimate limit of bonding values for electroplated plastics. First of all, it is of interest to note that the expression: is often equal to unity for plastics.
Consider, for example, the case of ABS plastics, which are of major importance in automotive, appliance, hardware and related fields. ABS plastics are customarily copper plated before application of any other desired final electrodeposited coating. Young's Modulus for ABS is 310,000 psi24 while for electrodeposited copper it is about 16,000,000 psi.22 Thus, for copper plated ABS,
(17)
For one of the commonly used chemical conditioning methods, the original thickness of the deforming film is of the order of 0.001 in. The tensile strength of this film has never been measured experimentally, but it is not likely to be significantly higher than that for undisturbed ABS, which has been reported as 5500 psi.24 Substituting all the above values into equation (16) leads to the following:
(18)
This is a most important relationship, in that it shows what can be expected concerning Jacquet test ("adhesion") values for ABS plastics which have been copper plated.
A final important conclusion may be drawn from equation (16): research studies into chemical conditioning processes for improving the adhesion of electrodeposits to plastics must concentrate on methods for improving the values of σf and tf, since Em and Ef are not readily amenable to change, and tm is dictated generally by economic criteria over which the researcher has little control. Unfortunately, as was shown in the paper, chemical conditioning methods which increase tf have a tendency to reduce σf, thus cancelling out any gains. Nonetheless, equation (16) points the way towards future research in improving the adhesion of electrodeposits to plastics.
For the immediate future, it would appear that the use of equation (18) is justified as a means of predicting the approximate Jacquet test values which may be obtained, especially for copper-plated ABS, although similar values will obtain for other plastic and metal coating systems.
For heavier copper electrodeposits, for which F values are relatively high, the plastic-yielding substrate may behave more as a Newtonian adhesive than as a Hookean solid. Under such conditions,
(19)
where m is less than unity. This leads25 to the following modification of equation (16):
(20)
An example is given in the text of how equation (20) can be used to alter the value of K.
The above equations can also be related to tensile strength. For example, since tensile strength is the force required to break the bond, divided by the cross sectional area, then, the ratio of the peeling force to the tensile force for Hookean solids is:
(21)
where l is the length of the section undergoing tensile testing. An example is given in the text of the conversion of peel test data to tensile strengths.
APPENDIX II
Method of operating the Jacquet test
Two testing methods were employed. One involved a standard tensometer; the other, a simple strain-gage tester which was developed to provide a rapid, convenient shop method for checking Jacquet test results in the field. Comparisons were made of the results obtained with the two testing devices, using ABS (Cycolac EP-3510) plaques plated with 1.5 mil of copper. One strip of each plaque was tested using an Instron tensometer, the other with the simple strain-gage. Results obtained on a number of plaques did not differ by more than ± 1 lb/in. in value. Thus, the simple strain-gage should be an acceptable field tool. Of course, the reference standard should be a standard tensometer such as the Instron tester.
The tensometer test is generally conducted according to a standard method26 or a close variant thereof. For convenience, the method will be briefly summarized. The tensometer is used to measure the tensile load (which is applied at a constant rate of 1 in./min at an angle of 90° to the interface) which will peel a strip of electrodeposit of constant width from the plastic substrate. The equipment required (the Instron tester has been found useful) is a tensometer having one fixed crosshead, one movable one, self-aligning grips, a means of separating the crossheads at a constant rate of one inch per minute, a parallelogram-shaped jig attached to the fixed crosshead, which supports the test specimen and insures that the load is applied at 90° to the interface, and a device for continuously recording the applied load (Fig. 23)
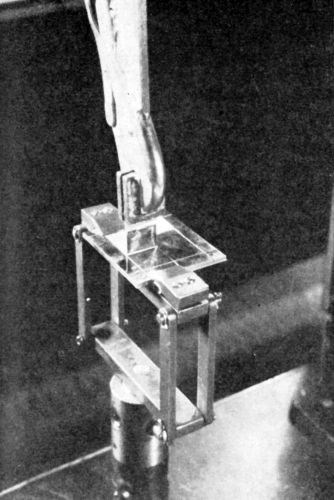
Figure 23 - Instron tester (Photo, courtesy of Marbon Chemical).
In operating the method, test plaques are used which are 3-4 in. wide and about 6 in. long. These are trimmed to fit the jig, and one-inch wide strips are cut into the metal coating, running from the trimmed edge to the end of the plaque. The metal strip is peeled back for a distance of 0.5 in., starting from the trimmed edge and filament reinforced tape is applied to both sides of the metal. The test specimens are held at 23°C (73°F), 50% relative humidity for about four hours before testing.
After calibrating the tensometer, the plaque is placed in the jig and the strip with the reinforced tape is fastened to the movable jaw. The jaws are separated at 1 in./min until the metal strip is completely detached from the plastic, the load being recorded continuously. Test results are usually based on testing of two plaques, each containing two strips. The average pull test value is determined by taking the mean of the maximum and the minimum load on each strip, and averaging the four means thereby obtained. Results are reported in lb/in. of pull.
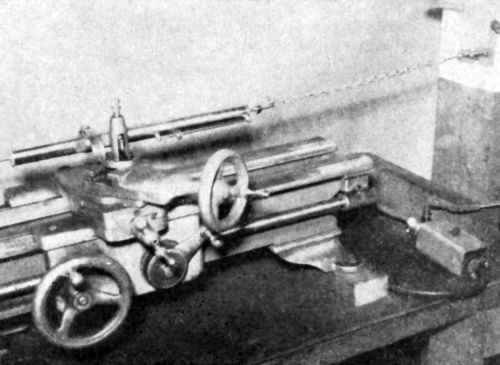
Figure 24 - Simplified strain-gage tester.
In a simplified method more adaptable to field use, we developed a means of using an ordinary lathe and a strain-gage to approximate the values obtained by testing with a tensometer as described above (Fig. 24). A lathe with a 36 in. bed was used. On the tool carrier was mounted a strain-gage (Chatillon Gage No. 719-20) with a 0-20 lb range and calibrated in 0.25 lb. The automatic feed was adjusted to feed the tool carrier at a constant rate of 1 in./min. The lathe was driven by a one-HP motor. The test plaques were prepared as previously noted, except that ½ in. strips were cut. The plaque was clamped vertically on a wooden board which stood about one foot away from the end of the lathe. The peeled-back portion of the strip was at the top of the vertical plaque and clamped with a laboratory hosecock clamp and attached to the strain-gage by a 1.5-foot-long chain. Care must be exercised that the elevation of the plaque be such that the pulling by the chain is as close as possible to 90° to the interface being tested. A variation of ±5° was permitted during the peeling of the strip. The strain-gage method results in a somewhat different pulling phenomenon as load is applied. The load increases from zero to some particular value, at which point a crack propagates in the plastic across the width of the strip and the metal strip becomes detached over a finite length. The load on the strain-gage drops back to zero, then slowly increases again as the lathe continues its movement, until a second crack develops, and the phenomenon is repeated. The mean value of the load at the point where cracking propagated is taken as the Jacquet test value. Readings on the strain-gage are doubled to give results in lb/in. of pull.
As previously noted, agreement between the two methods was found to be surprisingly good, so that the above simplified method could be used in the field, where more accurate tensometer equipment is unavailable.
APPENDIX III
Curve plotting
Because of the scatter of much of the data reported in this paper, it was decided to use a computer to calculate a number of curves for each plot, and then determine the best fit.
For Figs. 20 and 21, it was arbitrarily decided to obtain a least squares fit for two separate straight lines: one covering the range 0.71 to 1.20 mil; the other covering the range 1.20 to 3.57 mil. The following results were obtained (tm in mil):
Fig. 20: Low range:
F = 6.07 - 0.363 tm
Standard deviation of F = 1.02
Correlation coefficient = 0.050
Statistic "t" = 0.31
High range:
F = 1.84 + 2.59 tm
Standard deviation of F = 1.91
Correlation coefficient = 0.70
Statistic "t" = 9.37
Fig. 21: Low range:
K = 1946 - 919 tm
Standard deviation of K = 233
Correlation coefficient = 0.55
Statistic "t" = 4.11
High range:
K = 777 - 14.6 tm
Standard deviation of K = 151
Correlation coefficient = 0.050
Statistic "t" = 0.48
In Figs. 12-15, it was decided to obtain the best polynominal fit over the entire range of plating thicknesses studied. The following results were obtained (tm in mil):
Fig. 12:
F = 5.05 + 1.60 tm + 0.092 tm2
Standard deviation of F = 1.20
Fig. 13:
K = 1827 - 696 tm + 117.6 tm2
Standard deviation of K = 148
Fig. 14: (Results with Plastic C not included)
F = 2.86 + 1.79 tm - 0.065 tm2
Standard deviation of F = 0.73
Fig. 15: (Results with Plastic C not included)
K = 1181 - 450 tm + 90.6 tm2
Standard deviation of K = 101
Acknowledgments
We wish, first of all, to acknowledge the excellent cooperation that has been given us for many years by various plastic resin manufacturers. Without this splendid cooperation, this paper would not have been written. In particular, we wish to single out the cooperation of Mr. J. B. McNamara of Marbon Chemical (Washington, WV), who supplied information on the tensometer method of Jacquet testing, and data on composite copper coatings; Messrs. Carroll Hardy, General Electric Radio Receiver Div. (Utica, NY) and Eli Schwartz, Naugatuck Chemical Div. (Naugatuck, CT) who performed the Instron tests referred to in the paper. We also acknowledge the help of Dr. Edward George and other members of the staff of the Connecticut Scientific Center (New Haven, CT) who assisted in the theoretical development of Appendix I and in the computer studies. At Enthone, we wish to acknowledge the help of Ed Baker and Tony Lombardi who prepared many of the standard test pieces used in this study, and of Ken Howard who assisted in developing the strain-gage method.
References
1. J.J. Bikerman, The Science of Adhesive Joints, Academic Press (New York), 1961; pp. 126-129.
2. J.J. Bikerman, op. cit., p. 31.
3. J.R. Huntsberger, J. Polymer Science, A-l, 1339, 2241 (1963).
4. J.J. Bikerman, op. cit., pp. 132-134.
5. F.J. Backhoff, E.T. McDonel and J.E. Rutzler, Ind. Eng. Chem., 50, 904 (1958).
6. E.B. Saubestre, "Electroplating of Plastics," Soc. of Automotive Engineers, Preprint 995A, (Jan. 1965).
7. R.G. Baker and A.T. Spencer, Ind. Eng. Chem., 52, 1015 (1960).
8. J.M. Sykes and T.P. Hoar, Cambridge Univ., England; unpublished communication (1965).
9. D. Taylor and J.E. Rutzler, Ind. Eng. Chem., 50, 928 (1958).
10. J.J. Bikerman and C.R. Huang, Trans. Soc. Rheology, 3, 5 (1959).
11. J.J. Bikerman, op. cit., pp. 113-114.
12. W.H. Schroder and M.J. Bodner, Plastics Technol., 3, 988 (1957).
13. W.H. Kreidl, Kunststoffe, 49, 71 (1959).
14. H. Peukert, Kunststoffe, 48, 3 (1958).
15. H.T. Patterson, in Adhesion, ASTM STP 360 (1964), pp. 32-44.
16. E.J. Ripling, S. Mostovoy and R.L. Patrick, in Ref. 15, p. 5.
17. A.L. Ferguson and E.F. Stephan, Monthly Review Amer. Electroplaters' Soc., 32, 894; 1006; 1116; 1237 (1945); 33, 45; 166; 279; 620 (1946).
18. P.A. Jacquet, Comptes Rendus, 198, 1313 (1934); Trans. Electrochem. Soc., 66, 393 (1934).
19. Ref. 17, 33, 283-287 (1946).
20. H.B. Linford and A. Venkateswarlu, Plating, 45, 728 (1958); H.B. Linford and J.J. Grunwald, ibid., 46, 1039 (1959).
21. A. Brenner, V. Zentner, and C.W. Jennings, Plating, 39, 865 (1952).
22. H.J. Read, J. Electrochem. Soc., 108, 73-78 (1961).
23. S. Timoshenko, Strength of Materials, D. Van Nostrand and Co., New York, NY, 1941.
24. Marbon Chemical Co., Data Sheet on Cycolac EP-3510 (1964).
25. J.J. Bikerman, J. Appl. Polymer Sci., 2, 216 (1959).
26. Marbon Test Method TM-249-64 (Jan. 28, 1964).
About the authors
Note: The biographical sketches below were those composed at the time of publication.


Related Content
Innovation in Plating on Plastic
Plating on advanced plastics solution offers improved adhesion, temperature resistance and cost savings.
Read MoreHow to Maximize Nickel Plating Performance
The advantages of boric acid-free nickel plating include allowing manufacturers who utilize nickel plating to keep up the ever-changing regulatory policies and support sustainability efforts.
Read MoreSuccessful South African Plater Beating the Odds
Remaining focused on quality and reliability, Team Plating Works stays profitable in a volatile and challenging economy.
Read MoreProducts Finishing Reveals 2023 Qualifying Top Shops
Each year PF conducts its Top Shops Benchmarking Survey, offering shops a tool to better understand their overall performance in the industry. The program also recognizes shops that meet a set of criteria to qualify as Top Shops.
Read MoreRead Next
Delivering Increased Benefits to Greenhouse Films
Baystar's Borstar technology is helping customers deliver better, more reliable production methods to greenhouse agriculture.
Read MoreEpisode 45: An Interview with Chandler Mancuso, MacDermid Envio Solutions
Chandler Mancuso, technical director with MacDermid Envio discusses updating your wastewater treatment system and implementing materials recycling solutions to increase efficiencies, control costs and reduce environmental impact.
Read MoreEducation Bringing Cleaning to Machining
Debuting new speakers and cleaning technology content during this half-day workshop co-located with IMTS 2024.
Read More



.jpg;maxWidth=300;quality=90)


