Coating Thickness Measurement: The Fundamentals
A review of available test methods, common applications and innovative instrumentation...
Coating thickness measurement is a concern for both finishers and for companies receiving finished components. Defective coatings lead to rust. As a result, product liability requires quality control of coatings, and in many cases documentation of measurements in an electronic format. Conflicts can occur if a manufacturer and a customer of a finished good use different methods or types of instruments to determine coating thickness. This article will discuss the test methods available for determining coating thickness, common applications, and innovations in coating thickness instrumentation.
Test Methods
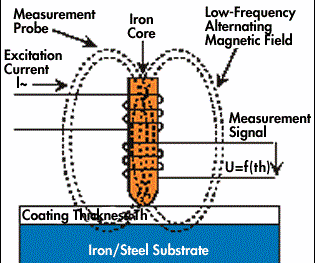
The magnetic induction method measures non-magnetic coatings over ferrous substrates and magnetic coatings over non-magnetic substrates. The process is direct, in that a probe is placed on the part to be measured. When the probe is positioned, the linear distance between the probe tip that contacts the surface and the base substrate is measured.
Inside the measurement probe is a coil that generates a changing magnetic field. When the probe is placed on the substrate, the magnetic flux density of this field is altered. The change in magnetic inductance is measured by a secondary coil. The output of the secondary coil is transferred to a microprocessor where it is viewed as a coating thickness measurement on a digital display.
The magnetic induction method is quick and can be used with either a bench-top or hand-held coating thickness gage. It’s also non-destructive, relatively low-cost, easy to operate, accurate and repeatable, and measurements are instantaneous with a digital display.
Common applications for this test method include liquid or powder coatings, as well as plated finishes such as chrome, zinc, cadmium or phosphate over steel or iron substrates.
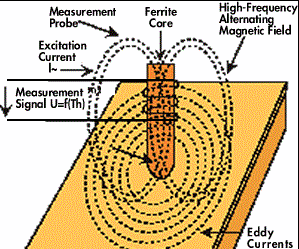
The eddy-current method of coating thickness measurement measures non-conductive coatings on non-ferrous conductive substrates, non-ferrous conductive coatings on non-conductive substrates and some non-ferrous metal coatings on non-ferrous metals. It is very similar to the magnetic induction method and can even use many of the same probe designs. Advantages of the eddy-current method are also very similar to those of magnetic induction, including low cost, ease of operation, accuracy and repeatability and instantaneous measurement with a digital display.
Eddy-current coating thickness measurement uses a probe that also contains a coil. This probe/coil is driven by a high-frequency oscillator to generate an alternating high-frequency field. When this field is brought near a metallic conductor, eddy currents are generated in that conductive material, which results in the impedance change of the probe coil.
The distance between the probe coil and the conductive substrate material determines the amount of impedance change. Therefore, coating thickness is determined by the impedance change in the form of a digital reading.
Common applications for eddy-current coating thickness measurement include liquid or powder coating over aluminum and non-magnetic stainless steel as well as anodize over aluminum.
Selecting A Gage
Many instruments available today combine both magnetic induction and eddy-current methods. This allows the user to perform multiple measurement tasks without switching gages. Users also can choose between basic gages that just provide a value on the digital display or gages that store measurements and provide statistical information such as average, standard deviation and high/low values.
Another important selection criterion is based on the shape of the part to be measured. Not all parts can be measured using a gage with a built-in probe. Units that offer a probe on a cable provide more flexibility when it comes to multiple part configurations. Many units with separate probes also offer the ability to exchange probes should the application change; for example, measuring coating thickness on the inner diameter of a tube may require a 90-degree probe, while measurements on a flat surface are best performed with a zero-degree probe. Factors such as curvature, edge effect, surface roughness, substrate thickness, permeability and conductivity all influence coating thickness measurement but can be accounted for through proper calibration.
As previously mentioned, the ability to store measurements for later documentation and report generation is often very important. These types of reports can help to determine spray patterns, for example, or may also be used for incoming inspection of parts. Some gages feature an on-board radio transmitter that allows users to send readings in real time to a computer up to 60 ft away from where the measurements are being taken. Data can be input directly into a statistical process control program, eliminating the need to key in data to save time and eliminate input errors.
Another option for coating thickness measurement and data documentation is a bench-top system. Bench-top systems provide a large digital display with full statistical evaluation of measurements. This includes mean value, standard deviation, coefficient of variation, maximum and minimum, number of measurements, statistics of single readings or groups; calculation of process capability factors; histograms; probability charts with test for normal distribution; automatic grouping after N measurements and/or automatic final evaluation after N groups; and group evaluation according to group numbers or group identifications. Some bench-top systems even provide customer-specific print form templates.
In addition to documentation benefits, some bench-top systems can combine multiple test methods into one measuring system. A single unit combining multiple test methods benefits companies that perhaps might be plating parts as well as painting in another department, for example. Such systems also use separate probes, meaning they have wider application than built-in coating thickness gages.
Special Applications
Not all coating thickness applications are as straight-forward as measuring paint over steel. Coatings consisting of a paint applied to galvanized sheet steel are sometimes called duplex coatings, and are frequently used in the automotive industry. Thickness of the individual layers of both the paint and galvanize are important. In automotive vehicle body manufacturing zinc thicknesses are between zero and 10 μm. Paint thicknesses are usually up to 150 μm.
The galvanize coating is applied by the sheet metal supplier either by hot-dip galvanizing or by electrogalvanizing. If the zinc coating thickness were uniform, the thickness of the subsequently applied paint coating could be measured using a conventional magnetic induction coating thickness measurement instrument. One would simply have to deduct a constant value from the actual reading.
However, zinc thickness changes when the sheet is formed. During forming, flowing or even scraping off of the zinc coating may occur in areas of severe bending. This may vary its thickness by between 3 and 9 μm, and occasionally remove the coating altogether.
Similar situations may be encountered when repairing a body area that has coating defects due to sanding and subsequent re-painting of the defective area. In this case, the zinc coating may be sanded away as well, leading to an apparent reduction in the paint thickness if a conventional coating thickness measurement system is used. This is not only problematic for inspection, but also critical to the quality of a cataphoretic paint, because that thickness is typically only about 20 μm. An error of 5-6 μm in the thickness measurement through a reduced zinc coating will exceed the tolerance limits.
Our company’s Phascope PMP10 Duplex instrument, for example, can measure paint thickness independent of zinc thickness. Repeatability precision of the zinc thickness measurement is as low as a few tens of nanometers; that of the paint thickness measurement is below 0.5 μm.
To reduce vehicle weight, some automakers are using increasing amounts of aluminum sheet in non-safety-relevant body components. Measuring coating thickness over an aluminum alloy substrate can be accomplished using a conventional eddy current channel to measure the paint thickness according to a standard. With no human intervention (the operator may not even know whether parts are made of steel or aluminum), the instrument automatically selects duplex or eddy-current method immediately after the probe touches down and stores that paint thickness data in such a way that a simple evaluation of paint distribution is possible regardless of the type of sheet metal.
Other Thickness Measurement Techniques
There are other methods for measuring coating thickness, especially in automotive applications. These include the Coulometric, beta backscatter, and X-ray fluorescence techniques.
The Coulometric method has many important functions, such as measuring duplex nickel coatings in automotive applications. The technique involves determining the weight of an area of a metallic coating through localized anodic stripping of the coating, the calculating thickness based on mass per unit area.
Thickness measurement is made using an electrolysis cell, which is filled with an electrolyte specifically selected for stripping the particular coating. Constant current runs through the test cell to deplate the coating material, which serves as the anode. With current density and surface area being constant, coating thickness is proportional to the time it takes to strip the coating.
This method is particularly useful for measuring electrically conductive coatings on a conductive substrate.
The beta backscatter method begins when a test sample is exposed to beta particles from a beta-emitting isotope. A beam of beta particles is directed through an aperture onto the coated component, and a portion of these particles is backscattered from the coating through the aperture to penetrate a very thin window of a Geiger Muller (GM) tube. The gas of the GM tube ionizes, causing a momentary discharge across the tube electrodes. The discharge in the form of a pulse is counted by an electronic counter, which is then translated into coating thickness.
Materials of relatively low atomic number backscatter the beta particles at a significantly lower rate than materials of high atomic number. For example, a component with copper as a substrate and a gold coating 40 micro-inches thick, beta particles are scattered by both the substrate and the coating material. If coating thickness increases, the backscatter rate increases. The change in the rate of particles scattered is therefore a measure of coating thickness.
The technique is applicable when the atomic number of the coating and substrate differ by 20%. Applications include thickness measurement of gold, silver, and tin on electronic components, coatings on cutting tools, decorative plating on plumbing fixtures, and vapor-deposited coatings on electronic components, ceramics and glass. Other applications could include organic coatings such as oil or lubricant coatings over metals.
X-ray fluorescence (XRF) is a versatile, non-contact, coating thickness measurement method for very thin multi-layer alloy coatings on small parts.
Measurement is performed by exposing the part to X-radiation. A collimator focuses the X-rays onto an exactly defined area of the test specimen. This X-radiation causes characteristic X-ray emission (fluorescence) from both the coating and the substrate materials. This emission is detected with an energy-dispersive detector.
Using the appropriate electronics, it is possible to register only the emission from the coating material or from the substrate. It is also possible to selectively detect a specific coating when intermediate layers are present. Common applications include printed circuit boards, electronic components, jewelry, and optical components.
Acknowledgement
The author would like to acknowledge the work of a colleague, Peter Neumaier of Helmut-Fischer Technology, Inc. GmbH & Co. KG (Sindelfingen, Germany) on the portion of this article that covers measurement of paint thickness over galvanized coatings and over aluminum substrates.
Related Content
Finishing Systems Provider Celebrates 150 Years, Looks to Future
From humble beginnings as an Indiana-based tin shop, Koch Finishing Systems has evolved into one of the most trusted finishing equipment providers in the industry.
Read MoreZinc Phosphate: Questions and Answers
Our experts share specific questions about zinc phosphate and pretreatment
Read MoreConcrete Reinforced Bars Built to Last
Not all corrosion-resistant materials for infrastructure are created equally. Epoxy-coated steel rebar has advantages that other materials used to prevent corrosion do not.
Read MoreProducts Finishing Reveals 2024 Qualifying Top Shops
PF reveals the qualifying shops in its annual Top Shops Benchmarking Survey — a program designed to offer shops insights into their overall performance in the industry.
Read MoreRead Next
A ‘Clean’ Agenda Offers Unique Presentations in Chicago
The 2024 Parts Cleaning Conference, co-located with the International Manufacturing Technology Show, includes presentations by several speakers who are new to the conference and topics that have not been covered in past editions of this event.
Read MoreEpisode 45: An Interview with Chandler Mancuso, MacDermid Envio Solutions
Chandler Mancuso, technical director with MacDermid Envio discusses updating your wastewater treatment system and implementing materials recycling solutions to increase efficiencies, control costs and reduce environmental impact.
Read MoreEducation Bringing Cleaning to Machining
Debuting new speakers and cleaning technology content during this half-day workshop co-located with IMTS 2024.
Read More


.jpg;maxWidth=300;quality=90)


